Fix: iPhone Not Showing Up on Windows 10
Some users recently reported problems while connecting their iPhones to a Windows 10 Computer. They noted that Windows 10 OS does not recognize their iDevices at all. If you are experiencing this scenario, you know how frustrating this problem might be. You fail to transfer any pictures, videos, music, and documents from your iPhone to your computer and vice versa. Therefore, you can’t perform any task that includes a connection with iTunes.
After thorough research, I found a solution to this problem. Actually, there are a couple of possible solutions. Which one will work for you depends on the cause of your problem. In this article, I will present you the most useful ones. So, if your iPhone is not showing on Windows 10 computer, here is what you should do.
Preparations
Before you perform any of the solutions, make sure you have the latest iTunes installed on your PC. Also, select Trust on the “Trust This Computer” message, if you haven’t done it already when plugging in your iPhone to the computer. Now you are ready to go.

Solution 1: Hardware Issues
Many factors may result in disabling the connection between your iPhone and your Windows 10 computer. First of all, when you are dealing with this kind of problem, check for any hardware issues. And, when I say hardware issues I am not thinking only of your computer. Sometimes, the problem may be the Apple mobile device or other related hardware. To check out if the recognition issue is caused by the hardware follow these steps.
- Restart your Windows 10 computer and iPhone. Then, reconnect the devices and check if the issue recurs.
- Connect your iPhone to another computer (PC or Mac). If that doesn’t work, the problem might be in your iDevice.
- Use the original USB lightning cable while connecting the iPhone to your computer. Many third-party lightning cables work only for charging and not for data transfer.
- Check if your original lightning cable works properly with another iPhone. If not, get another original Apple USB cable.
- Try connecting your iPhone to a different USB port on your computer. Use some of the ports on the back if using a desktop computer and check if it solves the non-showing iPhone issue. Also, if you are using the USB Type-C port, make sure it allows data transfer.
If your iPhone is still not showing on your Windows 10 computer after performing the all the hardware checks, try the following method.
Solution 2: Restart Apple Mobile Device Service
One of the possible solutions for non-showing iPhone issue might be dysfunctional Apple Mobile Device Service. To fix the issue, you should try restarting the service.
- Open the Start Menu and choose Windows Administrative Tools.
- Now, select Services.
- Find and double-click the Apple Mobile Device Service.

- Select Startup type as Automatic.
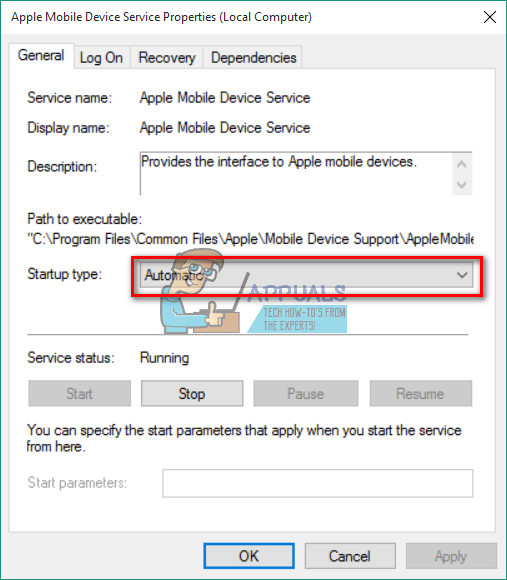
- Click Stop to disable the service.
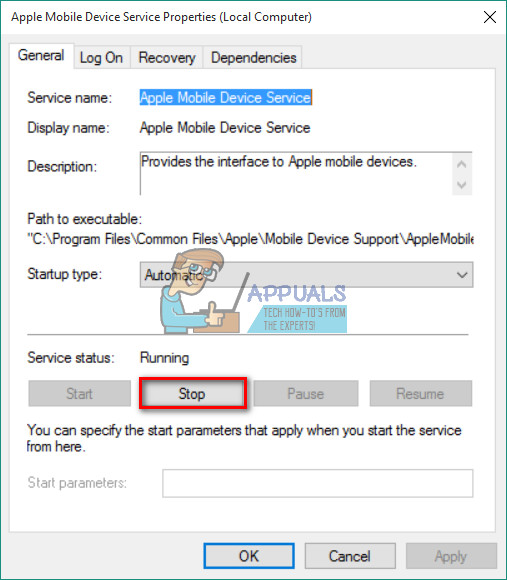
- Now, click Start to enable it again.

- Click Apply and OK.
- Reconnect your iDevice to the PC.
If Solution 2 doesn’t work or your iPhone is detected by Windows 10 but cannot connect to iTunes, you need to reinstall the iPhone drivers.
Solution 3: Reinstall iPhone USB Drivers
Usually, if you connect a mobile device to your computer via USB, your operating system will recognize the device and will automatically install MTP USB driver or Apple Mobile Device USB driver. If all the hardware parts work properly, and your iPhone is still not recognized by your Windows computer, the problem might be in the Apple mobile device driver or iPhone USB driver. Incorrectly configured, corrupted, or missing iPhone USB driver for Windows 10 can result in not showing your iDevice on the computer.
Besides the inability to recognize your iPhone, faulty drivers also cause system problems on Windows. Your mouse, keyboard, touchscreen, etc. may stop working correctly. In this case, if Windows fails to fix the issue automatically, it is crucial to reinstall the iPhone, USB driver. Here is the procedure.
Step 1: Check your iPhone USB Driver in Device Manager
- Connect the iPhone to your computer with the lightning cable.
- Open the Device Manager. To do that, right click on My Computer (Computer) and choose Now click on Device Manager in the upper left corner of the window. (You can also launch System Properties with the keyboard shortcut Win Key + Pause)

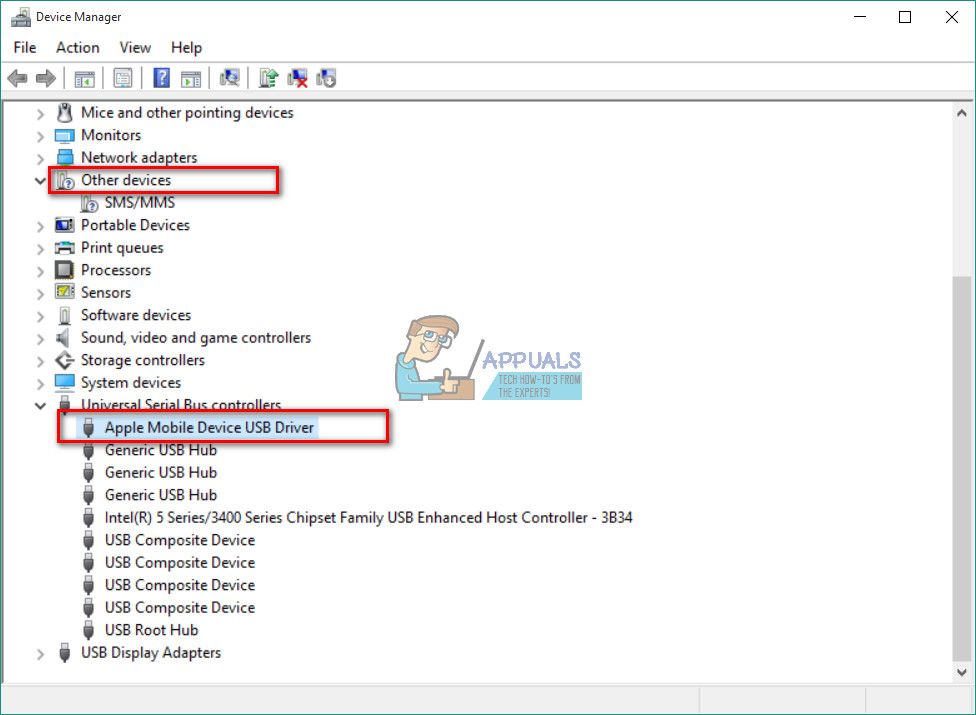
- Click on Universal Serial Bus controllers and check if Apple Mobile Device USB Driver is present in the list. If you can’t find it in that field, expand the Other Devices section and check for Unknown devices.
Step 2: Reinstalling iTunes and all its Components
If you can’t find Apple Mobile Device USB driver on the list, or there is a yellow sign on the device name, you need to reinstall the driver manually.
Note: If you are using a Windows 10 anniversary (version 1607), make sure you have permission to install drivers manually.
- First, uninstall iTunes and all of its components. You can use Control Panel for the uninstall process, and these are the components you need looking for.
- Apple Application Support 32-bit
- Apple Application Support 64-bit
- iTunes
- Apple Mobile Device Support
- Bonjour
- Apple Software Update
If you find 2 versions of Apple Application Support, make sure you uninstall them before continuing the process.

- Now, download and install iTunes with all its components You can do that on the following link Download iTunes.
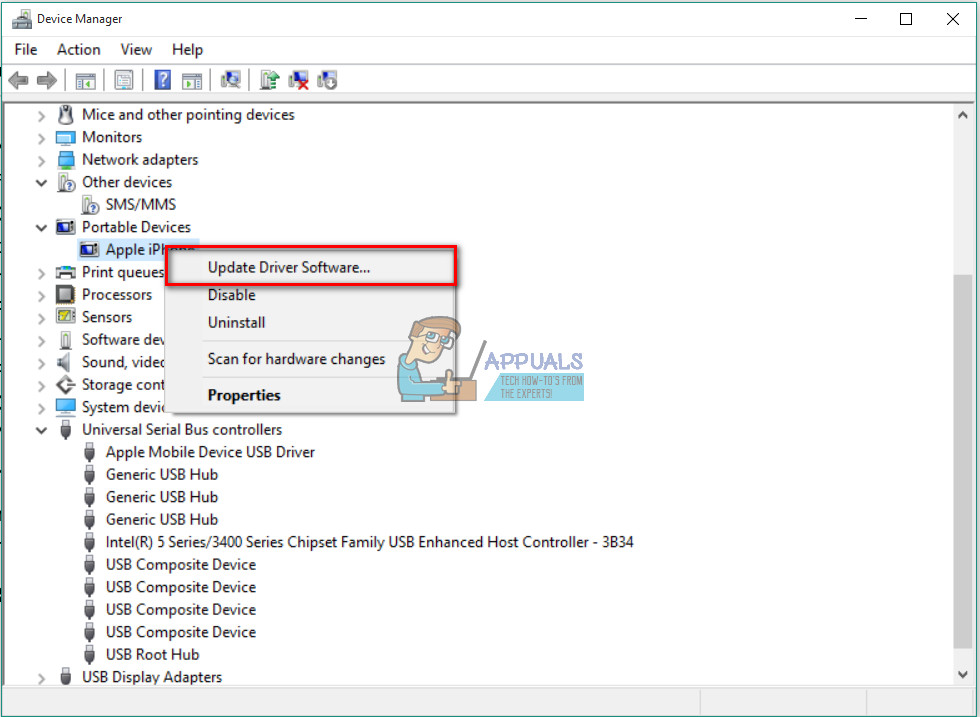
- Go to Device Manager and locate your iDevice. You can see how to do that in Step 1 of this method. (In my case the Apple Device was located under Portable Devices, but it might be different in your case)
- Right-click on the device and choose Update Device Driver.
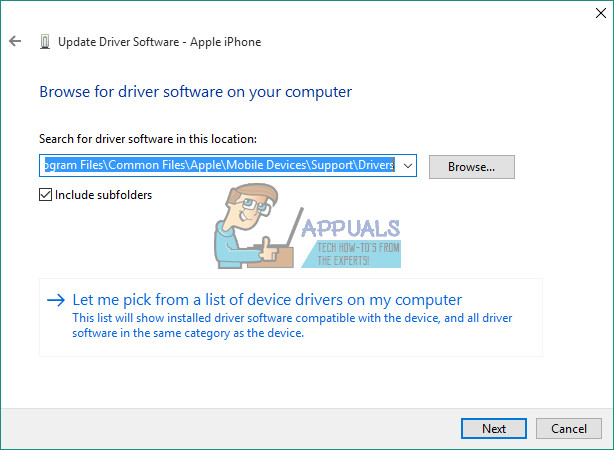
- Click Browse my computer for driver software.
- Here you need to select the folder with the drivers. (C:\Program Files\Common Files\Apple\Mobile Devices\Support\Drivers)
- Click Next, and the driver will install.
- Now, you should see Apple Mobile Device USB Driver in Device Manager under the Universal Serial Device USB Driver
Subheading
After you finish installing the drivers, restart your computer and reconnect your iPhone to it. When the notification window “Trust This Computer” pops up on your iPhone, make sure you choose Trust. Now your iPhone should be recognized by Windows 10.
I hope this article helped you to fix the non-showing iPhone issue on Windows 10. Feel free to share it with anyone whom you think it may be useful. Also, do not be shy to share with us if you know any other solution for this common issue.
Step 2 worked immediately. Thank you so much for this article!!