Fix: INF file you selected does not support this method of installation
Some people are encountering the inf file you selected does not support this method of installation error when trying to install one or more drivers on a Windows PC. This error message occurs before the installation can start. Typically, the error is encountered when the user tries to right-click the inf file and chooses Install from the contextual menu.
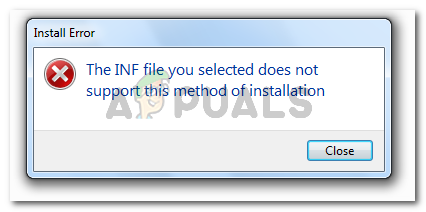
What is causing the Inf file you selected does not support this method of installation error
We investigated this particular error by trying to replicate the issue and looking at various user reports. Based on our investigations, there are several scenarios that will lead to the apparition of this issue:
- INF file doesn’t have the [DefaultInstall] section – For an INF file to be installed using the conventional Right click > Install method, it needs to have a [DefaultInstall] section and potentially other types of ‘default’ sections like [DefaultInstall.Service], [DefaultUninstall] or [DefaultUninstall.Service].
- INF file can only be installed through a Command line – If you’re trying to install an INF file that is missing a default section, the only way to install it is through an elevated Command Prompt.
- INF driver is incompatible with your OS architecture – You might also see this error message if you’re trying to install an INF driver that is not configured to run on the OS infrastructure that you’re using.
If you’re struggling to resolve this particular issue, this article will provide you with a basic set of troubleshooting steps. Below you have a collection of methods that other users in a similar situation have used to either fix or circumvent the issue entirely. For the best results, follow the steps below in order until you find a fix that is effective in your particular scenario.
Method 1: Installing the .inf file from Device Manager
A lot of users have managed to install .inf drivers that were displaying the inf file you selected does not support this method of installation error by using Device Manager. This might work if the INF driver doesn’t have the required install parameters to run conventionally (Right-click > Install) but it’s configured to be installed through Device Manager.
Here’s a quick guide on installing the INF driver from Device Manager:
- Press Windows key + R to open up a Run dialog box. Then, type “devmgmt.msc” and press Enter to open up Device Manager. If prompted by UAC (User Account Control) click Yes at the prompt.

Run dialog: devmgmt.msc - Once you get inside Device Manager, right-click on the device that whose INF driver belongs to. Then, click on Update Driver software (or Update Driver).

Right-click on the device and choose Update driver - At the next window, click Browse my computer for driver software.
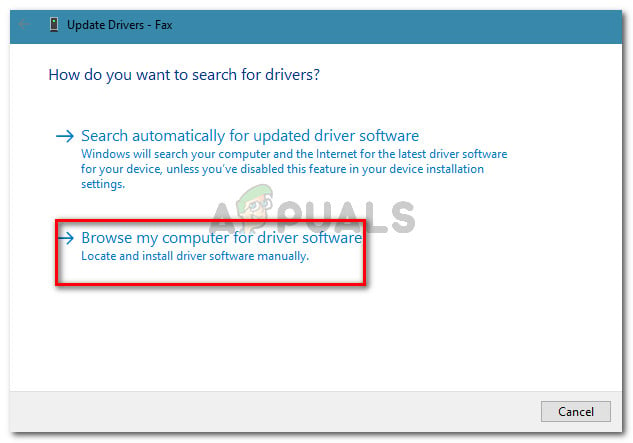
Click on Browse my computer for driver software - At the next screen, click on Let me pick from a list of available drivers on my computer.
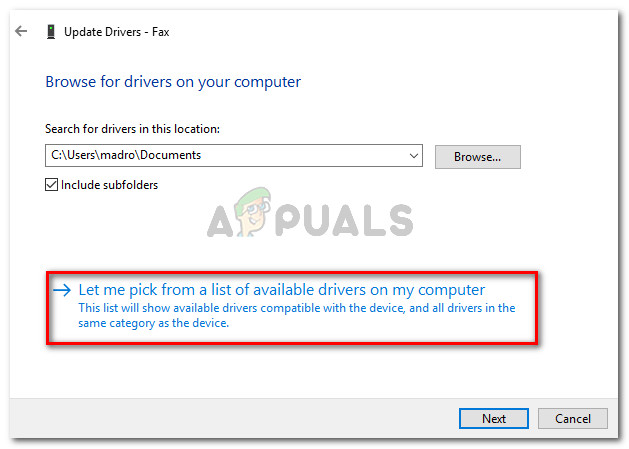
Click on Let me pick from a list of available drivers on my computer - In the next screen, click the Have Disk… button then click on Browse. From the Locate File window, navigate and select the INF file and click Open. Once the INF file is ready to be installed, click the Next button to complete the installation process.
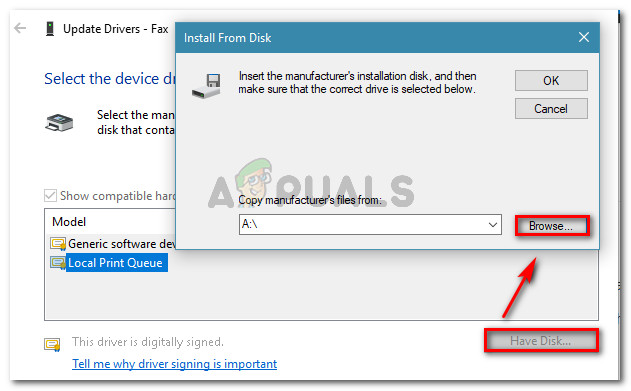
Click on Have Disk… and then on Browse - If the INF driver is installed successfully without the inf file you selected does not support this method of installation error, you managed to resolve the issue. All that’s left to do now is restart your computer and see if the device is functioning properly at the next startup.
If you’re still encountering the inf file you selected does not support this method of installation error while using Device Manager to install the INF driver, move down to the next method below.
Method 2: Installing the .inf driver from Command line
If you are getting the inf file you selected does not support this method of installation error when you’re trying to install an INF driver conventionally and Method 1 has produced the same results, it’s very likely that this issue is occurring because the INF driver does not have the right parameters to support a conventional or Device Manager installation.
Luckily, the INF drivers that have this problem can still be installed from an elevated Command Prompt. Here’s what you need to do:
- Press Windows key + R to open up a Run dialog box. Then, type “cmd” and press Ctrl + Shift + Enter to open up an Elevated Command Prompt. When prompted by the UAC (User Account Control) click Yes.

Run dialog: cmd then press Ctrl + Shift + Enter - Once you get into the elevated Command Prompt, insert the following command and press Enter to install the INF file through the command line:
C:\> rundll32 syssetup,SetupInfObjectInstallAction DefaultInstall 128 .\<file>.inf
Note: Keep in mind that you’ll have to replace the last part (<file>) with the name of your file in order for this to work.
If this method doesn’t work or yields a different error message, move down to the final method below.
Method 3: Check if the driver is compatible with your PC architecture
If the two methods above didn’t allow you to install the .inf driver on your system, it’s very likely that the driver in question is intended to function with a certain type of OS architecture while your OS is different. Most of the time, this happens when the user tries to install a 32-bit INF driver on a 64-bit computer.
Here’s a quick guide on checking the OS architecture of your PC:
- Press Windows key + R to open up a Run command. Then, type “msinfo32” and press Enter to open up the System Information screen.
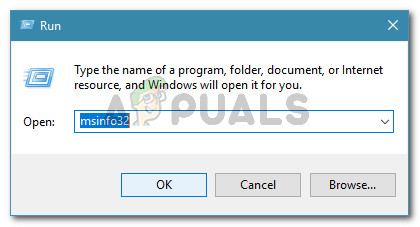
Run dialog: msinfo32 - In the System Information window, select System Summary from the left-hand pane. Then, moving to the right-hand pane, see the Value listed under System Type.
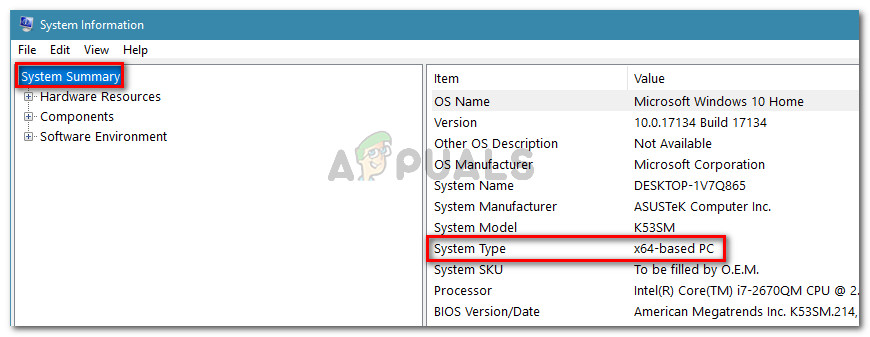
Check the System Type under System Summary
Now that you know your system architecture type, compare it with the architecture of the INF driver that you’re trying to install. If they are different, you’ve identified the cause of the inf file you selected does not support this method of installation error.
If this scenario is true, you have two options:
- You look for another INF driver that is designed to work with your OS architecture type.
- You clean install your Windows version to accommodate the OS architecture type of the INF driver that is causing the issue. If you decide to do this, you can follow this guide (here).


