Fix: HTC One M8 Not Charging
When it came out, HTC One M8 was among the most promising flagships of 2014. It featured superior specifications and a dual camera that added depth to every ordinary picture. I contemplated about buying it for a good while, but I remember being thrown off by the 2600 mAh battery. HTC claims that the battery has enough power to last you a full day, but that’s only true if you’re not gaming a lot and not doing other battery-demanding activities.
As if the small battery wasn’t enough, a lot of users are complaining that their HTC One M8 suddenly turned off and is refusing to accept a charge. I know some people that returned it and got a new replacement, but sometimes that’s not applicable.
You might be tempted to single out the battery as the culprit, but the reality is that’s not always the case. HTC One M8 could be refusing to charge because of a charging port issue or even a bad charger, among others. Here are the most common causes that can cause your HTC One M8 device to stop charging:
- Faulty battery
- Battery needs recalibration
- Bad charger
- Bad USB cable
- Faulty micro-USB port
- Broken connectors on the device or battery
- Dirt or lint accumulation in the charging port
Sending your phone for a repair will take anywhere from 2 weeks to a full month. And if you don’t have an active warranty, you will need to pay the repair costs yourself. But before you get your HTC One M8 ready for a trip to the repair shop, there are a few potential fixes you should try first. Who knows? You might just end up saving some money.
Down below you have our master guide of fixes that proved to be successful in fixing HTC One M8 charging related issues. I would advise you to start with the very first method and work your way downwards until you find a fix that works for your particular problem. Let’s begin!
Method 1: Performing a soft reset
Let’s start slow and make sure your device is not frozen. If your device becomes unresponsive, it might trick you to believe it’s unable to accept a charge. To make sure that’s not the case, let’s start with performing a soft reset.
All you have to do is hold the Power button + Volume Up button for at least 10 seconds. Release both buttons when your HTC device restarts.
Method 2: Testing the charger
Many users single out the battery right away, neglecting to actually troubleshoot the charger and see if there’s an underlying issue with it. Few people know this, but chargers can be very misleading when it comes to pinpointing the cause of your issue.
In order to go through the next steps properly, you’ll need two different chargers with 2 different micro-USB cables. I’m guessing you have more than one in your house since most Android devices are compatible with the standard micro-USB port. Here’s what you need to do:
- Get the stock charger & cable that shipped with your device and connect it to your HTC One M8. Connect your device to a wall plug.
- Do you see any signs of charging (blinking LED & charging icon on the screen)?
- If nothing happens, change the wall-plug charger to a different one and connect it again with the original cable.
- Still nothing? Proceed further by changing the original cable with the second one and try again.
- Finally, remove the charger and use your micro-USB cable to connect your device to a PC. If that didn’t trigger a charge, repeat the procedure with the other cable.
In the event that your phone started charging with a different set of charger & cable, all you need is to buy a different set. Make sure you get a stock one, don’t cheap out and buy anything that isn’t certified.
If the method above didn’t get you anywhere, you can eliminate the charger from the list and proceed to Method 2 for even more troubleshooting. However, if you were able to get a charge while connected to a PC, jump straight to Method 5.
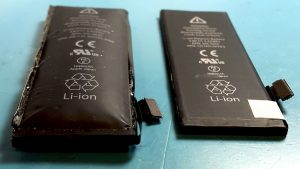
Method 3: Inspecting the battery
HTC One M8 is powered by a non-removable battery. This means that, unless you’re a technician, you won’t be able to take out the battery yourself for inspection. Under normal circumstances, the battery should last you a little more than 2 years before it needs to be replaced.
If you’re well beyond the two-year period, you should seriously consider getting a replacement. Common signs that your battery is starting to fail are random restarts, excessive heating, and screen flickering. If you experienced any of that before you Android started to refuse charges, most likely your battery is to blame.
In some cases, you can make sure that the battery is faulty by inspecting the back case. If it appears to be bloated or swollen as if something is pushing the case out, it’s most likely the battery. As a rule of thumb, when the battery is larger than its normal size you need to take it to a service ASAP in order to avoid additional damage to your HTC device.
Method 4: Recalibrating the Battery
If the battery isn’t bloated, recalibrating it might just do the trick. The good thing is, HTC has one of the most accessible ways of recalibrating the battery. In some cases, the battery sensors might believe the battery is full and refuse to allow charging even though the battery is completely empty. If that’s the case, you can fix it easily by recalibrating the battery. Here’s how:
- Shut down your HTC One M8 completely.
- Use your original charger to plug it into a power outlet and leave it for 10 minutes.
- With the device still connected to the charger, hold down both volume buttons + power button for a good 2 minutes. Your phone will turn off repeatedly during this period, but make sure you continue to hold all three buttons.
- Power your device off again and let it charge fully.
Method 5: Cleaning the charging port
If you’ve got this far without a result, there’s a big chance you might be dealing with a dirty charging port. All Android devices are vulnerable to this type of issue, excluding the ones that charge wirelessly. If you carry your HTC phone in your pocket a lot, there’s a high chance that the charging port will become filled with lint and dirt.
If you were able to trigger a charge from PC-based USB port while following Method 2, you certainly need to do some cleaning. When your phone is connected to a wall outlet, it will try to use the grounding pin. In the event that the grounding pin becomes surrounded by dirt and lint, the transfer of electricity might be halted.
Here’s what you need to do to clean your device’s charging port:
- Use a flashlight to take a look inside the charging port of your phone. Do you see anything foreign? If you see traces of lint or dirt, proceed with the next steps.
- Power off your device completely.
- Use a small pair of tweezers to remove any lint or dirt that you were able to locate. You can also use a needle or a toothpick for this part.
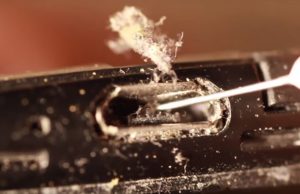
- Dip a small cotton swab in rubbing alcohol (isopropyl alcohol), but make sure you don’t overdo it. If you don’t have cotton swabs in your household, you can also wrap a tiny piece of cloth around a needle.
- With rotational movements, get rid of the remaining dirt that might be present around the gold connectors.
- Leave your phone for at least two hours in a warm environment. This will ensure it’s dried off when you attempt to power it on again.
- Connect your phone to a charger again and see if it has regained the normal charging capabilities.
Method 6: Lifting the internal connectivity pins
Every Android phone relies on a number of connection pins to transfer electricity from the power outlet to your device’s battery. In the event that one or more of those connection pins get bent or broken, the transfer of electricity might become affected. Sometimes a broken pin will stop your phone from fast-charging, and other times it will stop the charging completely.
If you’re like me, you occasionally plug in the micro-USB port upside down. Over time, this can lead to the displacement of the internal pins. What usually happens is, you’ll force the internal pins and push them further inside until eventually the transfer of electricity is stopped.
Note: Keep in mind that this method implies a fair amount of risk, and if you’re not careful you might provoke further damage to your device. I would advise against trying out this method if you have a viable warranty. It’s worth waiting for a new replacement to come in instead of voiding your warranty altogether.
If you are ready to go through with it, here’s what you need to do:
- Make sure your HTC device is completely powered off.
- Pick up your charging cable and take a look at the micro-USB port. Do the connectors on the port appear to be pushed inside?
- Use a flat-head screwdriver or a needle to lever up the connectivity pins a little bit. Make sure you don’t bend them too much.
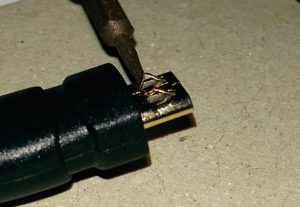
- Move over to your phone and place a flat-head screwdriver right under the micro USB-port. Gently push downwards to lift the port. At this point, it’s critical to do it very gently so you don’t dislodge the charging port.
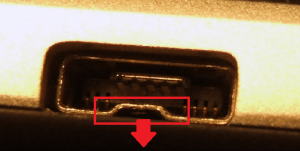
- Connect your charger again and see if it’s charging normally.
Wrap Up
I certainly hope one of the methods above was successful in restoring the charging functionality on your HTC One M8. If you went through all the methods without a result, your only hope is to take it to a certified technitian for a repair.
Thanks… was the bad cable.