Fix: High CPU Usage by LockAppHost.exe
Windows 10 is one of the most used operating systems in the world with its cumulative updates rolling out time to time. It offers ease of access and a lot of features as compared to other operating systems. Since each operating system is very complex and involves a lot of modules running together, it is possible that some of them conflict and cause unexpected problems.
One of these problems is the high CPU usage by the service “LockAppHost”. This service is mostly associated with lock screen issues. Many users reported this problem when their computer woke up from sleep or hibernation after closing the lid. There is a few workaround to solve this problem. Take a look.
Solution 1: Restarting your Computer
Before try out other technical methods, it would be wise to restart your computer and check if the problem still persists. There were many reports that simply restarting the computer fixed the problem since this problem is mainly associated with the computer being started into lock screen after sleep or hibernation. Restart multiple times and before you resort other solutions listed below.
Solution 2: Locking and Unlocking your Machine
We can try locking your screen (not sleeping or hibernating) and unlocking it again. Whenever you lock the screen, the process gets refreshed as it is triggered again and most of the time, it stops consuming your resources. Windows has an inbuilt feature where you can directly lock your screen by pressing Windows + L button. This action will instantly lock your computer. Unlock it again using your password and check if the problem got fixed.
Solution 3: Re-enabling login after the Device Wakes from Sleep
Many users have the login option disabled after their computer wakes up from sleep or hibernation. The OS redirects you directly to your home screen instead of the standard lock screen. We can try re-enabling this feature and check if the problem still persists. If it does, feel free to revert the changes.
- Press Windows + S to launch the search bar. Type “settings” in the dialogue box and open the relevant result which comes forth.
- Once in Settings, click on “Accounts”.

- Once in Accounts, click on “Sign-in options” present at the left navigation bar on the screen.

- Set the option to require sign-in by select “When PC wakes up from sleep” from the drop-down present. Exit the windows and restart your computer. Check if the problem got solved.

Solution 4: Disabling the non-bootup lock screen
Another workaround which worked for people was to disable the non-bootup lock screen from the computer. There are two instances of lock screens. One is when you log in to your computer the first time (this is called bootup lock screen). The other on when you open your computer after it has gone to sleep (this is called non-bootup lock screen). Since there is no way to disable the bootup lock screen at this moment, we can try disabling the other one and check if this solves the problem.
- Press Windows + E to launch the File Explorer. Navigate to the following file location:
C:\Windows\SystemApps
- Once in the target location, look for the folder named:
Microsoft.LockApp_cw5n1h2txyewy
- Simply rename the folder by right-clicking it and selecting “Rename”.
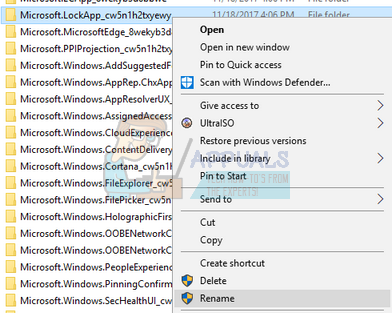
Don’t rename the whole file name. Just add “.bak” at the end of the name and restart your computer. Hopefully, the problem will be solved. If not, feel free to revert the changes.
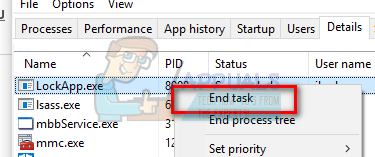
Note: If you encounter a dialogue stating that the folder is in use by another application, head over to the task manager and end the lock process. The dialogue is shown because the process is already running in the background.
Solution 5: Ending the Service
As a last resort, we can try ending the service from the task manager. Do note that disabling this function might disable your lock screen. Furthermore, you might require a restart for the process to start again. In most of the cases, ending the service automatically resolves the problem of High CPU usage. In very rare cases, the service comes back online. This is a temporary fix as the process will most likely spawn again upon restart or waking the computer from sleep. You can also click “End process tree” if ending the task spawns the process again.