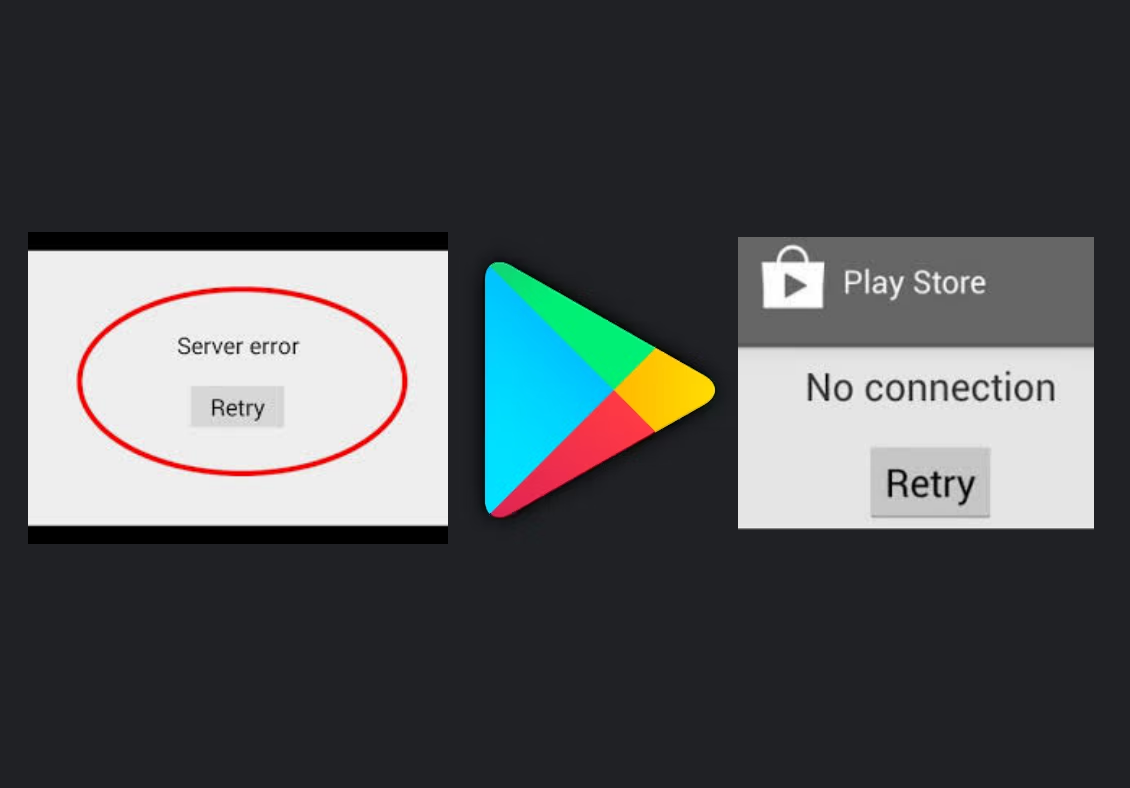
How to Fix ‘Server Error’ and ‘No Connection’ in Google Play Store
The Play Store’s “Server Error” or “No Connection” error might look like two different issues, but they both indicate the same problem. The error message you receive depends on the Android version you’re using. While it may seem like an internal issue with Google, most of the time, the problem originate from your device or the router you’re connected to.
Here are some common causes of these errors:
- Incorrect date and time settings
- Google Play Store language settings that are incorrect
- Google account glitches
- Poor Wi-Fi connection or configuration
- Excess cache data in Google Play Store
Considering these factors, we’ve created a guide to help you resolve these errors and restore normal functionality to Google Play.
1. Connect through Mobile Data
Connecting through mobile data can potentially fix the errors by providing an alternative internet access route. This bypasses any local network issues such as misconfigured Wi-Fi settings, router problems, or ISP-related outages that might be disrupting the service.
- Close the Google Play Store app.
- Disable your Wi-Fi connection and enable Mobile Data.
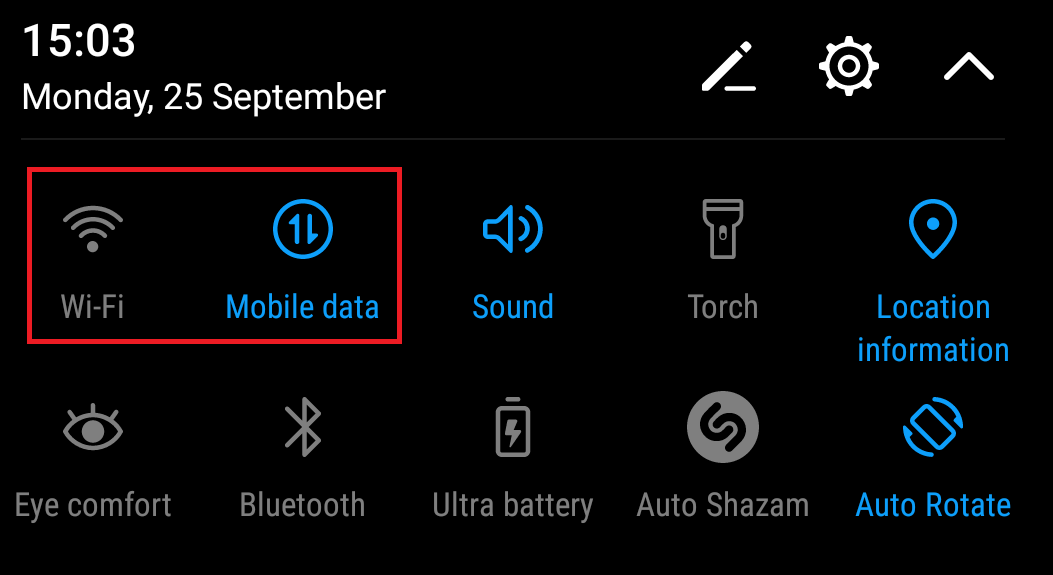
- Wait for a minute, then reopen the Google Play Store.
If the Play Store works correctly, your router could be at fault. Before considering a new router, try these steps:
- Navigate to Settings > Wi-Fi, press and hold the network you’re connected to and select Forget (Forget Network).

- Unplug the router’s power cable to restart it.
- Re-enable Wi-Fi on your Android device, go to Settings > Wi-Fi, and reconnect to your network.
- Try accessing the Google Play Store again to see if the error has been resolved.
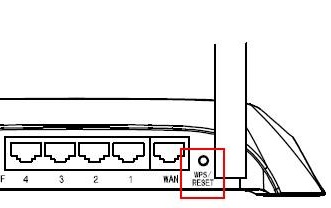
Note: If the error continues, consider resetting your router by pressing and holding the reset button with a pencil or needle for a few seconds, or by following the instructions in the “failed to obtain IP address” guide.
2. Update Date/Time Settings
Outdated date and time settings on your device can cause these errors because Google Play relies on the correct date and time for secure network communication. If the date and time are incorrect, it can disrupt the SSL/TLS handshake, leading to a failure in establishing a secure connection with Google’s servers.
- Open Settings and select Date & Time. If you can’t find it, check under Advanced Settings.
- Turn on Automatic date & time and Automatic time zone.

- Restart your device and check the Google Play Store.
3. Clear Data and Cache of Google Play Store
Clearing data and cache of the Google Play Store can often fix the issues because it removes corrupted data and refreshes the app’s internal state, allowing it to establish a fresh connection with Google’s servers.
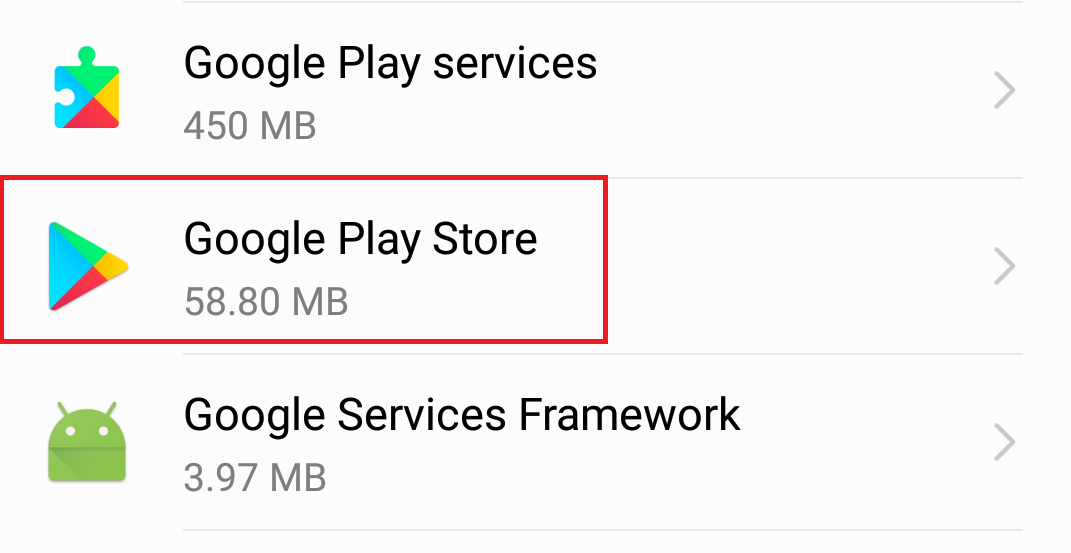
- Navigate to Settings > Apps (Applications) and select the All apps filter.
- Scroll to Google Play Store, choose Storage, and tap Clear data followed by Clear cache.
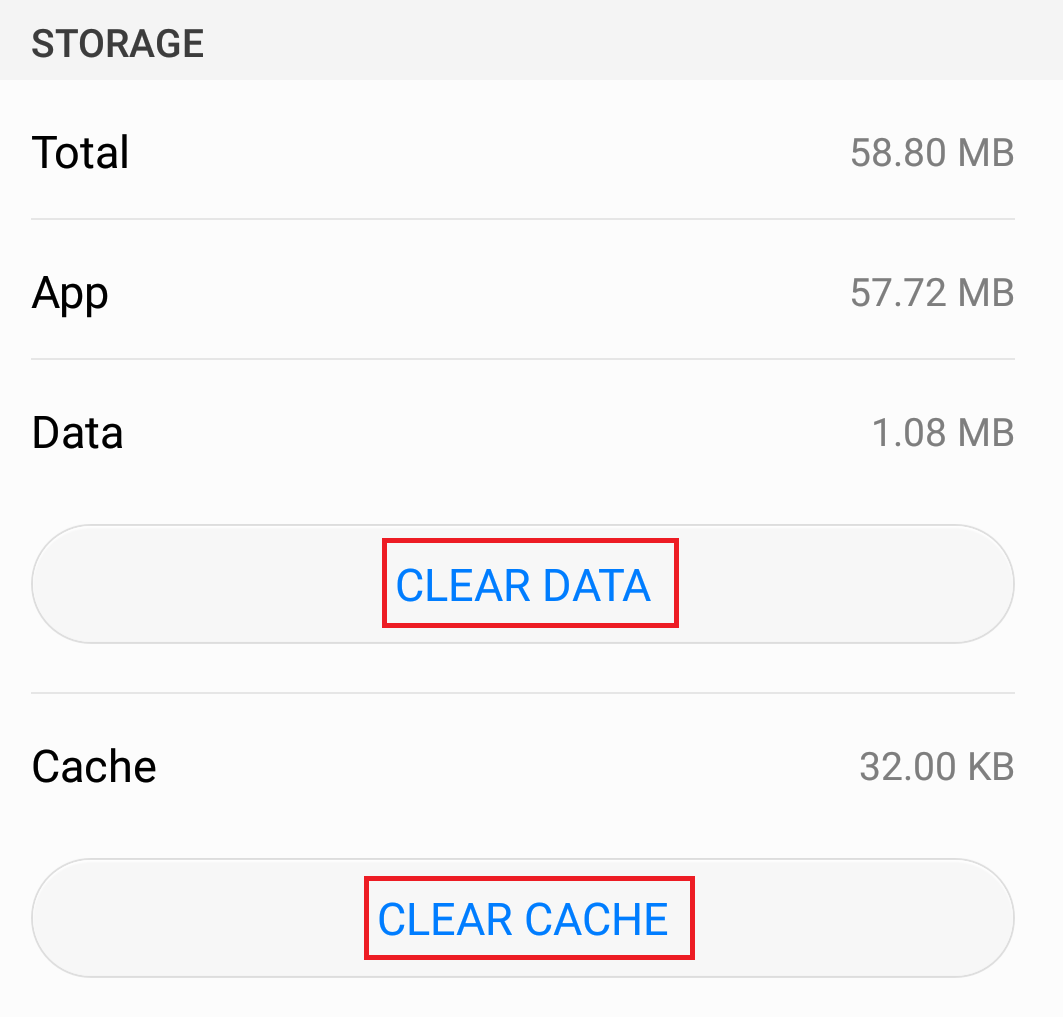
- Hit the back button, select Force Stop, restart your device, and then open the Google Play Store.
4. Uninstall Google Play Updates
Uninstalling Google Play Updates can fix these issues by reverting the app to its original, stable version, which may not have the bugs or compatibility problems of the updated version.
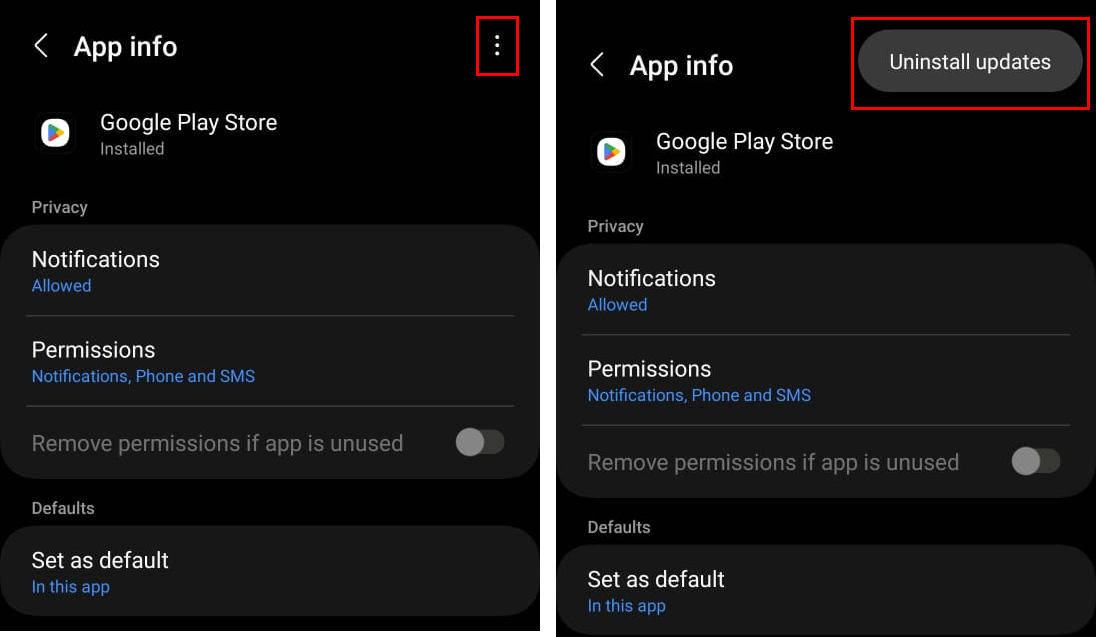
- Under Settings > Apps (Applications), apply the All apps filter and locate Google Play Store.
- Tap on the app and then the three vertical dots in the top right corner.
- Choose Uninstall Updates, restart your phone, and avoid updating the Play Store until you confirm the error is resolved.
5. Remove and Re-Add Your Google Account
Your Google account may be the source of the issue. So, Removing and re-adding your Google account can fix it by refreshing your account’s connection with Google’s servers. It clears cached credentials and forces a resynchronization.
- Go to Settings > Accounts, select Google, tap on your account, and choose Remove.
 If there’s no remove icon, select the three-dot icon.
 - Return to Settings > Accounts and select Add account.
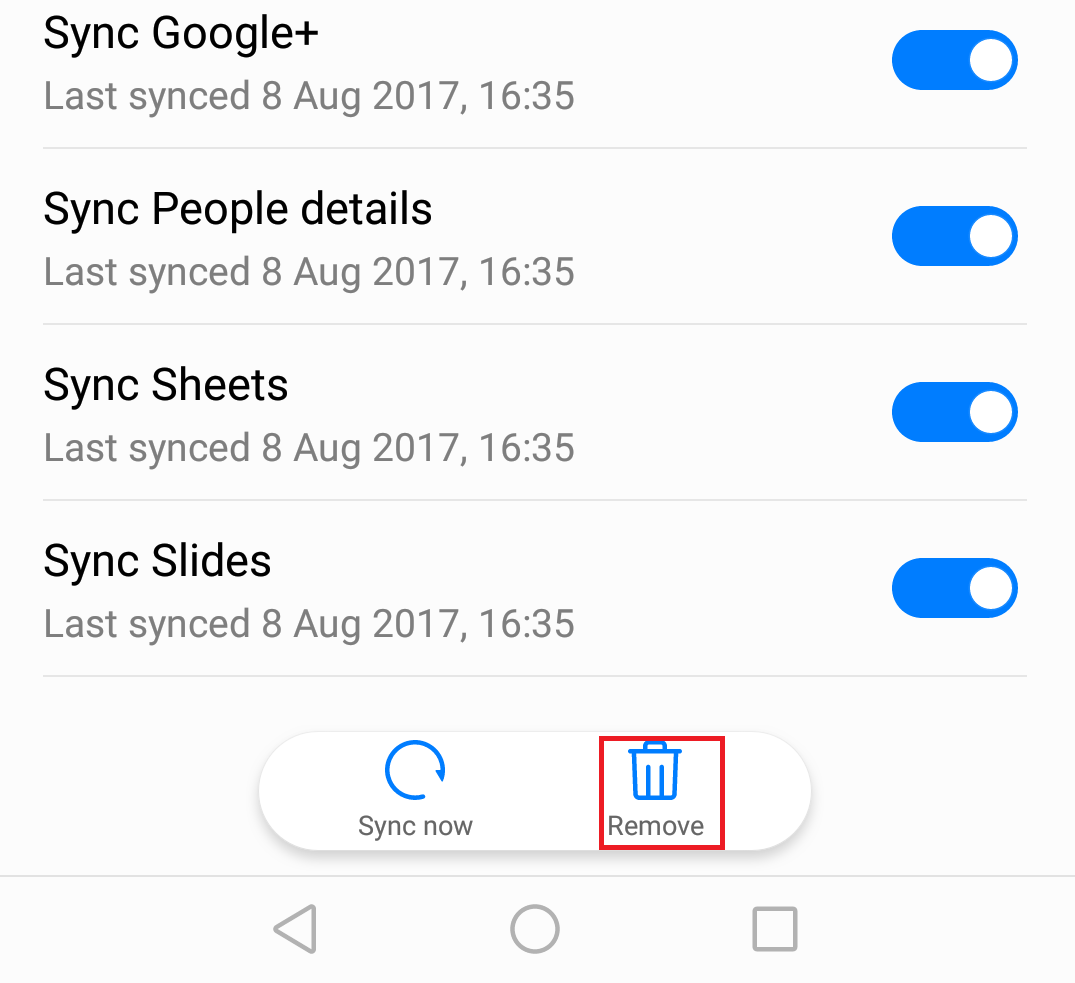
- Tap on Google, enter your credentials, and press Sync Now.
- Re-open the Google Play Store.
6. Clear Google Services Framework Cache
Clearing the Google Services Framework cache removes temporary data that could be causing issues. By clearing the cache, you reset the framework’s internal state, potentially resolving server communication problems.
- Enter Settings and choose Application Manager. If it’s not visible, select the three-dot icon in Settings > Apps (Applications) and select Show System processes.
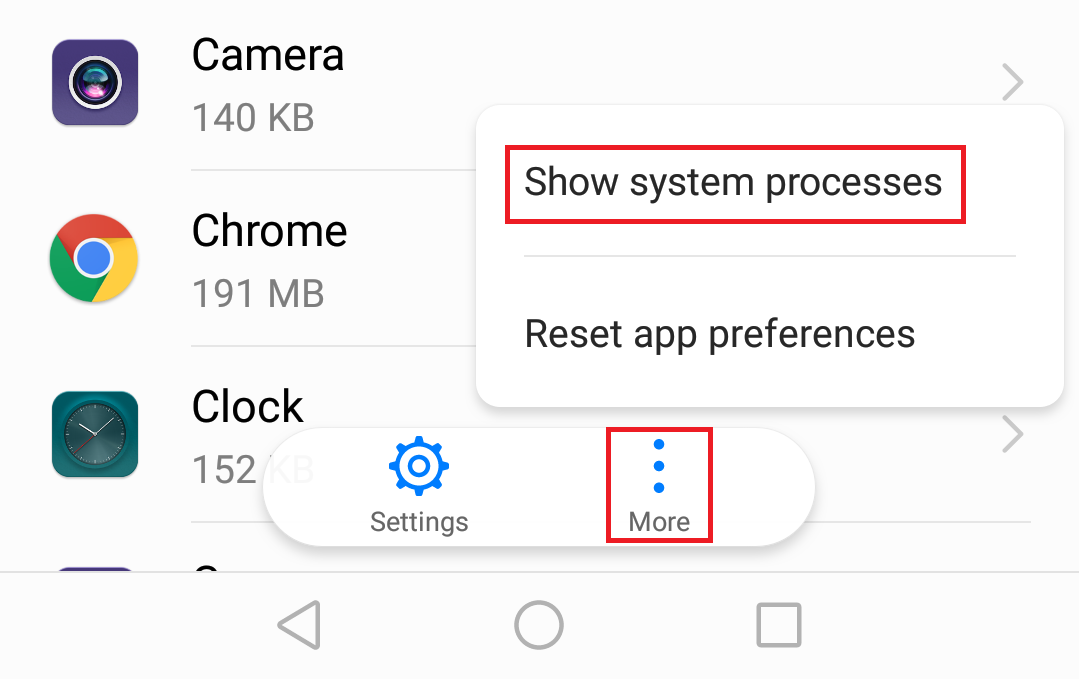
- Find and tap on Google Services Framework, select Force Stop, then go to Storage and tap Clear Cache. Reboot your device and try the Play Store.
8. Do a Factory Reset
A factory reset can fix the errors by restoring the device to its original system state, removing any corrupt data, problematic updates, or misconfigured settings that might be causing the connectivity issues.
This reset clears the cache, deletes all installed apps, and removes any glitches in the system software that could interfere with Google Play’s ability to connect to its servers.
- Back up your data in Settings > Advanced Settings > Backup & reset using the Back up my data option.
- Navigate to Factory data reset, select Reset Phone, and confirm. After your device restarts, check the Google Play Store.

Remember: A factory reset will erase all the data on your device. Make sure to back up any important files, photos, contacts, and other data to be in a safe place before proceeding with the reset.
Server no work