Fix: Google Play Music Error Code 16
The error code 16 which appears while using the Google Play Music service is quite an annoying error and it often prevents users from performing some simple actions such as adding music to their library, etc. The error usually appears on the screen along the following message:
Connection to the server failed with error code: 16
Solutions to this problem vary from user to user and there are no official responses by Google on how to avoid or approach this problem and that is why you will need to follow the instructions provided in the solutions below in order to tackle this problem on your own and try to solve it.
Solution 1: Disable Certain Avast Antivirus Features
Avast is one of the antivirus tools which interferes with the Google Play Music service and you will have to make note of that. Disabling your antivirus is not recommended at all cases and it’s vital to have a copy of one of the antivirus tools on your computer. However, if you have Avast installed on your PC, you will have to make certain adjustments in order for your Google Play Music service to start working again.
- Open your Avast antivirus user interface by double-clicking on its icon on the Desktop or by double-clicking on its icon in the bottom right part of your taskbar.
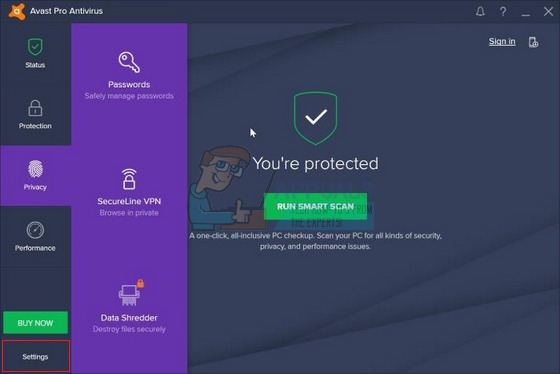
- Click on the Settings button at the bottom left part of the screen.

- Navigate to the Components tab on the left panel and click on the Customize button next to the Web Shield entry on the list.
- Uncheck the box next to the Enable HTTPS scanning option in order to disable it. Check to see if the error code still appears while using Google Play Music.

Alternative: If this method did not work for you, you may want to try and disable Avast completely for a while before you try and complete the action you weren’t able to complete before. Since Avast only targets certain actions such as uploading music, you can turn it off, upload music, and turn it on again.
- Right-click on the Avast icon located at the bottom right part of your taskbar (system tray) and choose the Shield control >> Shut Down Shields. Choose the appropriate amount of time you think it will take to upload music or perform your wanted action.

- After you finish, you can restore Avast manually by restoring the shields from the system tray or you can wait for the time you set to expire which will reopen the shields automatically.
Solution 2: Workaround for BitDefender Users
The issue regarding antivirus tools incompatibility with Google Play Music extends to BitDefender as well and there is a solution to make the problem go away if you are using BitDefender. It consists of disabling a certain area of protection which isn’t now vital but you should still decide if you want to disable it.
- Open your BitDefender antivirus user interface by double-clicking on its icon on the Desktop or by double-clicking on its icon in the bottom right part of your taskbar.
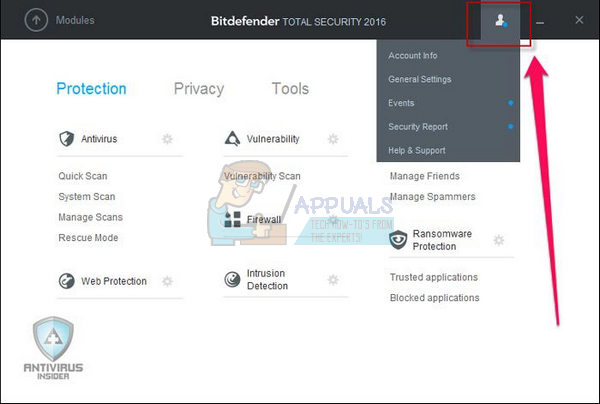
- Click on the Settings button at the top right part of the screen.

- From the Settings Overview window, make sure to navigate to the Privacy Control section.
- Switch to the Antiphishing tab and turn the switch next to the Scan SSL option to off. Check to see if the error code 16 still occurs.

Solution 3: Solutions for Kaspersky Users
It appears that even the high quality paid for antivirus tools experience the same issues and you will actually have to add Google Chrome to the exclusions list on Kaspersky in order to get your problem to sort itself out. Follow the instructions below carefully if you are using any version of the Kaspersky Internet Security tool and if you encounter the error code 16.
- Open your Kaspersky antivirus user interface by double-clicking on its icon on the Desktop or by double-clicking on its icon in the bottom right part of your taskbar.
- Click on the “Settings” icon in the Kaspersky user interface.

- Navigate to the “Additional” tab and choose the “Threats and Exclusions” option.
- Choose the “Specify Trusted Applications” option under the “Exclusions” heading

- Click on the “Add” button at the bottom of the window and search for Chrome using the search icon at the top or scroll down until you locate the Chrome application.
- Select “Google Chrome” from the list and click “Next”.
- Under the “Exclusions for application” page, check the checkbox for the “Do not scan all traffic” option and click the drop down menu to change this option to “Do not scan encrypted traffic”. Then select “Add” and restart Chrome in order to apply these changes.

- Check to see if the error code 16 still appears while you try to upload music.
Solution 4: Solution for AVG Users
It seems that a major number of well-known antivirus tools are having conflicts with Google Play Music service and AVG is no exception. Much like the solutions above, you will also need to provide an exception in AVG for Google and you will be able to connect and upload music to Google Play Music properly.
- Open AVG by double-clicking its icon on your computer or by locating it in the system try at the bottom right part of your screen.
- Click on Menu >> Settings and navigate to the Components tab in the new window that opens.

- Click on the Customize button next to the Web Shield entry on the list and navigate to the Exceptions tab.
- Under the URLs to exclude section type in the following addresses in order to try and fix the error code 16:
google.com/*
*.google.com

Solution 5: Downloading and Changing the Location in Google Play Music Manager
Using the Google Play Music Manager is one way to avoid the issue and you can download it from here.
Sometimes the Music Manager tool gets confused and you literally have to tell it where your music files are located if you want to avoid the error code 16. Not everyone uses Music Manager to manage the music files associated with their Google Play Music service but if you are, make sure you follow the instructions below in order to avoid the error code.
- Open Music manager and make sure that you are signed in with your own Google account where the error occurs.
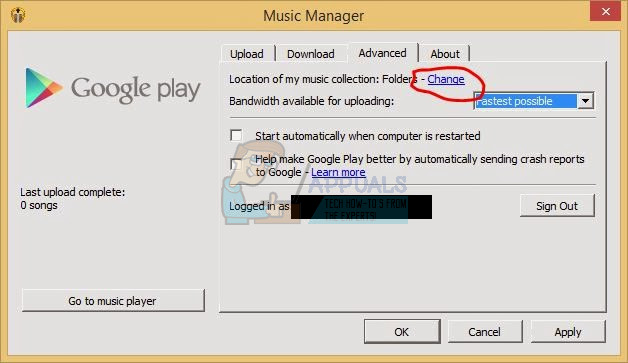
- Click on the Advanced tab in Music Manager and locate the “Location of My Music Collection: Folders” option.

- Click on Change and browse your computer in order to find the folder where your music is actually located.
- Check to see if the error code 16 still appears on your PC.
Note: If using Google Play Music Manager failed to solve the issue for you, you can always try this fix suggested by a user on Google forums and the method seems to have helped several users to deal with the issue at hand.
- Open Google Music Manager and navigate to the Settings section
- Stay in the Upload tab of the Settings window and uncheck the option next to “Automatically upload songs added to my selected folders”.

Solution 6: Reinstall the Google Play Music Mini Player Extension in Your Browser
Reinstalling this extension seems to have helped folks deal with this enormous problem and this solution should definitely help if the solutions above failed to produce any results at all. The method is simple and you won’t lose any of your data in the process.
- The easiest way to open Extensions settings in Chrome is by navigating to this link:
chrome://extensions
- Locate the Google Play Music Mini Player extension and click on the trash can icon next to it to remove it from Chrome permanently.
- Reinstall the extension by visiting this link and clicking the Add to Chrome button at the top right part of the page. Make sure you reopen your browser and check to see if the issue persists.
