How to Fix Front Audio Jack not Working?
When the front audio jack is not working, the system typically fails to detect the plugged-in device, resulting in no sound playing despite the connection being correct. This issue often arises because the audio port isn’t enabled in the BIOS or due to incorrect configurations in Realtek audio software.

The most common causes of this issue include either a misconnection of the front panel audio cable to the motherboard or an outdated or incorrect audio driver. Additional factors include BIOS settings where “HD Audio” is improperly configured or the front panel jack detection feature is disabled.
Now that you know the causes, lets move on to the solutions.
1. Set the Audio Device as Default
If the audio device corresponding to the front jack is set as the default, your computer will consistently route sound through it. This prevents issues that can occur when multiple audio outputs, such as rear jacks or external speakers, are present and the system fails to automatically detect the correct one. Setting the front jack as the default avoids conflicts and ensures seamless audio output without manual adjustments each time.
- Right-click the sound icon on your taskbar and select Sounds.

- Select the Playback tab, right-click your audio device, and select Set as Default Device. Once set correctly, your window will appear similar to the one below.

- Now check if the front audio ports are working properly.
2. Enable Detection
Enabling the front audio jack detection ensures your system recognizes plugged-in devices. Often disabled by default, this feature, when activated, allows the audio driver to monitor the jack, ensuring connected headphones or speakers are detected and function properly. This step aligns hardware and software communication, resolving recognition issues.
Note: If it’s already enabled, we recommend disabling it first to see if the issue gets resolved.
- Navigate to Realtek’s official download site and download the necessary drivers for your computer to an easily accessible location.
- Run the driver setup and install the drivers on your computer as required. You may be prompted to restart. Restart your computer properly before proceeding.
- Press Windows + R, type “control” in the dialogue box, and press Enter to launch the Control Panel. Select the Small icons display type from the top-right side of the screen. Choose Realtek HD Audio Manager.

- Click the folder icon located at the top-right side of the screen.

- Once the window opens, check/uncheck the option Disable front panel jack detection.

- Press OK to save changes and exit. Now check if the issue is resolved.
3. Check Connection Between Motherboard and Audio Jack
Front audio jack issues often arise from loose internal connections. The jack needs a stable link with the motherboard, so even a slightly loose cable can cause problems. Ensure the HD Audio connector is firmly attached to the right pins (usually labeled JAUD1) on the motherboard. This simple step can fix sound detection failures and restore normal audio output if other methods don’t work.
- Open the casing of your computer and locate the connection between the motherboard and the front audio jack.
- If you also have USB functionality at the front of your tower, you’ll see both audio and USB wires. Ensure they are properly connected.

- In some cases, users reported success by reversing the orientation of the jacks before inserting them into the motherboard. Ensure that the wires are securely connected.
Note: If this doesn’t work for you, you might need to troubleshoot whether the audio jack is functional. If it isn’t, you may need to check the connections and soldering, among other things.
4. Reinstall Audio Drivers
Another reason the front audio jack might not work is due to outdated or corrupt audio drivers. Drivers act as the main interface between the operating system and the hardware, so problems here can cause issues. We will update the drivers and check the settings to see if this resolves the problem.
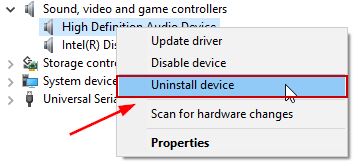
- Press Windows + R, type “devmgmt.msc” in the dialogue box, and press Enter.

- Once in the Device Manager, navigate to the sound/audio devices drop-down.
- Select the HD audio device (or whichever is installed), right-click on it, and select Uninstall.

- Once the device is uninstalled, restart your computer completely.
- Go back to the Device Manager, and you should notice that the device will be reinstalled automatically using default drivers. If it isn’t, you can navigate to your sound card manufacturer’s website and install the latest drivers from there.
- After installing the latest drivers, check if the issue is resolved.
5. Use the Audio Jack at the Back
If other methods fail, try using the rear audio jack. Rear jacks are directly soldered to the motherboard, avoiding issues like loose wires or misalignment that can occur with front jacks, ensuring a more stable and reliable connection.

Locate the audio jack, which is usually green in color (pink for the microphone), and plug your audio device there. These connections usually work by default, allowing you to use your audio device without issues.


