Fix: External Hard drive not showing up Windows 10
With the advancement in technology and the increase in research and development, external hard drives are becoming more viable options for storing your data while on the go. With blazing fast speeds and portability, external hard drives have a lot to offer to people who are relying on carrying their data on the go.
Despite the operating systems and the hard drive software being updated frequently, there are still numerous cases where the computer fails to detect an external hard drive on your computer even if it is plugged in. This means your computer might not show the drive in the file explorer even if you can see it in the device manager. This problem has been there for quite some time and can be solved using the workarounds listed below.
Solution 1: Performing basic troubleshooting tasks
Before we indulge in carrying out more technical and advanced troubleshooting, you should perform the basic troubleshooting tasks and see if they fix your issue. Most of the time, you might not be able to access your hard drive because of very simple problems. Ensure you carry out all the instructions below before going on with the other solutions.
- Try plugging the hard drive in the USB port at the back of your computer if you own a PC or to some other port if you own a laptop.
- Check if the USB cable of the hard drive is in working condition. You can try plugging another cable and check again.
- Make sure that the hard drive is not physically damaged. External hard drives are very delicate and tend to break even on the slightest fall.
- You should make sure that the USB port you are connecting into is in working state with the latest drivers installed.
- If you are seeing the device in hardware and printers and not on your device manager, you should uninstall the driver. Then navigate to the device manager and scan for hardware changes.
Solution 2: Updating Hard drive Drivers
Drivers are the main components in running any hardware on your computer and controlling them using the operating system. They are the interface between the OS and the hardware. If your drivers are out of date or corrupt, there is no way you will be able to access your hard drive. We will try updating the drivers manually and see if this fixes the issue under discussion.
We will be updating two different entities; your hard drive drivers and the storage controllers.
- Press Windows + R, type “devmgmt.msc” in the dialogue box and press Enter.
- Once in the device manager, expand the category of storage controllers, right-click on the device and select “Update Driver”.
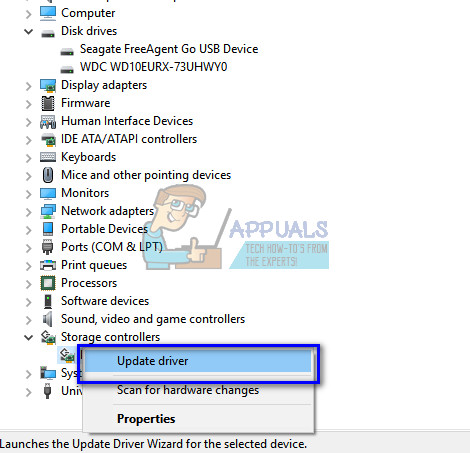
- There are two ways through which you can update the drivers. Either you can automatically search the internet for the latest drivers against the hardware ID and let windows update automatically. Either this or you can update the drivers manually by downloading the drivers to an accessible location and installing them using “Browse my computer for driver software”.
This is an open-ended step. You may choose any option but always make sure that in the end, you have the latest compatible drivers for your device.

- Once you have updated the storage controllers, expand the category of ‘Disk Drives’, right-click on your external drive and press “Update Driver”.

- Now you can update the driver using the guidelines we presented in step 3.
- Restart your computer after applying both changes and check if you can access your hardware. You can also try re-plugging the device if it still doesn’t show up.
Solution 3: Uninstalling the Drivers
If updating the drivers don’t work, we can probably try uninstalling the drivers and then scanning for hardware changes. What goes behind the scenes is that Windows uninstalls the drivers and the hardware disappears from the device manager. Now when we scan for hardware changes, Windows searches all of its modules for any hardware whose drivers are not yet installed. Upon finding such a module, it installs the stock drivers to make it run.
We will be uninstalling the device drivers and the USB controllers as well.
- Press Windows + R, type “devmgmt.msc” in the dialogue box and press Enter.
- Once in the device manager, expand the category ‘Disk drives’, right-click on the device and select “Uninstall device”.

- While in the same device manager, expand the category ‘Universal Serial Bus controller’, right-click on the device and select “Uninstall device”.

- After you done uninstalling the hardware, right-click on any empty space on the device manager and select “Scan for hardware changes”. The hardware will be automatically be detected and the default drivers will be installed.

- Consider restarting your computer and check if the problem at hand got solved.
Solution 4: Changing Drive Letter
Each drive is identified by a unique drive name along with a path through which it can be accessed. It is possible that the drive letter is conflicting with another one which is already reserved by the system for another memory device. We can allocate another drive name to your drive and see if this makes any difference.
Make sure that you insert the hard drive before you boot your computer. Shut down your computer, plug in the device, and then start it up. Do note that the first boot device in your BIOS settings is not the removable device (it is should be the hard drive where your Windows is installed).
- Press Windows + R, type “diskmgmt.msc” in the dialogue box and press Enter.
- Once in disk management, right-click on your drive and select “Change Drive Letter and Paths”.

- Click on the “Add” button present at the list of options present.
Note: If your drive already has a name, click on “Change” instead of “Add”. In this case, since the drive is already named “E”, we will click on “Change and select a new drive letter for the hard drive”.
- Now select a new drive letter for your hard drive. Press OK to save changes and exit.

- Now check if you can access the removable device successfully. If you still can’t, restart your computer and check again.
Solution 5: Enabling Hidden or Empty Drives
Some computer systems have the option by default to hide all the empty drives from your file explorer. This option is useful for people who connect a lot of hard drives at once and need preferences for viewing the one which is filled up. However, in this case, it might be causing a problem.
- Press Windows + S, type command prompt in the dialogue box, right-click on the application and select “Run as administrator”.
- Once in elevated command prompt, execute the following command:
set devmgr_show_nonpresent_devices=1

- Now press Windows + R, type “devmgmt.msc” in the dialogue box and press Enter.
- Once in the device manager, click on ‘View’ and check the option “Show hidden devices”.

- After making the changes, search and check if you can access your external hard drive. If you cannot, restart your computer and after reconnecting, check again.
If you still cannot see your hard drive in the file explorer, follow these steps:
- Press Windows + E to launch the File Explorer. Click on the ‘View’ tab and select Options > Change folder and search options.

- Uncheck the option “Hide empty drives”. Press Apply to save changes and exit.

- Restart your computer and check if the problem at hand got solved.
Solution 6: Allocating New Volume to Hard Drive
If all the above solutions don’t work, it is possible that there is no volume assigned to your hard drive. This is the case if you purchased your hard drive recently and you haven’t used it even once. This case might also arise if you formatted the drive without properly allocating the parameters.
Note: Here we will be formatting the drive. If you have any data present, it will be lost. Formatting is essential in order to make the computer recognize the drive.
- Press Windows + R, type “diskmgmt.msc” in the dialogue box and press Enter.
- If your hard drive has not been allocated any volume, you will see a picture similar to the one shown below. The bar will be black with an unallocated tag present. Right-click on the tab and select “New Simple Volume”.

- A new wizard will appear on the screen. Click Next to proceed with the allocation.

- Now you will be asked to set size allocations and the drive letters against your disk. In most cases, the default values are correct and you do not need to change anything. Click Next to proceed.

- In the last window, you will be able to choose the type of drive. It is recommended to keep the default values and press Next.
Note: Do note that here we are also checking the option “Perform a quick format”. This will erase all the data present on your hard drive (if any).

- After you finish the wizard, the drive will be allocated properly and hopefully, you will be able to access the disk drive without any problems.

Note: If all the above steps don’t work, you can try formatting the drive using the same method. Only a few steps will be different. Right-click on the partition and select “Format”. Next, follow the on-screen instructions and format the drive in the default file type. After the partition, reconnect the hard drive and check.


