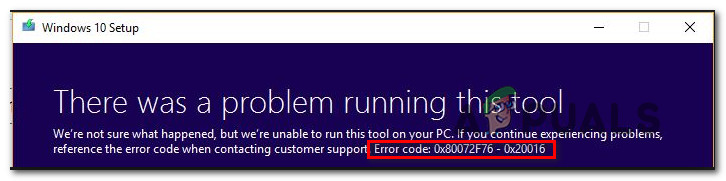
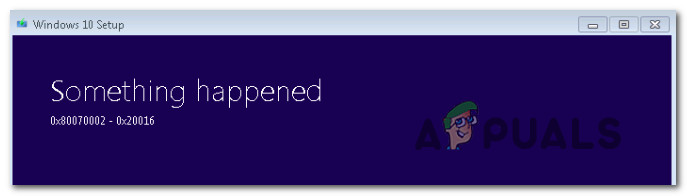
Fix: Error Code 0x80072f76 – 0x20016
Some users are seeing the 0x80072f76 – 0x20016 error code when trying to use the Media Creation Tool or when trying to install Windows 10 or Windows 8 via Windows Installer. The error is typically reported to occur a few seconds after the Media Creation Tool or Microsoft Refresh Tool is launched.
What is causing the 0x80072f76 – 0x20016 Error Code in Media Creation Tool?
We investigated this particular issue by looking at various user reports and the repair strategies that most affected users have successfully used to get to the bottom of the issue. Based on our investigations, there are several repair strategies that are known to trigger this particular error:
- Media Creation Tool is set to open with Windows XP Compatibility Mode – Several affected users have reported that in their case, the Media Creation Tool was trying to open with Windows XP set as the Compatibility mode. Changing the settings to Windows 8 and granting administrative privileges resolved the issue for some users.
- Corruption among Windows Update files – This particular issue can also be caused by system file corruption in the Windows Update component files – In this case, renaming the SoftwareDistribution and Catroot2 folder should resolve the issue. Another potential fix for this scenario is to clear the $WINDOWS.~BT and$Windows.~WS cache folders.
- Windows version is configured to reject the upgrade – You might also be seeing this particular error if your current Windows configuration is rejecting the OS upgrade. You can resolve the issue in this particular scenario by changing the value of AllowOSUpgrade using Registry Editor.
- S.M.A.R.T Monitoring is conflicting with the os installation – SMART HDD/SSD monitoring is a feature known to conflict with the OS installation (using the Windows Installer) with certain PC configurations. In this case, you can resolve the issue by disabling the SMART feature from the BIOS settings.
If you’re struggling to find fixes that will resolve this particular error message, this article will provide you with several troubleshooting guides. Down below, you’ll discover a collection of methods that other users in a similar situation have successfully used to resolve the 0x80072f76 – 0x20016.
The potential fixes below are ordered by efficiency and severity, so please follow them in the order that they are presented. One of them is bound to resolve the issue in your particular scenario.
Method 1: Running the Windows Update troubleshooter
Some affected users have reported that the issue was resolved after they ran the Windows Update Troubleshooter – a Microsoft tool that is equipped with various repair strategies that might end up resolving the issue automatically.
Here’s a quick guide on how to run the Windows Update troubleshooter:
- Press Windows key + R to open up a Run dialog box. Then, type “ms-settings:troubleshoot” and press Enter to open up the Troubleshoot tab of the Settings app.
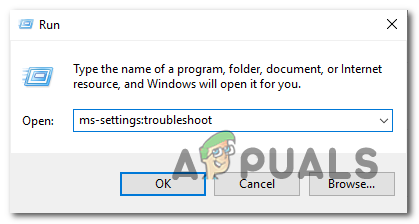
Opening the Troubleshooting tab of the Settings app via a Run box - Inside the Troubleshoot tab, click on Windows Update (under Get up and running) and choose Run the troubleshooter.
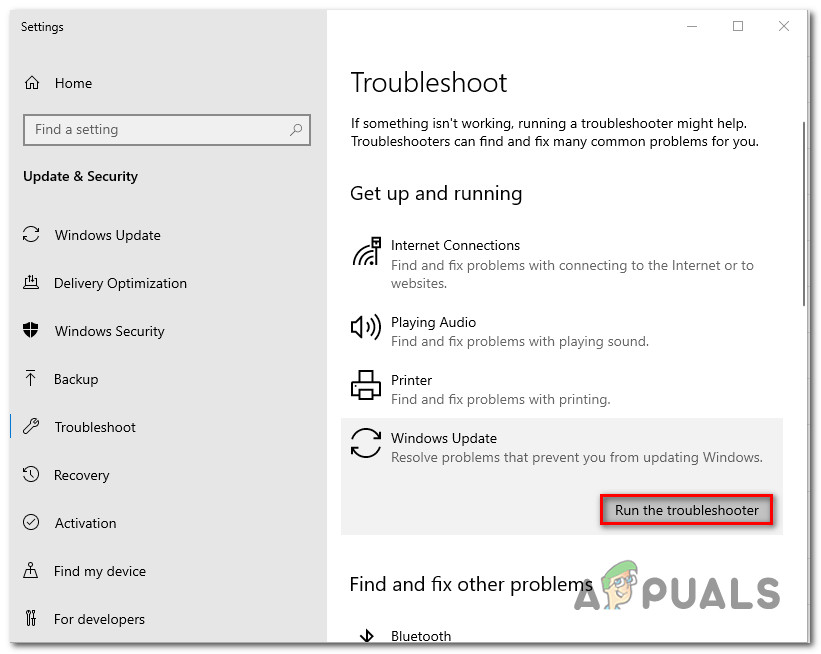
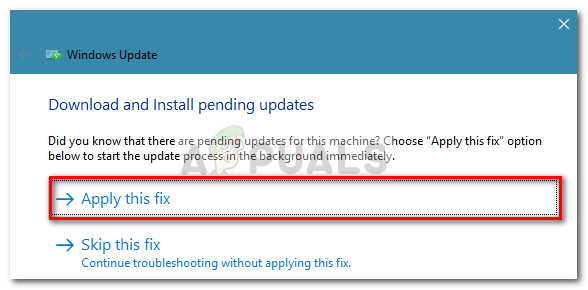
Running the Windows Update troubleshooter - Wait until the investigation part is complete, then click on Apply this fix to enforce the recommended repair strategy automatically.
- Once the repair strategy is applied, restart your computer and see if you’re still encountering the 0x80072f76 – 0x20016 error when opening the media creation tool or when trying to install/upgrade Windows.
If you’re still encountering the same error message, move down to the next method below.
Method 2: Setting the Compatibility Mode to Windows 8
Some users have been able to resolve the 0x80070002 – 0x2001 error after discovering that the Media Creation Tool was opening in Compatibility mode set to Windows XP. Most users have reported that changing the Compatibility Mode to Windows 8 and making sure that the Media Creation Tool is opening with administrative privileges ended up resolving the issue for them.
Here’s a quick guide on ensuring that Compatibility Mode is set to Windows 8 for the Media Creation Tool (with admin access):
- Navigate to the location where you downloaded the Media Creation Tool, right-click on it and choose Properties.
- Inside the Properties screen of the Media Creation tool, go to the Compatibility tab and check the box associated with Run this program in compatibility mode for.
- Next, move down below and make sure that the box associated with Run this program as an administrator is checked.
- Click Apply to save the changes, then open the Media Creation Tool again and see if you’re still seeing the same error message.
If you’re still encountering the 0x80072f76 – 0x20016 error, move down to the next method below.
Method 3: Resolving corruption related to Windows Update
As it turns out, this particular issue can also occur if the culprit that ends up causing the 0x80070002 – 0x2001 is corruption with the Windows Update component files. If this scenario is applicable to your current situation, then resetting the Windows Update component should resolve the issue and allow you to use Media Creation Tool without encountering the 0x80070002 – 0x2001 error.
Here’s a quick guide on how to do this:
- Press Windows key + R to open a Run dialog box. Then, type “cmd” and press Ctrl + Shift + Enter to open up an elevated Command Prompt. When prompted by the UAC (User Account Control), click Yes to grant admin privileges.
- Inside the elevated Command Prompt, type the following commands in order and press Enter after each one to stop the necessary services:
net stop bits
net stop wuauserv
net stop appidsvc
net stop cryptsvc
Note: This command will stop the BITS service, the Windows Update service and the Cryptographic service.
- Once the required services have been stopped type the following commands to rename the software distribution folders backup copies:
Ren %systemroot%\SoftwareDistribution SoftwareDistribution.bak
Ren %systemroot%\system32\catroot2 catroot2.bak
Note: This command will force your OS to create new folders for software distribution, which will circumvent any issues cause by file corruption.
- Restart the services that we previously stopped by running the following commands and pressing Enter after each one:
net start bits
net start wuauserv
net start appidsvc
net start cryptsvc
- Restart your computer and recreate the action that was previously triggering the 0x80070002 – 0x20016 error and see if the issue has been resolved.
If you’re still seeing the same error message, move down to the next method below.
Method 4: Clearing the $WINDOWS.~BT & $Windows.~WS folders
Some users have reported that the 0x80070002 – 0x20016 error was finally resolved after they erased the contents of the $WINDOWS.~BT and $Windows.~WS cache folders. These contain files needed to create the installation media, so clearing their contents might resolve corruption-related issues.
Note: Chances are the two folders are not visible when you access your Windows drive. In this case, using the ribbon bar at the top, go to View and make sure that the box associated with Hidden items is checked.

Once the two folders are visible, open each folder individually and empty its contents by selecting every item and choosing Delete.

Once the two cached folders have been cleared, restart your computer and see if you’re still encountering the 0x80070002 – 0x20016.
If you’re still seeing the same error message, move down to the next method below.
Method 5: Editing the AllowOSUpgrade value via Registry Editor
You might be seeing this particular error message because your current Windows version is configured to reject an OS upgrade. If this scenario is applicable, you’ll see the Something happened 0x80070002 – 0x20016” error when trying to run the Media Creation tool to upgrade an existing installation.
This is typically reported to occur with Windows 7 or Windows 10 computers that are eligible to upgrade to Windows 10 but haven’t received the notification to reserve a copy because of a Registry value.
Here’a step-by-step guide that will help you change the AllowOSUpgrade value. This will allow you to use the Media Creation tool without receiving the 0x80070002 – 0x20016 error. Here’s what you need to do:
- Press Windows key + R to open up a Run dialog box. Then, type “regedit” and press Enter to open up a Run dialog box. When prompted by the UAC (User Account Control), click Yes to grant administrative privileges.
- Once you’re inside the Registry Editor, use the left-hand side pane to navigate to the following location:
Computer\HKEY_LOCAL_MACHINE\SOFTWARE\Microsoft\Windows\CurrentVersion\WindowsUpdate\OSUpgrade
Note: If the OSUpgrade key is not created yet, right click on WindowsUpdate and choose New > Key. Then name the newly created key to OSUpgrade.
- With the OSUpgrade key selected, move over to the right-hand side panel and right-click on an empty space. Then, select New > DWORD (32-bit) value and name it AllowOSUpgrade.
- Double-click on AllowOSUpgrade and change the Value to 1 and the Base to Hexadecimal.
- Once the value has been adjusted, close regedit and restart your computer.
- At the next startup, recreate the action that was previously triggering the 0x80070002 – 0x20016 error and see if the issue has been resolved.

If you’re still encountering the same error message, move down to the next method below.
Method 6: Performing a Refresh via Windows Defender Security Center
If you went through all these methods without success and you’re trying to use the Refresh tool from Microsoft, you can complete the procedure from Windows Defender Security Center.
This procedure will allow you to Refresh your PC in those instances where the official Microsoft Refresh tool produces the 0x80070002 – 0x20016 error. This procedure is typically known to be effective on Windows 10 builds that already have the Creators Update.
Here’s what you need to do to perform a Refresh via the Windows Defender Security Center:
- Press Windows key + R to open up a Run dialog box. Then, type “ms-settings:windowsdefender” and press Enter to open up the Windows Security tab.
- Once you get to the Windows Security tab, click on Open Windows Security.
- When you’re inside the home screen of Windows Security, click ok Device performance & health.
- In the Device performance & health tab, scroll down to Fresh start and click on Additional info.
- Under Fresh start, click on Get Started to begin the process of refreshing your PC. This is the equivalent of installing a clean, up to date installation of windows.
- Follow the on-screen prompts to complete the Fresh start process and complete the refresh.
Method 7: Disabling S.M.A.R.T
Some affected users have reported that they managed to resolve the issue by disabling the S.M.A.R.T. feature from their BIOS settings. As it turns out, this HDD/SSD monitoring system can end up triggering 0x80070002 – 0x20016 error on certain PC configurations.
If this scenario is applicable, disabling the S.M.A.R.T. feature might allow you to perform the operation without encountering the error message again. Here’s a quick guide on disabling the S.M.A.R.T. feature:
- Power on your computer and press the Setup key during the initial booting sequence to enter your BIOS settings. The Setup key should be visible on-screen, but just in case you don’t find it, you can search online for the specific key according to your motherboard manufacturer.
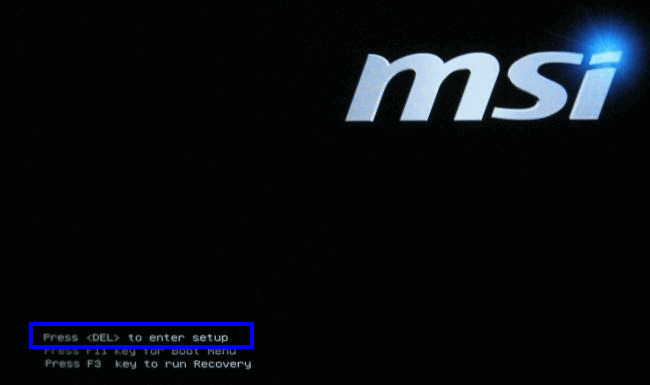
Press [key] to enter setup - Once you get inside your BIOS settings, go to the Main tab, so you get an overview of all your HDDs / SSDs. Then, select the HDD that you’re encountering the issue with and set SMART Monitoring to Disabled.
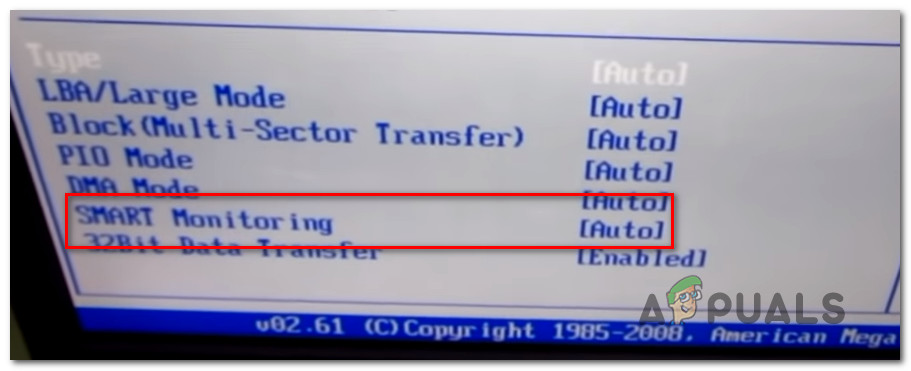
Disabling SMART Monitoring for the affected HDD - Save the changes and allow your computer to boot back up.
Once the next boot sequence is complete, recreate the same action that was previously triggering the 0x80070002 – 0x20016 error and see if the issue was resolved.


I would like to add that this problem can occur because of the language and region associated to the system.
I had this problem with a system and found out from the installation log files that there were a problem downloading the ULA files associated with US while my system was connected to an Canadian Internet provider. It appear that my system were configured for the US Region.
After changing my language to Canada French and region to Canada for the whole system (applying it to system and default accounts), the fresh installation process worked.