Fix: Error Code 0x80072746 on Windows 10
The error 0x80072746 is indicating that an existing connection was forcibly closed by the remote host. This error is typically encountered in the Windows Mail app when users try to sync the application in order to see the new e-mails. Typically, users see the message “We’re having a problem downloading messages. Make sure you have a connection and your account info is correct, and then try again” followed by the 0x80072746 error code.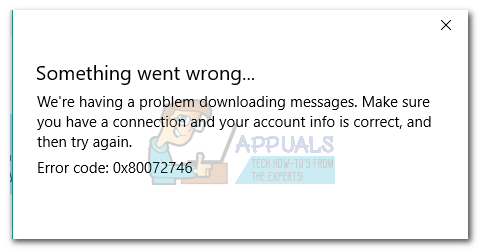 Some users have encountered this issue when using a VPN connection from Outlook (or similar email client) to Windows Mail. If the issue only happens on a VPN connection, it’s most likely because the server machine certificate binding to HTTPS is not applicable on the VPN server, or the server machine certificate is not installed on the VPN server.
If you’re not using a VPN connection to protect your privacy, there’s a high chance that the error code is caused by an external firewall. While the built-in firewall (Windows Defender Firewall) will not cause problems with the email app, BitDefender and AVG are known to cause this particular issue.
In the event that you’re currently struggling with this issue, start troubleshooting with the selection of potential fixes below. Please follow each method in order until you find a solution that works for you.
Note: If you’re only encountering this issue while using VPN / proxy, please refer to your service provider for specific troubleshooting guides.
Method 1: Set up your account manually
If you’re using an email client that is less popular (like TalkTalk, GoDaddy, or a company-provided email), the Windows client might not be familiar with the appropriate automatic settings. In this case, the solution would be to look up the manual settings for POP & IMAP and configure set up your email account manually in the Windows Mail client. Here’s a quick guide through the whole thing:
- Open your Windows Mail client, click the settings icon and choose Manage Accounts.

- In the Manage accounts tab, click on the account that has been causing problems and select Change Settings.

- In Account Settings, click on Remove this account from your device under Delete account and hit the Delete button again to confirm.

- Once the account has been successfully removed, go your email provider website and copy the manual settings for IMAP (or POP3 if IMAP is not available).

- Return to Windows Mail client, click the setting icon and go to Manage accounts > Add account.

- In the Add an account window, scroll all the way down and click on Advanced Setup.

- Choose Internet email and start adding your credentials and manual settings for IMAP that you previously fetched from your email provider.

- Once you’ve configured the manual settings, click Sign In and see if your email client is able to sync the remaining messages.

If you’re still unable to sync your emails and receive the same 0x80072746 error, move to Method 2.
Method 2: Allowing svchost.exe in your 3rd party Firewall
In case you’re using an external firewall, there’s a high chance that it’s responsible for the 0x80072746 error. To confirm this, temporarily disable your firewall, re-open the Windows Mail client and see whether you’re able to sync without the 0x80072746 error. If you are, it means that your external firewall is preventing the connection between your email client and the email server.
One of the ways you can remedy this problem is by allowing Svchost.exe in your firewall settings. As you probably imagine, this exact steps of doing this will be different depending on your firewall solution. However, most firewall solutions have an Allow / Exclusion list in their application settings. Once you locate it, hit the Add button, navigate to C:\Windows\system32 and allow svchost.exe.

Once Svchost is allowed in your Firewall settings, return to the Windows Mail client and see whether you’re able to sync your emails without the 0x80072746 error. If you’re still encountering the same issue, move to the next method.
Note: Allowing svchost.exe in your firewall will most likely fix the issue, but it can potentially open up your system to certain security exploits.
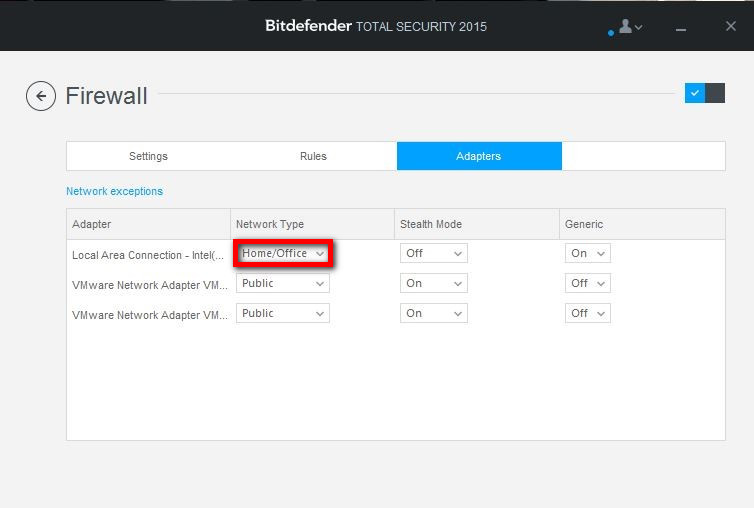
Method 3: Set Network Type to Trusted Network (BitDefender)
If you’re using BitDefender’s firewall, you can fix the issue and remove the 0x80072746 error by changing the Firewall / Adapter settings from Home / Office to Trusted.
To do this, open BitDefender, go to AV settings and click on the Adapters tab. Then, use the drop-down menu associated with your Local Area Connection to change the Network Type to Trusted.
 Once you set your Local Area Connection to Trusted, restart the Windows Mail client and see wither it’s now able to sync properly. If you aren’t using one of the two methods below.
Note: If you have a different external firewall, you might be able to find the equivalent settings for the ones in BitDefender.
Method 4: Using Windows Defender Firewall
Depending on your firewall provider, you might not be able to follow the latest two methods in order to stop your firewall from interrupting the connection between Windows mail and the email server. In this case, you can disable your 3rd party firewall entirely and use Windows Defender Firewall. Windows Defender‘s firewall will work perfectly with Mail and doesn’t require additional tweaks.
Note: If you don’t want to get rid of your AV security suite you can keep using it, just make sure you disable the firewall from it.
If you decide to disable your 3rd party firewall, keep in mind that you’ll likely need to re-add the email client in order for the sync to resume working. Here’s a step-by-step guide through the whole thing:
- Disable the external firewall or uninstall the security suite from your system.
- Open your Windows Mail client, click the settings icon and choose Manage Accounts.
- In the Manage accounts tab, click on the account that has been causing problems and select Change Settings.
- In Account Settings, click on Remove this account from your device under Delete account and hit the Delete button again to confirm.
- Return to Windows Mail client, click the setting icon and go to Manage accounts > Add account and re-add the respective email client.
- Enable Defender’s Firewall by opening a Run window (Windows key + R) and typing “wf.msc“. Hit Enter to open Windows Defender Firewall with Advanced Security.

- Scroll all the way down in the Overview tab and click on Windows Defender Firewall Properties. Then, go to Domain Profile and set the Firewall state to On. Finish it off by clicking Apply.
