Fix: DNS Server Unavailable
Internet is an integral part of our daily lives now. A ton of our daily tasks require smooth access to the internet. That is why, the DNS Server might be unavailable issue might be a huge problem for many of us. This problem can happen at any time. Your internet will be either slow or completely gone. The status of your internet might be set to “limited access”. If you try to access a certain website, you won’t be able to connect to it and you might see a message “can’t connect to website address” or a variation of it. If you go to the control panel and run the network troubleshooter or perform network diagnostics in any other form, you will most likely see this error DNS server might be unavailable.
There can be multiple reasons behind this issue. It might simply be your antivirus blocking the connection or corrupt DNS cache entries causing the problem. The root of the problem can be your DNS server as well, in which case changing the DNS server manually solves the issue. It can also be an issue with your router especially if none of your devices on the same network are facing this issue. So, as mentioned earlier, there are quite a few things that can cause your internet to act like this. But, worry not, this problem can easily be solved by the methods given below.
Tips
- If you have multiple anti-virus application installed then try to disable or uninstall one of them. Having multiple security applications can cause a conflict resulting in connection problems like these.
- Windows provide their own network troubleshooter that might be helpful for you. It’s not super effective but it is something that you should try before going deep into the technical methods mentioned below. Here are the steps for accessing the network troubleshooter
- Hold Windows key and press R
- Type control.exe /name Microsoft.Troubleshooting and press Enter
- Click Network and Internet
- This should initiate a network check for you. Wait for it to complete and see if it resolves the issue.
Method 1: Flush DNS and Request new IP
This should be the first thing on your list if you are having troubles with the internet. Simply flushing the DNS cache usually solve these issues. This is because the entries in the cache can get corrupted which might be causing all of these problems.
Follow the steps given below to flush the DNS and request a new IP
- Press Windows key once
- Type command prompt in the search bar
- Right click Command Prompt from the search results and select run as administrator
- Type ipconfig /flushdns and press Enter
- Type ipconfig /release and press Enter
- Type ipconfig /renew and press Enter
- Type exit and press Enter
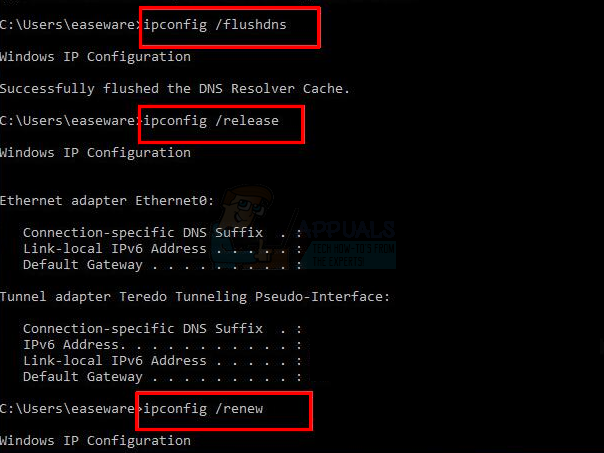
Once done, check the results. Your internet should be fine now.
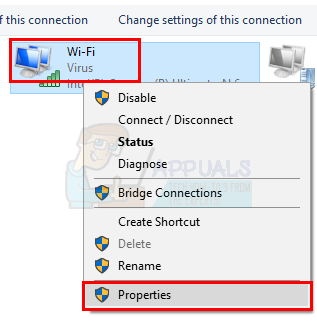
Method 2: Fix Network Connection Properties
There are a few things that you can do to your network connection properties that might solve the issue for you. Clearing the DNS services addresses from both IPv4 and IPv6 of the problematic network has resolved the issue for many users. So, here are the steps for doing this.
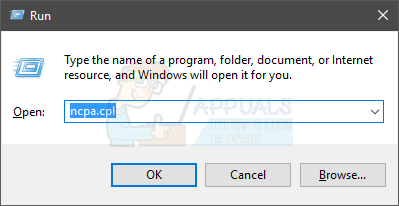
- Hold Windows key and press R
- Type ncpa.cpl and press Enter

- Locate and right click your network connection then select Properties
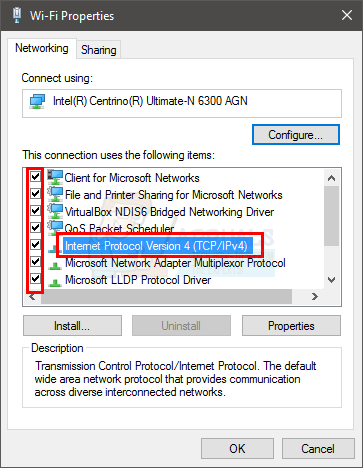
- Check all the boxes in the section This connection uses the following items:
- Double click Internet Protocol Version 4 (TCP/IPv4)
- Click Advanced
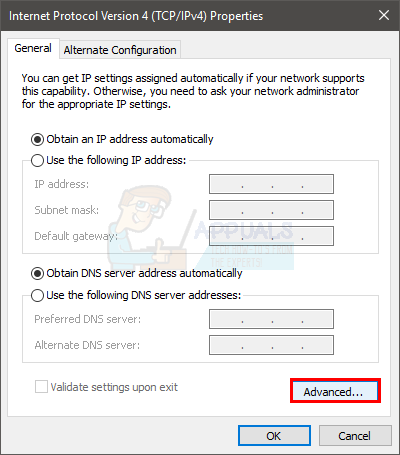
- Select the DNS tab
- If you see any entry in the DNS server addresses, in order of use section then select it and click Do it for all entries in that section.
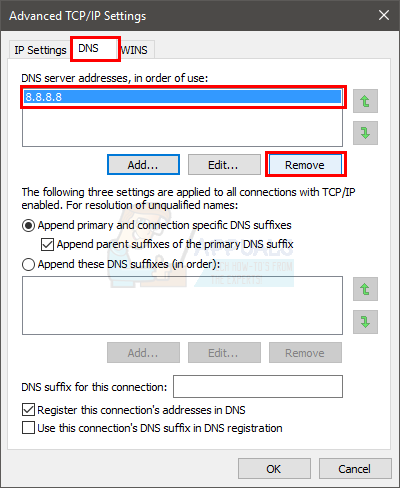
- Click Ok then select Ok again
- Double click Internet Protocol Version 6 (TCP/IPv6)
- Click Advanced
- Select the DNS tab
- If you see any entry in the DNS server addresses, in order of use section then select it and click Do it for all entries in that section.
- Click Ok then select Ok again
- Click Ok to exit the Properties window
Check your internet connectivity once you are done with the steps. If the problem isn’t resolved then move to the next method.
Method 3: Unplug Router
This is a simple yet a surprisingly effective way of resolving this issue. Simply unplug your router, wait a minute and plug in the router again. The problem should be resolved once the router restarts.
Method 4: Enter DNS Server Address Manually
Usually, your network settings are set to obtaining the DNS server automatically. Changing these DNS server addresses manually to Google servers or OpenDNS might resolve the issue for you.
Here’s how you can change the DNS server addresses manually
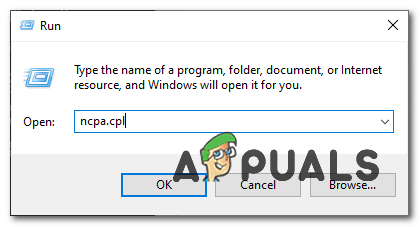
- Hold Windows key and press R
- Type ncpa.cpl and press Enter
- Locate and right click your network connection then select Properties

- Double click Internet Protocol Version 4 (TCP/IPv4) from the This connection uses the following items: section
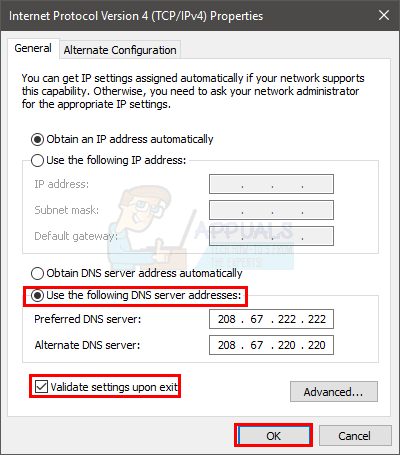
- Click the option Use the following DNS server addresses:
- Type 8.8.8.8 in the Preferred DNS server
- Type 8.8.4.4 in the Alternate DNS server
- Check the option validate settings upon exit
- Click ok. This will be for the Google DNS servers. If you want to enter the OpenDNS addresses then continue.

- Double click Internet Protocol Version 4 (TCP/IPv4) from the This connection uses the following items: section
- Click the option Use the following DNS server addresses:
- Type 208.67.222.222 in the Preferred DNS server
- Type 208.67.220.220 in the Alternate DNS server
- Check the option validate settings upon exit
- Click ok
- Click Ok to exit the Properties window
Manually entering the DNS server addresses should resolve the issue for you.
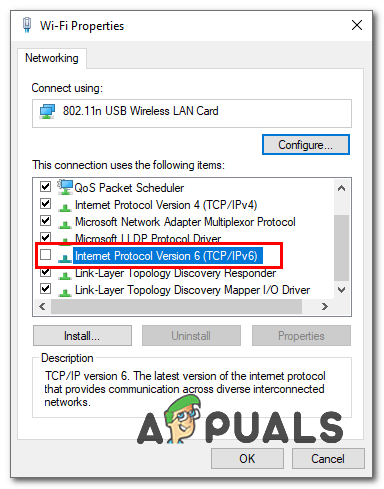
Method 5: Disabling IPv6
If none of the methods above helped you at all, IPv6 protocol can also be the culprit here, however, you can easily disable it. Follow these steps:-
- Press and hold the Windows key and press “R” to open the run program.
- Type “ncpa.cpl” and press enter.
Opening Network Adaptors - Right-click on the adaptor you are using and click “Properties”.
- Now uncheck the option named “Internet Protocol Version 6 (TCP/IPv6)”
Disabling IPv6 - Restart your router and your computer.
- Check to see if the issue persists.
Method 6: Keeping only one Anti-Virus
If you are using multiple antivirus and security programs we highly recommend you to uninstall all of them and keep only one security program that fits your needs and it is working well enough for you. Because having multiple anti-viruses on your computer can cause conflicts as some anti-viruses think it’s not a virus but some try to aggressively change the settings. So, therefore, uninstall all of the anti-viruses from your computer and install the one that fits you the best.