Fix: DISM error 87 on Windows
Several users are getting the “DISM Error: 87” when trying to run DISM on Windows 10 from an elevated Command Prompt. Although the issue is also encountered on previous Windows version, the frequency of reports on Windows 10 is much higher.
What is causing the DISM Error 87 on Windows 10?
We investigated this particular issue by looking at various user reports and the repair strategies that they used to get the issue resolved. Based on our findings, there are several fairly common scenarios that are known to trigger this particular error message:
- Command line isn’t typed correctly – This is the most common cause why this particular error occurs in the first place. Most of the time, it’s because of incorrect spaces before each ‘/’ character. In this case, the solution is as simple as using the correct spacing.
- Windows 10 bug – The apparition of this particular error when running the DISM scan is can also be the result of a Windows 10 bug that was resolved with the Fall Creators’s Update. If this scenario is applicable, the error can be resolved by installing every pending Windows update.
- The command is not run into an elevated prompt – Another common reason why this issue occurs is if the user tries to run the DISM command into a regular Command Prompt window. In this case, the solution is to run the correct command into an elevated Command Prompt.
- The machine is using the wrong version of DISM – This scenario is typically encountered in those situations where the user tries to apply a Windows 10 image using an older DISM version. In this case, the solution is to apply the Windows 10 image using the correct DISM version using the wofadk.sys filter driver.
If you’re currently looking for ways to resolve this particular error message, this article will provide you with a collection of verified troubleshooting steps. Down below, you have a collection of methods that other users in a similar situation have used to get the issue resolved.
For the best results, follow the methods below in the presented order until you encounter a fix that is effective in your particular situation. Let’s begin!
Method 1: Using the correct spacing
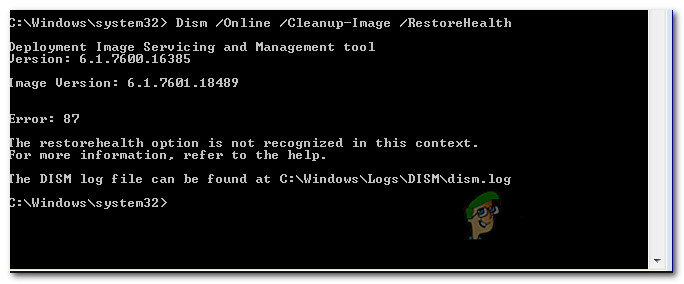
One of the most common reasons why this error occurs is due to incorrect spacing used when typing the DISM command. Typically, the error occurs due to incorrect spacing before each ‘/’. So instead of running a command like “DISM.exe/Online/Cleanup-image/Scanhealth“, you should ensure that you use one space before each ‘/’ character. The correct syntax of the command should be:
DISM.exe /Online /Cleanup-image /Scanhealth
DISM.exe /Online /Cleanup-image /Restorehealth
(depending on what you wish to accomplish)

Method 2: Using an elevated command prompt
Another common reason why this error message is encountered is when the user types the correct command but tries to run it into a regular Command Prompt. DISM commands (similar to SFC scans) need to be run into an elevated Command Prompt in order to work.
Here’s a quick guide on doing this:
- Press Windows key + R to open up a Run dialog box. Then, type “cmd” and press Ctrl + Shift + Enter to open up a Run dialog box.

Run dialog: cmd - When prompted by the UAC (User Account Control), choose Yes to grant administrative privileges.
- Inside the elevated Command Prompt, type your command and press Enter to run it.
If you’re still encountering the “DISM Error: 87“, move down to the next method below.
Method 3: Installing every pending Windows update
The “DISM Error: 87” can also be caused by a Windows 10 bug that was finally resolved in October 2017, with the launch of the Fall Creator’s Update. If you’re using a pirated copy of Windows 10 or you’re using a software that actively blocks Windows updates from installing, you’ll need to bring your system up to date in order to resolve the bug.
If this scenario is applicable and you’re using a legitimate Windows 10 license, eliminate the roadblock that is preventing the updates from installing and follow the instructions below:
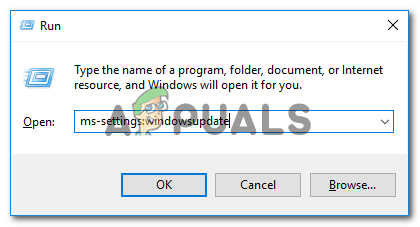
- Press Windows key + R to open up a Run dialog box. Then, type “ms-settings:windowsupdate” and press Enter to open the Windows Update screen of the Settings app.
Opening the Windows Update screen - Inside the Windows Update tab, click on Check for updates and follow the on-screen instructions to install every pending update.
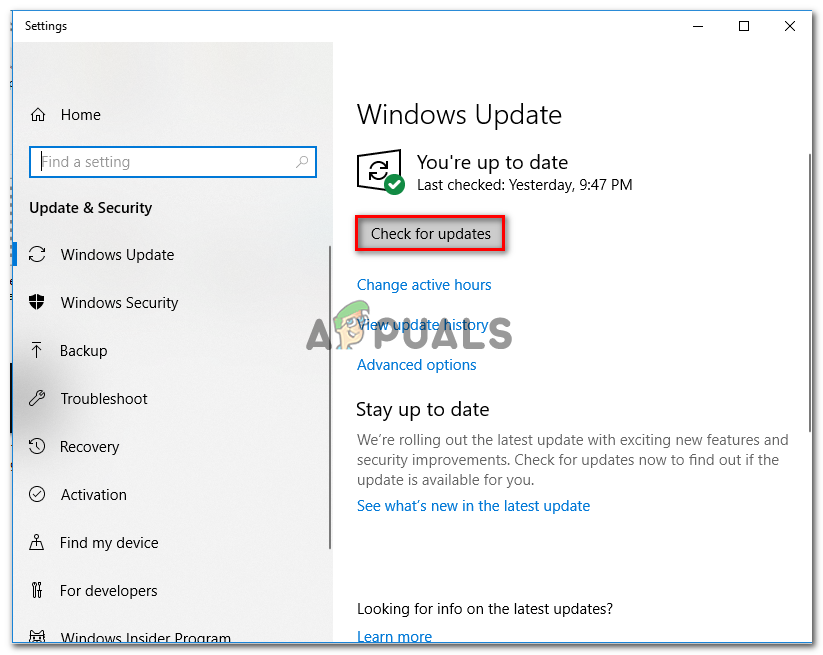
Installing every pending Windows update Note: You might be prompted to restart between update installation. If prompted, restart whenever prompted and remember to return to this same screen once the next startup is complete to proceed with the installation of the remaining files. Do so until all pending updates are installed.
- Once every pending update is installed, restart your computer and trigger another DISM scan once the next startup is complete.
In the event that you’re still encountering the “DISM Error: 87“, move down to the next method below.
Method 4: Using the Windows 10 version of DISM (if applicable)
If you’re encountering the issue when you try to apply a Windows 10 image the DISM /Apply-Image command on an earlier version of DISM (Windows 8.1 or earlier), the issue occurs because you’re using the wrong version of DISM.
Several users finding themselves in the exact same scenario have reported that the error was no longer occurring once they started using the Windows 10 version of DISM with the Wofadk.sys filter driver.
Keep in mind that this procedure will be different depending on the platform that you’re planning to use with Windows PE. If this scenario is applicable to your current situation, consult the following Microsoft resources for specific steps on dealing with the issue in your particular scenario:
If this method is not applicable to your current situation, move down to the final method below.
Method 5: Performing a repair install
If you performed the steps above to no avail, it’s very likely that some files belonging to DISM (or some different system files) are corrupted and need to be reinitiated. Since you can’t use DISM to scan and repair corrupted system files, you’ll need to use a different approach.
A clean install is always an option, but going this route will make you lose all your data (applications, personal files, personal settings, etc.)
A better approach would be to perform a repair install. This is a non-disruptive procedure that will allow you to reinitiate all Windows-related components without affecting your personal files and applications. This means that you’ll be spared from the trouble of reinstalling everything and reconfiguring your settings once the setup is complete. Follow this guide (here) to perform a repair install and repair the “DISM Error: 87“.


Resolved!! Thank you for this help!!