Fix: DISM Error 14098 ‘Component Store has been corrupted’
When you’re installing Windows 10 operating system, there are two images you’re using: boot.wim and install.wim. These are located in Windows 10 DVD or ISO file at location \Sources\. The purpose of boot.wim file is to boot your Windows machine to Windows PE (Windows Preinstallation Environment), and purpose of install.wim is to install complete Windows 10 operating system. By default there is no change in install.wim file, so IT administrators or end users need to do initial configuration.
Sometimes companies or end users need to install Windows 10 with installed proper drivers, enabled Windows features, or they need to add new packages or preconfigure Windows 10. Microsoft publishes a lot of deployment tools, some of them are integrated in Windows ADK (Windows Assessment and Deployment Kit) and some of them are indentpendent software solutions.
One of deployment tools is DISM (Deployment Image Servicing and Management). The DISM is command line tool which allow you to mount Windows image file (install.wim) and do image servicing including installing, uninstalling, configuring and Windows update. DISM is a part of Windows ADK (Windows Assessment and Deployment Kit) which you can download on Microsoft website at this link.
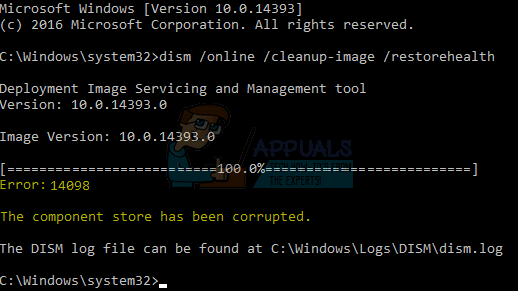
Sometimes during servicing Windows image, your image can be corrupted, and one of the errors end users are getting is Error: 14098, The component store has been corrupted, because of this issue several windows built in features stop working.
So why it’s corrupted? The main reason is problem with Windows update componentes, conflict between files or file corruption. Don’t worry, there is solution we prepared to solve your problem.
Reset Windows Update Components
To solve this issue, you need to reset Windows Update components and do steps as following:
- Press Windows Logo + X
- Choose Powershell (admin)
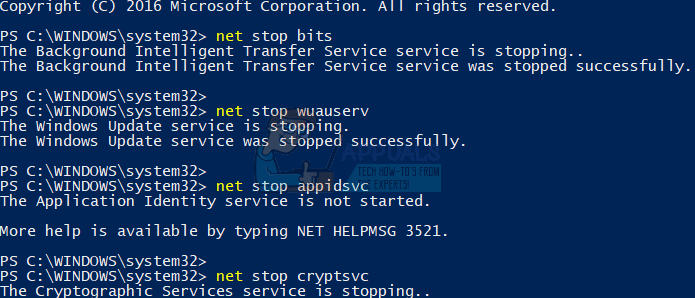
- Stop three services as following: BITS (Background Intelligent Transfer Service), Windows Update service and the Cryptographic service. You need to type the following commands at a Command Prompt.
net stop bits
net stop wuauserv
net stop appidsvc
net stop cryptsvc
- Delete qmgr*.dat file, which is created and used by BITS service. You need to type the following commands at a Command Prompt.
Del “%ALLUSERSPROFILE%\ApplicationData\Microsoft\Network\Downloader\qmgr*.dat”

- Restart your Windows and try to do image servicing by DISM
- In case steps you tried didn’t solve your problem, you need to do some aggressive mode of the fix, by renaming software distibution folders and resetting BITS service and Windows Update service to the default security description. For this task you need to open Command Prompt with Administrator privilege (step 1, step 2 and step 3).
Ren %systemroot%\SoftwareDistribution SoftwareDistribution.bak
Ren %systemroot%\system32\catroot2 catroot2.bak
sc.exe sdset bits
D:(A;;CCLCSWRPWPDTLOCRRC;;;SY)(A;;CCDCLCSWRPWPDTLOCRSDRCWDWO;;;BA)(A;;CCLCSWLOCRRC;;;AU)(A;;CCLCSWRPWPDTLOCRRC;;;PU)
sc.exe sdset wuauserv
D:(A;;CCLCSWRPWPDTLOCRRC;;;SY)(A;;CCDCLCSWRPWPDTLOCRSDRCWDWO;;;BA)(A;;CCLCSWLOCRRC;;;AU)(A;;CCLCSWRPWPDTLOCRRC;;;PU)
- At a Command Prompt, type the following command: cd /d %windir%\system32
- Reregister the BITS files and the Windows Update files. Type the following commands:
regsvr32.exe atl.dll
regsvr32.exe urlmon.dll
regsvr32.exe mshtml.dll
regsvr32.exe shdocvw.dll
regsvr32.exe browseui.dll
regsvr32.exe jscript.dll
regsvr32.exe vbscript.dll
regsvr32.exe scrrun.dll
regsvr32.exe msxml.dll
regsvr32.exe msxml3.dll
regsvr32.exe msxml6.dll
regsvr32.exe actxprxy.dll
regsvr32.exe softpub.dll
regsvr32.exe wintrust.dll
regsvr32.exe dssenh.dll
regsvr32.exe rsaenh.dll
regsvr32.exe gpkcsp.dll
regsvr32.exe sccbase.dll
regsvr32.exe slbcsp.dll
regsvr32.exe cryptdlg.dll
regsvr32.exe oleaut32.dll
regsvr32.exe ole32.dll
regsvr32.exe shell32.dll
regsvr32.exe initpki.dll
regsvr32.exe wuapi.dll
regsvr32.exe wuaueng.dll
regsvr32.exe wuaueng1.dll
regsvr32.exe wucltui.dll
regsvr32.exe wups.dll
regsvr32.exe wups2.dll
regsvr32.exe wuweb.dll
regsvr32.exe qmgr.dll
regsvr32.exe qmgrprxy.dll
regsvr32.exe wucltux.dll
regsvr32.exe muweb.dll
regsvr32.exe wuwebv.dll
- Reset Winsock
netsh winsock reset
- Restart the three services you stopped in the beginning of this procedure. Three services are BITS service, Windows Update service and Cryptographic serive. At a command prompt, type the following commands:
net start bits
net start wuauserv
net start appidsvc
net start cryptsvc
- Restart your computer
- Run DISM and try to do servicing of Windows 10 image.
If the solution listed above does not work, then repair dism following this guide 0x800f081f