Fix: Disk Defragmenter was Scheduled using Another Program
The error “disk defragmenter was scheduled using another program” occurs when Windows is unable to start the operation of defragmenting your drive because the operation is already scheduled/running by another application on your computer.
Disk Defragmenter is a utility in Microsoft Windows designed to increase the access speed of files by rearranging them to occupy contiguous storage locations. Defragmenting usually minimizes the time taken by the head to access the part of the disk.
Most of the times, even if you remove the application which took control of the service, the error message still appears. This is because it has changed the schedule of the disk defragmenter in the Task Scheduler and it probably didn’t revert the changes when it was uninstalled. This error has quick workarounds which fix the issue instantly. Follow the workarounds from the top and work your way down.
Solution 1: Click ‘Remove Settings’ on the Pop-up
Before we indulge in more tedious workarounds, you can try to give the control back to Windows by clicking the ‘Remove Settings’ button present on the pop-up. When you click this, Windows will try to regain control of the utility and try to set default values in the schedule.

Most of the time, clicking the button doesn’t do anything. In this case, restart your computer (multiple times if needed). Also, make sure that another application isn’t already running the Defragmentation utility in the background. Do note that you may require administrative privileges to perform this operation.
Solution 2: Disabling Disk Defragmenting Applications (Norton, CCleaner etc.)
There are many applications out there which perform ‘optimizing’ operations on your computer in order to make it fast and remove the disk access time. Defragmentation is only one of the few activities they perform to achieve this goal.
When third-party software defragments your disk, it basically takes control of the service and runs it at different time intervals according to their its schedule. If you have any application (such as CCleaner, Disk Optimizer etc.), make sure to either disable it or remove it completely.
One noticeable application was Norton Antivirus. It has a utility named as “Idle Time Optimizer”. It lets the antivirus to defragment your boot volume. It automatically schedules the optimization when it detects the installation of an application on your computer or when your computer is idle. We can try disabling it and see if this does the trick.
- Open Norton Antivirus and navigate to its Settings.
- Once in the settings, click on “Administrative settings” present underneath Detailed Settings.
- Uncheck/Turn the slider off for the process “Idle Time Optimizer”.

- Press Apply to save changes and exit. Restart your computer and check if the problem at hand got solved.
Solution 3: Enabling Disk Defragmenter using its application
Before we try to force the utility to run using the task scheduler, we can try setting its parameters and running it using its default application. Make sure that you are logged in as an administrator before proceeding.
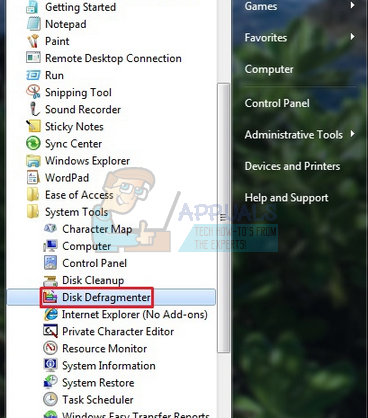
- Click the menu button on your keyboard and navigate to the Disk Defragmenter located in “System Tools”.

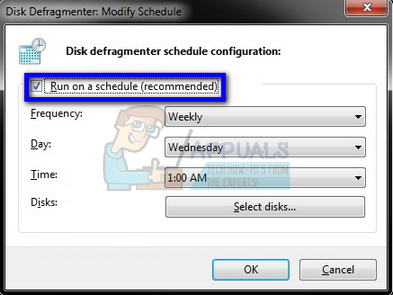
- If there is no schedule already set for the disk defragmenter, click on “Turn on schedule”.

- Now set the task scheduler according to your requirement. Try scheduling the task to in the near future (for example in 10 or 15 minutes), so you can check if it is running as required.

- Press OK to save changes and exit. Restart your computer and see if the problem at hand got solved.
Solution 4: Schedule the Utility Using Task Scheduler
The Task Scheduler enables you to automatically perform routine tasks on a chosen computer. The Task Scheduler does this by monitoring whatever criteria you choose to initiate the tasks (referred to as triggers) and then executing the tasks when the criteria you choose to initiate the tasks (referred to as triggers) and then executing the tasks when the criteria are met.
We will try changing the settings in task scheduler if you cannot defragment the disk manually and see if this solves the problem for us.
- Press Windows + R, type “taskschd.msc” in the dialogue box and press Enter.
- Navigate to the following file path using the left navigation pane:
Task Scheduler Library > Microsoft > Windows > Defrag
- Double-click on the task present at the window at the near middle of the screen to change the trigger settings. If the task is disabled, right-click it and select Enable.

- Click the tab “Triggers” and click on “New” to set a new time trigger for the application.

- Now you can set the schedule according to own need. You can set it to trigger on Daily, Weekly basis etc. After setting the trigger time, press OK to save changes and exit.

- Restart your computer and see if the problem at hand got fixed.