FIX: Destination Folder Access Denied in Windows
Many users have reported getting a “Destination Folder Access Denied” error window when they try to copy, move or delete a file or a folder either locally, or from a shared resource. It mostly occurs when there are multiple users configured on a system, and/or after you have updated your operating system and are trying to modify an existing file or folder on your old operating system. The situation can be different, but issue’s root cause is the ownership properties of the target file/folder.
The error may say “Destination Folder Access Denied“, but the problem mostly is with the properties of the source folder. Follow our guide to troubleshoot it.
Solution 1: Check Connectivity and Sharing
If you are getting this error when trying to access a shared folder, then the chances are that permissions for some reason on the other computer have messed up. The first method to diagnose this would be to test the connectivity and if it’s successful then check Share Permissions, else troubleshoot and make sure that both the systems are online. In this solution, i will refer the computer sharing the folder as the source computer, and the one accessing it as the host. First, get the local ip of the source computer, which you can obtain by typing ipconfig /all in the command prompt. To do this on the source computer, Hold the Windows Key and Press R. In the run dialog, type cmd and in the black command prompt window that opens up, type ipconfig /all.
Once you have the IP Address, go to the host computer where you’re getting this error and ping the source.
ping -t ip.address.here
If the replies are coming, then it is connected to the network, if not or if it times out, then it is not connected or if it is connected then the firewall may be blocking it, make sure that it is connected and ensure that firewall/antivirus and security softwares are disabled for this test.

Once the test has completed, and the ping is receiving replies, the next step is to check sharing permissions. To do this, go to the folder that is shared, Right click on it and choose Properties. Then click the Sharing/Share tab and choose Share.
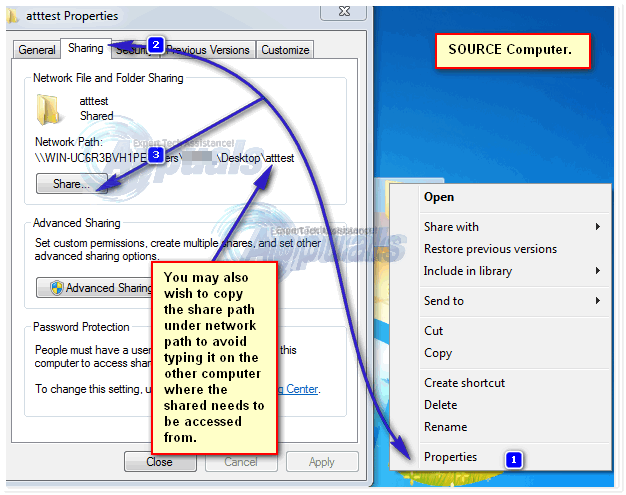
Now, in the Share properties, you will be able to check/add/delete users. Make sure the user trying to access this folder from the other computer is listed here, if not you can add it easily via command prompt.
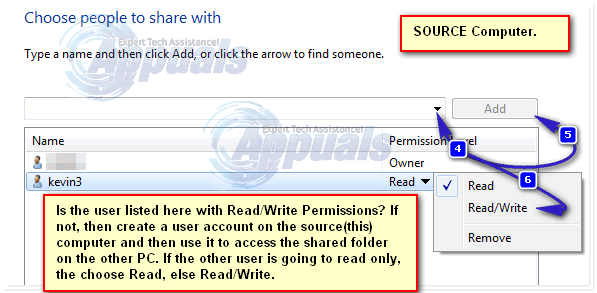
If adding a user, and trying the new credentials does not allow you access, then proceed to Solution 2.
Solution 2: Turn On Network Discovery & File Sharing
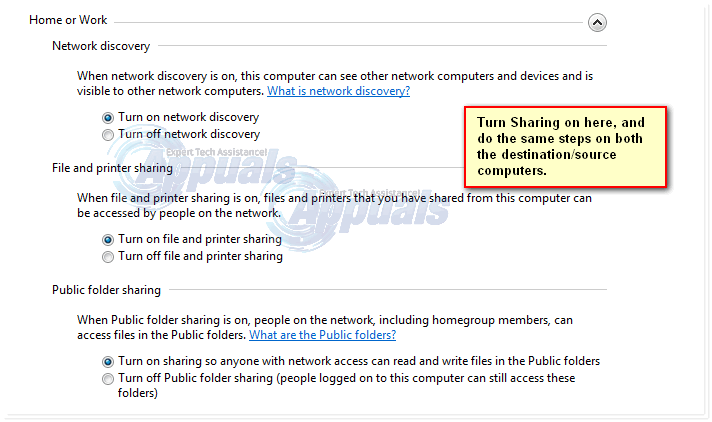
If you are copying/moving a file to or from a network location, and getting this error, make sure Network Discovery & File Sharing is enabled on both the systems (SOURCE / DESTINATION)
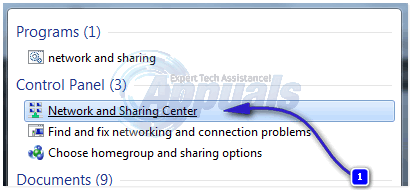
Press Windows key. In the search box type Network and Sharing Center. Press Enter to open it.
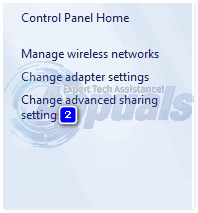
In the Network and Sharing Center’s window, click on Change advanced sharing settings in the left pane.
Click the arrow against Home or Work. Make sure Turn on network discovery and Turn on file and printer sharing radio buttons are selected. If not, select them and click OK.
Solution 3: Using Advanced Sharing
When accessing a source file shared on another computer we can use Advanced sharing, which provides more control over what is shared with whom and with what level of access.
Right click on the source file/folder, and click on Properties,
Click on the Sharing tab. Click Share, write the ComputerName\Username of the user who wants to modify it, and click Add. If the user’s already there, you can skip this.
Note: Click on Start Button, and the name on the upper right corner of the menu will be your User name. Press Windows key + Pause/Break to open your computer properties. Your Computer name will be given there.
Against the user name, under Permission Level, select Read/Write. Click Share > Done.
Now click on Advanced Sharing, click yes if the User Account Control (UAC) warning appears. Click on Share this folder to put a check on it.
Click on Permissions. Click Add.
Now type YourComputerName\YourUserName & click OK.
In the permissions panel below, make sure “Full Control” option is checked under the “Allow” column. Click Apply > OK.
Click Apply > OK in the Advanced Sharing window.
Close the properties.
Solution 4: Disabling User Account Control
UAC can also deny access to a folder. This can be re-enabled later, but must be done to test the issue.
Click on Start button. Type UAC in the search box. In the search results above, click Change User Access Control Settings. Drag the slider on the left to the bottom to “Never notify”. Click OK.
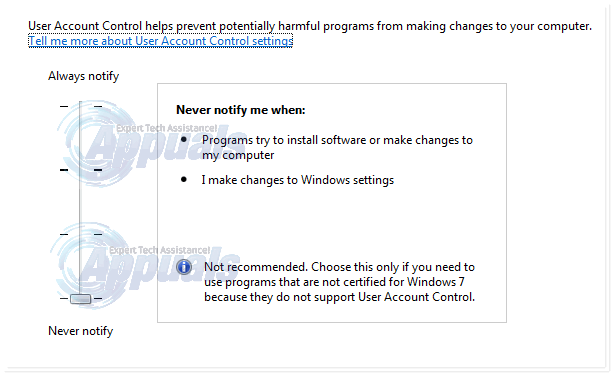
A UAC warning window will appear. Click Yes.
Restart your computer. Check if the issue persists. If yes, move on to the next solution. You can change the UAC settings to default (Second one on the slider) once you have completed this guide.
Solution 5: Transferring Ownership of the File/Folder
Unavailability of the ownership to your account can cause the system to restrict you to modify the file/folder in question. This usually occurs when the folder has been copied from a different computer, or is located on an external drive. To take ownership, log on with an administrator account
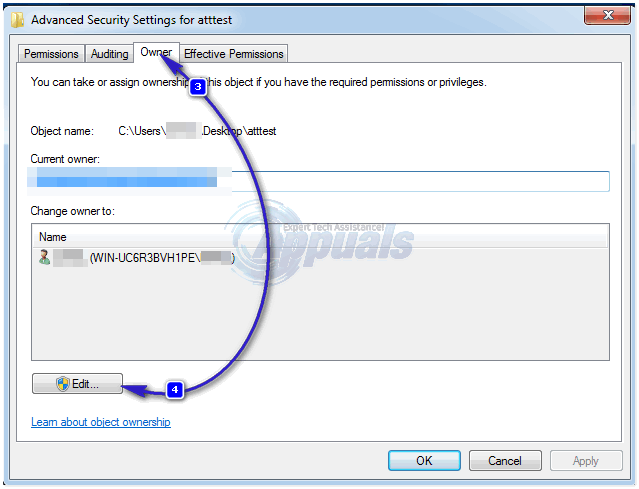
Right click on the target folder/file. From the pop up menu, click on Properties. In the folder’s Properties window, click on the Security tab. Click on Advanced button.

Click on Owner tab in the newly opened window. Click the Edit button in the bottom to change the owner.
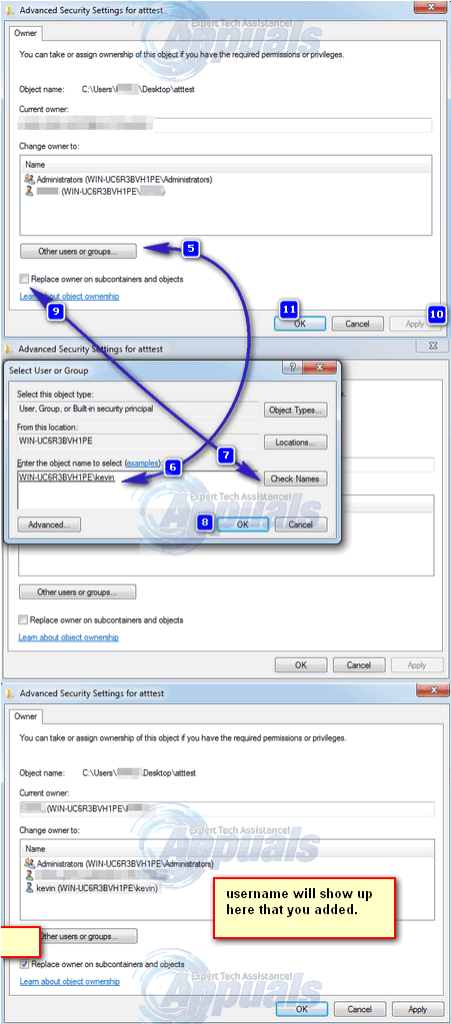
Click on Other users or groups. Now enter your account’s user name in the following format:
YourComputerName\YourUsername (or enter just the username and hit check names) if user is local, it will be automatically populated.
Note: Click on Start Button, and the name on the upper right corner of the menu will be your User name. Press Windows key + Pause/Break to open your computer properties. Your Computer name will be given there.
Click OK to add the user as owner. Click the Checkbox of Replace owner on subcontainers and objects to place a check on it. Click Apply > OK. Keep clicking OK to confirm and close the opened windows. Now try modifying the target folder. If not, you may have to repeat the process for each and every file and folder within the folder you intend to modify.
Solution 6: Setting Permissions for your User Account
Your account may not have the required permission to modify the target file/folder. To add permission, Right click on the target file/folder you want to modify (copy/move/delete/rename).
Click on Properties.
In the Properties window, Make sure the Read-only checkbox is clear. If not, clear it.
Click on the Security tab.
Click on the Edit button.
If your user name is already on the “Groups or user names” list, click on it.
Click on the box next to “Full control” to place a check on it. If it’s already checked, clear the check box, and then click on it again to place a check on it.
If your user name is not on the list, Click Add.
Now enter your account’s user name following the way mentioned in Solution 4.
Click Apply, and then OK.
Click Apply in the Properties window. If a window appears, select “Apply changes to this folder, subfolders and files”. Click OK and let the Windows complete its process.
Click OK to close the Properties window.
Now try modifying the target folder/file. Same results? Move on the next solution.
If the target folder is a sub folder, apply Solution 3, and then Solution 4 on the parent folder.
If the issue still persists, move on to the next method.
Solution 7: Through Command Prompt
In this solution, we will take ownership of the target file/folder and grant full access to he user through cmd.
Press Windows key. Type cmd.
Right click on cmd, and click Run as administrator.
Type the following code:
icacls “full path of file” /grant %username%:F /t
To find the full path of the target file or folder, open the folder.
Click on the address bar on the top. Copy the complete address that appears.
Write the full path with quotes. Press enter to run the code.
Once the command runs successfully, type the following code:
takeown /f “full path of file” /r
Similarly, write the full path of the target folder/file with quotes in the command above. Press Enter to execute the code. Now try modifying your target file/folder. Tell us which solution worked for you, or not for that matter. We will work out something else for you.