Fix: Desktop Icons Not Getting Saved
Some people like to rearrange the desktop icons in a familiar or easy to access arrangement. These settings should be saved and the icons should stay in the same order after every restart of the system. However, in some cases, the icons will be rearranged back to their default positions. This is, obviously, inconvenient for a lot of users since they want the desktop icons to be in a specific spot.
The reason behind this issue is related to permission problems. Whenever you change the settings of your desktop icons, these settings should be saved. But, if you don’t have the proper permissions, your registry key won’t be able to save these new settings. So, simply fixing the issue of permissions will most likely resolve this problem. This problem can also be cause by a malware. This isn’t very common but it definitely isn’t impossible. A lot of malwares are designed to change registry key values. So, it might be a malware that overwrites your registry key and, therefore, prevents your settings from getting saved.
- If your icons rearrange themselves even after a desktop refresh then there might be a problem with your settings. Make sure your desktop settings aren’t on “auto-arrange icons”. To do this, follow the steps given below
- Right click on an empty space on your Desktop
- Select View
- Make sure the options auto arrange and Align icons to grid option is unchecked
- Once done, check if the icons stay on their position or not.
- Another thing worth trying is to change your icon’s position and then refreshing your desktop. You can simply right click on an empty space on Desktop and select Refresh. A desktop refresh will lock your icons to their positions.
- This didn’t work for a lot of users but a few of the users solved their issue by switching from uTorrent to Bittorrent. So, if you are using uTorrent then try to switch to some other torrent client and check if that resolves the issue.
Method 1: Change the Registry Key Values
This solution will work if the registry keys were changed because of a malware. Manually changing the data of some registry keys (mentioned below) and deleting a certain registry key branch will most likely resolve the issue. Follow the steps given below to apply this solution
- Hold Windows key and press R
- Type regedit and press Enter

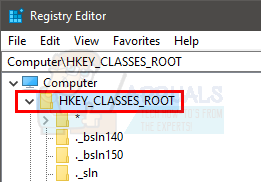
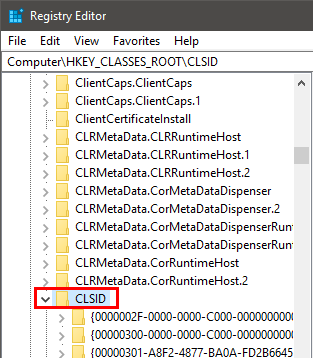
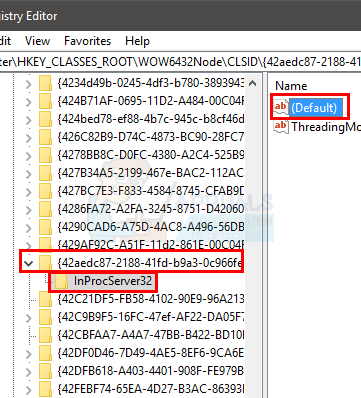
- Now, navigate to this location in the registry key HKEY_CLASSES_ROOT\CLSID\{42aedc87-2188-41fd-b9a3-0c966feabec1}\InProcServer32. If you have no idea how to navigate to this location then follow the steps given below
- Locate and double click HKEY_CLASSES_ROOT from the left pane
- Locate and double click CLSID from the left pane
- Locate and double click {42aedc87-2188-41fd-b9a3-0c966feabec1} from the left pane
- Locate and select InProcServer32 from the left pane
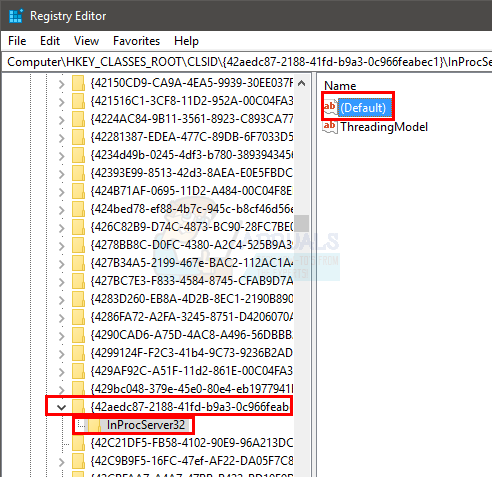
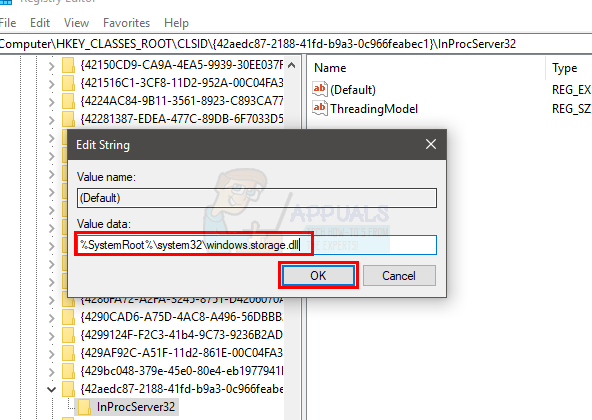
- Double click Default from the right pane
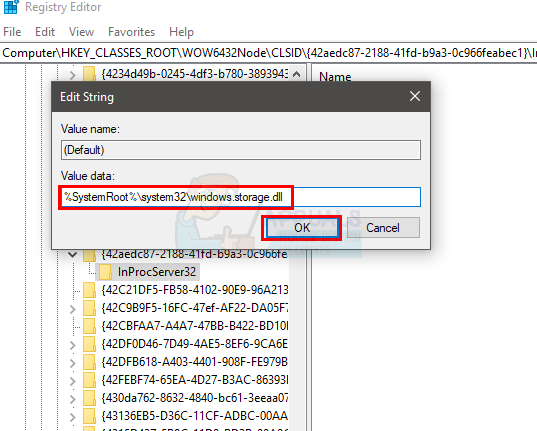
- A new window will open. Type %SystemRoot%\system32\windows.storage.dll in the value data section and click Ok
- If you see an error related to permission issues or that you don’t have permission to change the value of these keys then do the following
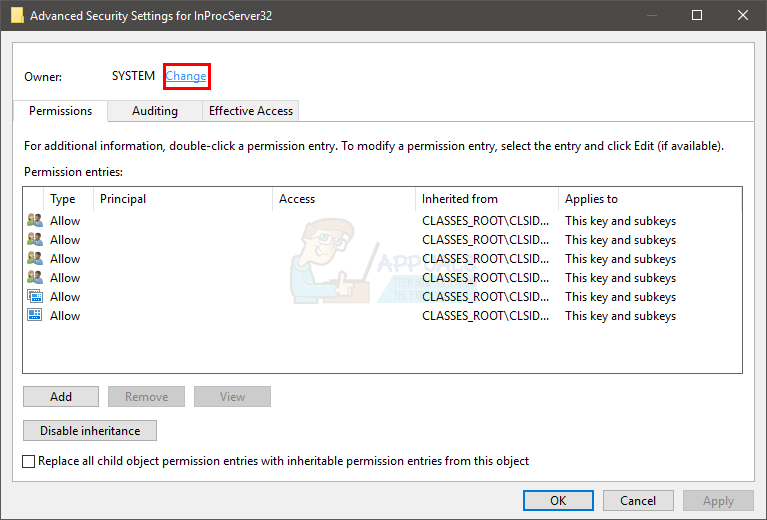
- Right click InProcServer32 from the left pane and select permissions

- Click Advanced

- Click Change in front of the Owner section
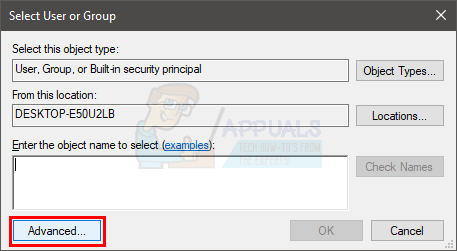
- Click Advanced
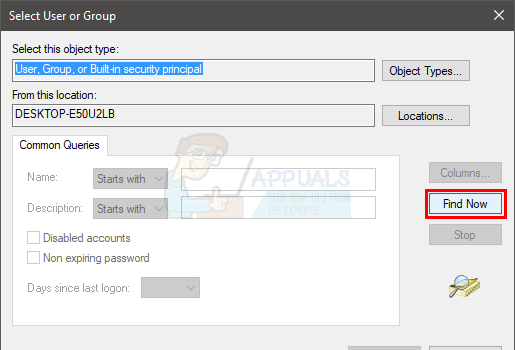
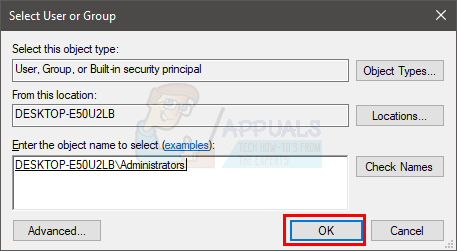
- Click Find Now
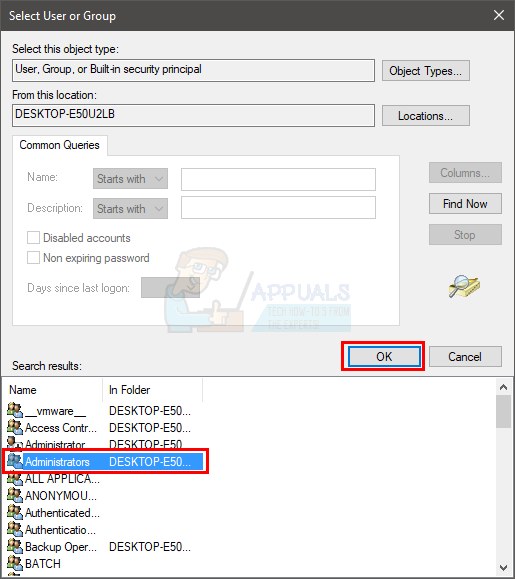
- Select Administrators
- Click Ok
- Click Ok again
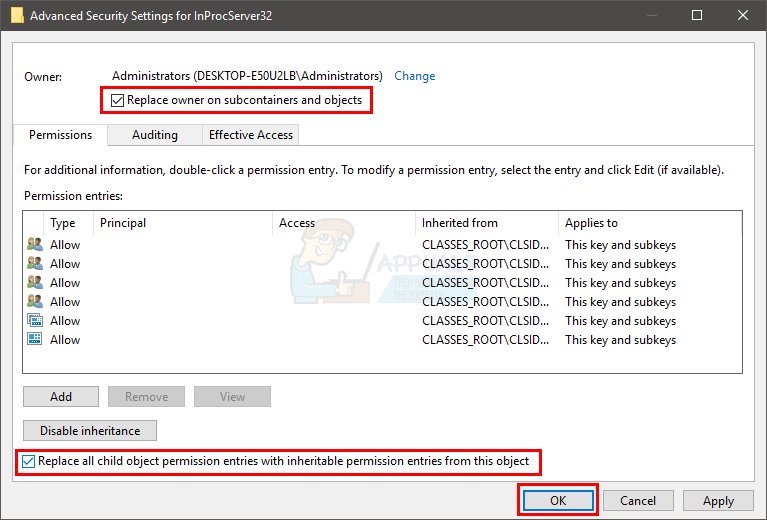
- Check the option Replace owner on sub containers and objects
- Check the option Replace all child object permission entries with inheritable permission entries from this object
- Click Ok
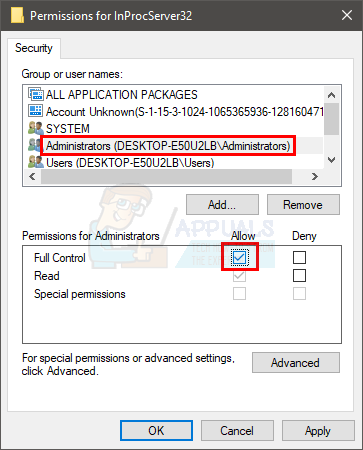
- You should be back to permission for InProcServer32 window. Select Administrators from the group or usernames section
- Check Allow option in front of Full Control
- Click Ok
- Now perform steps 4-5
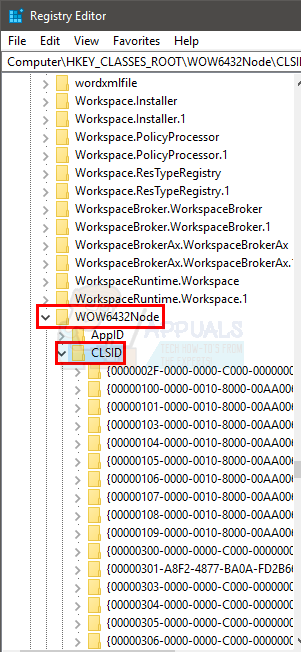
- Now, you should navigate to this location HKEY_CLASSES_ROOT\Wow6432Node\CLSID\{42aedc87-2188-41fd-b9a3-0c966feabec1}\InProcServer32 in the registry editor. Follow the steps given below to navigate to this location
- Locate and double click HKEY_CLASSES_ROOT from the left pane
- Locate and double click Wow6432Node from the left pane
- Locate and double click CLSID from the left pane
- Locate and double click {42aedc87-2188-41fd-b9a3-0c966feabec1} from the left pane
- Locate and select InProcServer32 from the left pane
- Double click Default from the right pane
- A new window will open. Type %SystemRoot%\system32\windows.storage.dll in the value data section and click Ok
- If you see an error related to permission issues or that you don’t have permission to change the value of these keys then do the following
- Right click InProcServer32 from the left pane and select permissions
- Click Advanced
- Click Change in front of the Owner section
- Click Advanced
- Click Find Now
- Select Administrators
- Click Ok
- Click Ok again
- Check the option Replace owner on sub containers and objects
- Check the option Replace all child object permission entries with inheritable permission entries from this object
- Click Ok
- You should be back to permission for InProcServer32 window. Select Administrators from the group or usernames section
- Check Allow option in front of Full Control
- Click Ok
- Now perform steps 8-9
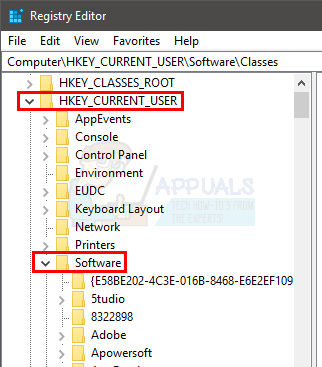
- Once you are done, navigate to this location in the registry editor HKEY_CURRENT_USER\Software\Classes\CLSID\{42aedc87-2188-41fd-b9a3-0c966feabec1}. Follow the steps given below if you aren’t sure how to navigate to this location
- Locate and double click HKEY_CURRENT_USER from the left pane
- Locate and double click Software from the left pane
- Locate and double click Classes from the left pane
- Locate and double click CLSID from the left pane

- Locate and right click {42aedc87-2188-41fd-b9a3-0c966feabec1} from the left pane
- Select delete and confirm any additional prompts
Close the registry editor once you have deleted the registry key and you should be good to go.
Method 2: Fix Registry Key Permissions
This solution will work for the people who are seeing this problem because of permission issues. As mentioned in the beginning of this article, the most likely cause of this problem is the lack of proper permissions that prevent your registry keys from getting updated. So, follow the steps given below to fix the permissions issue.
- Hold Windows key and press R
- Type regedit and press Enter
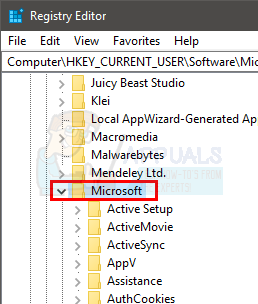
- Now, navigate to this location in the registry key HKEY_CURRENT_USER\Software\Microsoft\Windows\Shell\Bags\1\Desktop. If you have no idea how to navigate to this location then follow the steps given below
- Locate and double click HKEY_CURRENT_USER from the left pane
- Locate and double click Software from the left pane
- Locate and double click Microsoft from the left pane
- Locate and select Windows from the left pane
- Locate and select Shell from the left pane
- Locate and select Bags from the left pane
- Locate and select 1 from the left pane
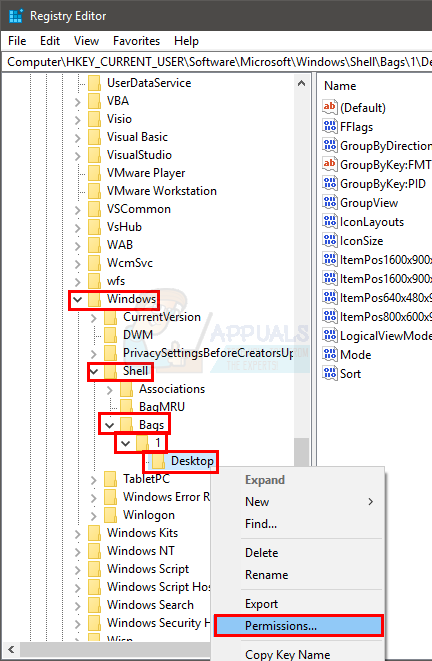
- Right click Desktop from the left pane and select permissions
- Click Advanced
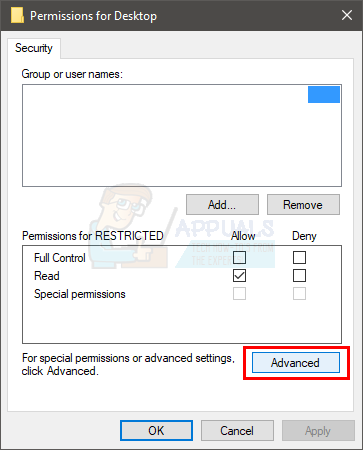
- Look at the entries in permission entries Select any entry that has Deny in its Type column and click Remove
- Repeat the previous step for all the Deny entries in the permission entries section
- Now, make sure your account has Full Control Locate the account from the permission entries section. If your account doesn’t have Full Control written in Access column, select your account entry and click Edit
- Check the box Full Control from the newly opened window
- Click Ok
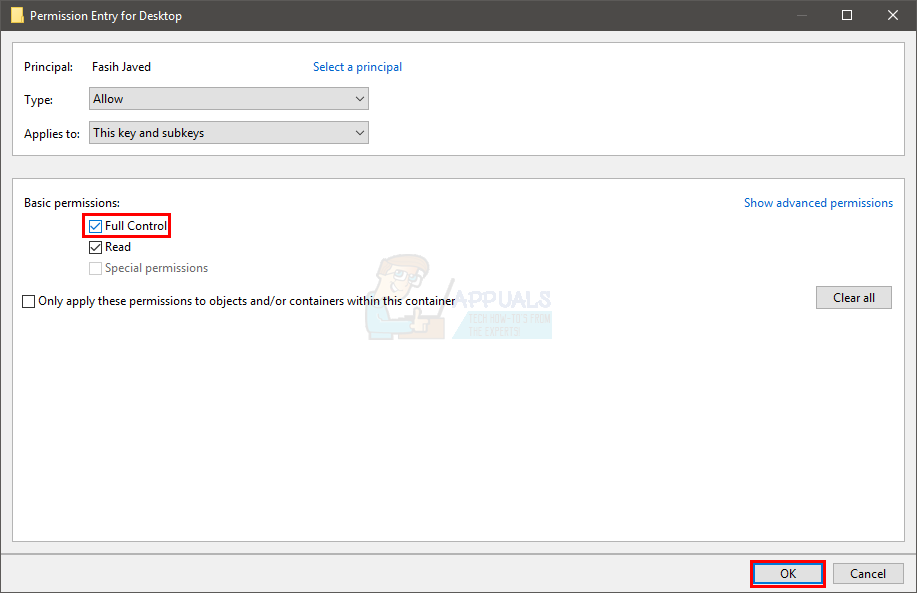
- Click Ok and then select Ok again
Once done, you should be good to go. Change the icon settings and it will retain even after a restart.
Method 3: Delete Bags and BagMRU folders
Deleting Bags and BagMRU folders from the registry editor has helped a lot of users in solving this issue. Deleting these folder will bring your icons to default settings and it will most likely resolve the issue for you.
Here are the steps for locating and deleting Bags and BagMRU folders.
- Hold Windows key and press R
- Type regedit and press Enter
- Now, navigate to this location in the registry key HKEY_CURRENT_USER\Software\Microsoft\Windows\Shell. If you have no idea how to navigate to this location then follow the steps given below
- Locate and double click HKEY_CURRENT_USER from the left pane
- Locate and double click Software from the left pane
- Locate and double click Microsoft from the left pane
- Locate and select Windows from the left pane
- Locate and double click Shell from the left pane
- You should be able to see multiple folders. There should be four folders under Shell. These four folders will be Associations, AttachmentExecute, BagMRU, and Bags
- Locate and right click BagMRU. Select Delete and confirm any additional prompts. Click yes if it asks whether you want to delete the sub-keys or not.
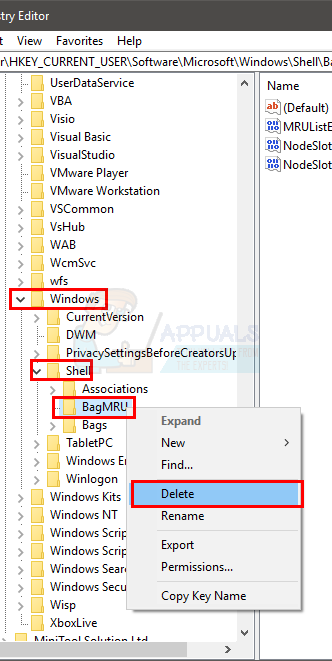
- Locate and right click Bags. Select Delete and confirm any additional prompts. Click yes if it asks whether you want to delete the sub-keys or not.
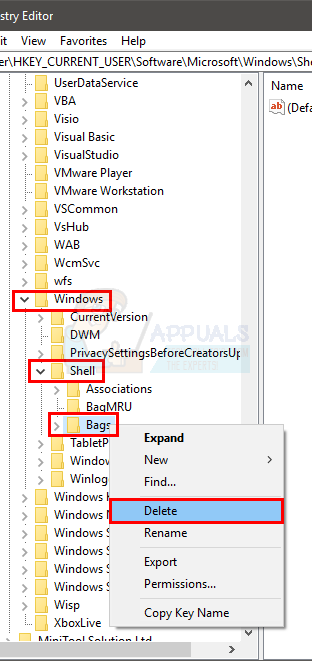
- Right click Shell folder from the left pane
- Select New then select Key
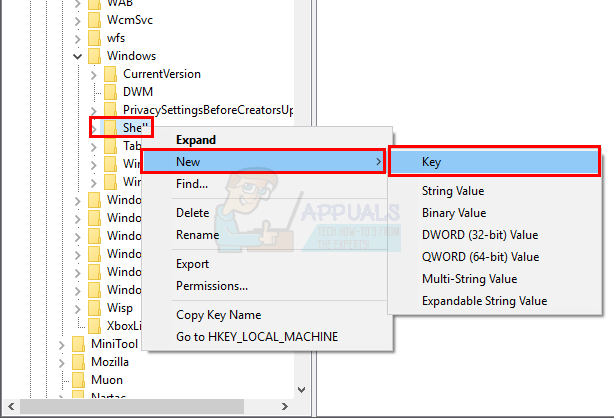
- Name this key BagMRU and press Enter
- Right click Shell folder again
- Select New then select Key
- Name this key Bags and press Enter
- Close the registry editor
You should be good to go now. Refresh your desktop and rearrange your icons. Your icons should stay at the same place now.
Method 4: ESET Antivirus
This issue can also be caused by the ESET Antivirus. The problem occurs whenever the antivirus removes a malware/virus from your system. Basically, this bug in the antivirus corrupts your icon and folder (registry) settings after successfully removing a Trojan. Once the settings are corrupted, you cannot fix these settings.
The good thing is that ESET has fixed the issue in their latest updates. So, if you have this antivirus and you are seeing this issue then simply update the antivirus reinstall the program by downloading the latest installer from their website.


fantastic, never heard of this trick with the registry. solved my problem easily.
many thanks!