Fix: DCOM Sever Process Launcher High Usage
DCOM is a set of Microsoft concepts and program interfaces in which client program objects can request services from server program objects on other computers in a network. It is a very common process in Windows operating system and the majority of the computers have this process running.
Keeping in mind the fact that DCOM is a popular process, many users reported that this process consumed huge resources sometimes. During this time, the computer was almost unusable and this process was the main culprit. We have listed down a number of solutions to help fix this problem. Start from the top and work your way down.
Solution 1: Disconnecting external devices
Many users reported that disconnecting external devices from the computer solved their case. Whenever you connect external devices (Smartphones, Tablets, Xbox, Playstation, etc.), they consume resources on the computer in order to sync with your machine. Furthermore, there are also other processes going on in the background. Disconnect all externally connected devices from your computer and reboot.
Solution 2: Making a new Account
You can ask the administrator to make you a new account or if you access the administrative account, you make a new one yourself. We can guide you on how to make a new account so all the account settings in the new will be the same as your current account. This way you won’t feel any difference and also fix the problem.
- First to boot your computer in safe mode
- Open an administrator account. Type Settings in the start menu dialogue box and click on Accounts.

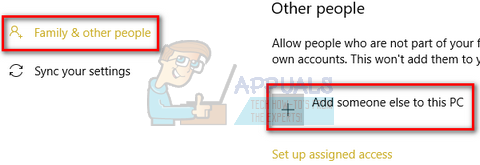
- Now click “Family and other users” options present at the left side of the window.
- Once inside select the menu, select “Add someone else to this PC”.
- Now Windows will guide you through its wizard on how to create a new account. When the new window comes forth, click “I don’t have this person’s sign-in information”.
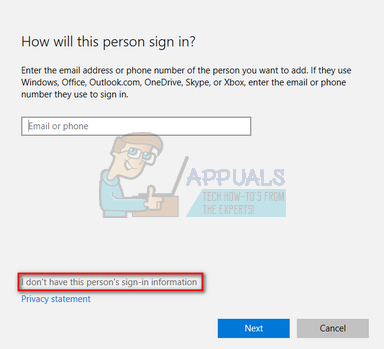
- Now select the option “Add a user without Microsoft”. Windows will now prompt you to make a new Microsoft account and display a window like this.
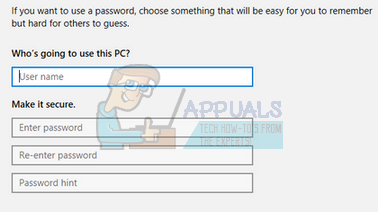
- Enter all the details and chose an easy password which you can remember.
- Now navigate to Settings > Accounts > Your Account.
- At the space beneath your account picture, you will see an option that says “Sign in with local account instead”.
- Enter your current password when the prompt comes and click Next.
- Now enter username and password for your local account and click on “Sign out and finish”.
- Now you can easily switch to a new local account, and move all your personal files to it without any barriers.
- After switching to the local account, check if the problem still persists. If it doesn’t and everything is going smooth, proceed with the instructions.
- Now navigate to Settings > Accounts > Your Account and select the option “Sign in with a Microsoft Account instead”.

- Enter your username and password and click Sign in.

- Now you can safely delete your old account and continue using this one.
If somehow you cannot access account settings, we can try making a new account using the command prompt. Do note that you still require administrator privileges
- Press Windows + S to launch the search bar. Type “command prompt” in the dialogue box, right-click on the result and select “Run as administrator”.
- Once in the command prompt, execute the following command:
net user /add [username] [password]
- This will create a new user account on your computer. Now we will grant administrator privileges to this account.
new localgroup administrators [username] /add
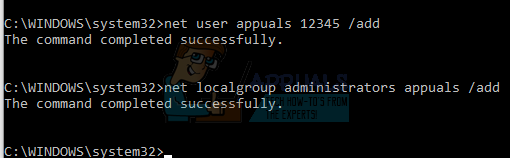
- These commands will make a local administrator account instantly. Reboot your PC and log into the new account.
Hopefully, everything will be working fine. If not, follow the steps below.
- Press Windows + R to launch the Run application. Type “msconfig” in the dialogue box and press Enter.
- Once in the system configuration, select “Selective Startup” from the list of options in the General tab.
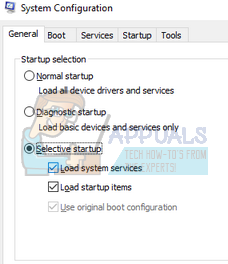
- Now navigate to the Boot tab and select “Safe boot” and “Network” underneath it. Press Apply to save changes and exit. Now reboot your computer to boot it in safe boot.

- Now repeat the process of creating a new account using the command prompt like we did in the earlier steps.
- Now open the system configuration again and undo all the changes we did in steps 2 and 3. Reboot your computer and log into the new account.
- Hopefully, the problem will be solved. You can easily transfer all your previous data using the steps mentioned at the start of this solution.
Solution 3: Disabling Third-Party applications
There are many reports when applications such as Google Chrome, Dropbox, Xbox, etc. cause problems in disk usage. Each computer configuration is different hence we cannot diagnose exactly which application is causing trouble.
Make an educated guess, disable each of these applications properly and check your CPU/Disk usage. Give more priority to applications that require frequent internet access for sync purposes. Here are some applications and the fixes:
- If you have Google Chrome, Mozilla or Opera, uninstall it and check your usage.
- Disable Dropbox properly and disable the application from launching on the startup.
- Turn off the Xbox application.
- McAfee Security Centre’s Firewall is also known to cause this issue so remember to disable it or uninstall completely.
Solution 4: Disabling Live-Tiles
Another feature of Windows 10 is the Live Tiles. These are tiles present on your start menu which pops up whenever you click the Windows button or icon. These tiles also constantly sync with other servers to provide you latest updates and news. We also found these to be a problem. After disabling these, many users reported that their problem was completely fixed. We can disable these for you as well. If it doesn’t make a difference, you can always revert the changes later on.

- Before uninstalling the applications, we can remove the live tiles from your start menu and check if this fixes anything.
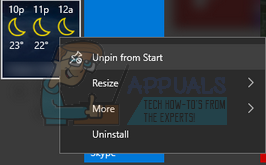
- Press the Windows key or click the Windows icon present at the bottom left side of the screen.
- and select “Unpin from Start”. This action will instantly remove the live tiles Right-click on the tile from your start menu. Do this for all the entries and reboot your computer.
If removing the live tiles don’t fix anything, we can try uninstalling the applications and check if the problem gets fixed. You can always reinstall the application using a single command line in the command prompt.
Refer to the “windows store cache may be damaged” article and browse down to the very last solution (solution 8). You will find a detailed explanation of how to uninstall built-in applications and ho to reinstall them.
Reboot your computer and check again if the problem persists. Also, try disconnecting from the network and if the usage stabilizes, try connecting to another network to check if the problem lies with the network.
Solution 5: Checking through Process Explorer
Process Explorer is a tool by Microsoft that shows you information regarding which DLL’s have been opened/loaded along with all the details about which parent process started it. It gives you information regarding the resources consumed, CPU usage, etc. We can try checking for processes using DCOM and troubleshoot why they are using it.
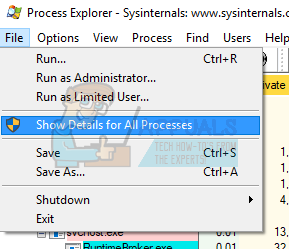
- Download Process Explorer from the official Microsoft website.
- Once you have unzipped the package in an accessible directory, launch it. You will be greeted by a number of processes along with their details. Click on “File” at the top left and select “Show Details for All Processes”. You might require administrator privileges to perform this operation
- Now locate the process “svchost.exe”, right-click it and select Properties. Navigate to the Image tab. Here you will see the culprit i.e. which process is using the executable.

- Do a little digging and locate the application/service. You can easily disable as service using “services.msc” or uninstall an application.
- One process which starts with the thread “dll!DabSessionStateChanged+0xe4..” is known to cause problems. You can disable this process using the process explorer directly. It is linked to System Events Broker.
Note: If the above fixes were unable to rectify your situation, try to revert to a previous restore point or perform a complete reset of the system.