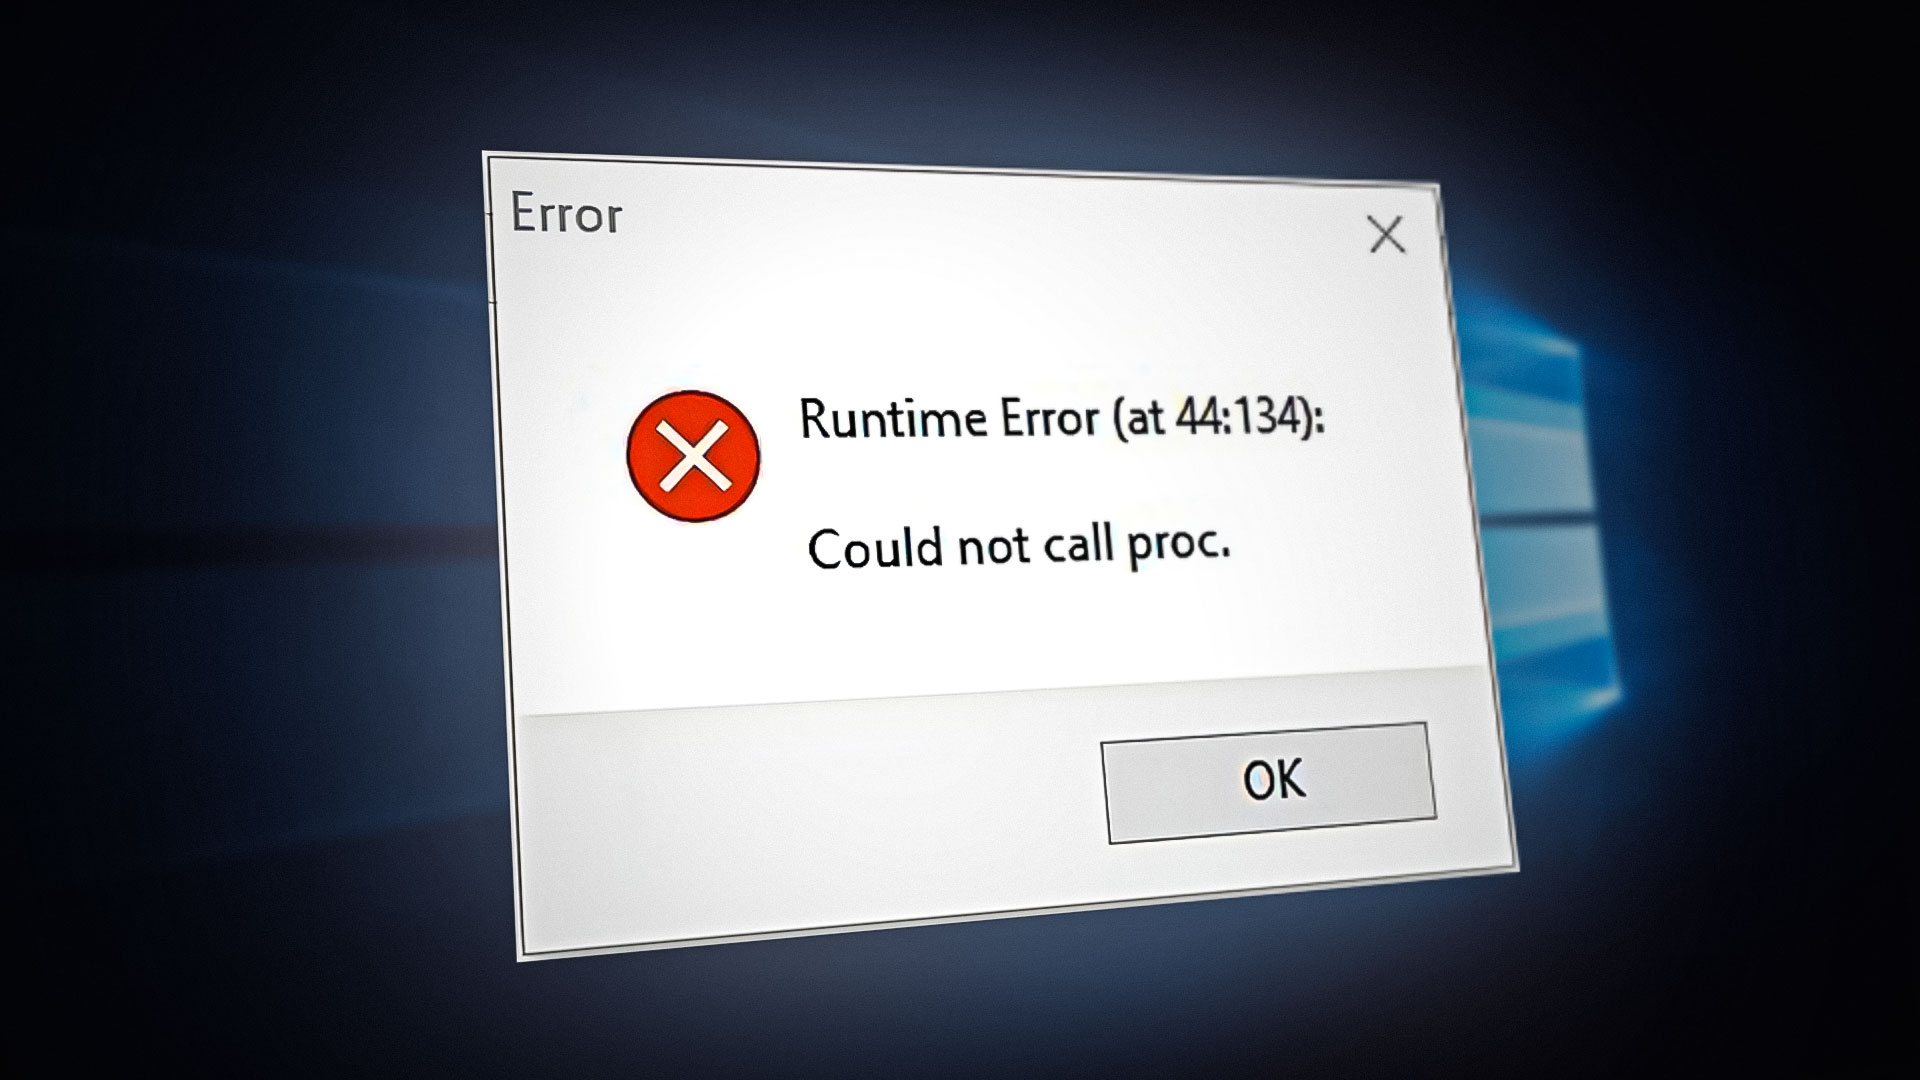
How to Fix “Could Not Call Proc” Error When Installing Programs?
The “Could not call proc” error occurs when an installer is unable to execute a necessary function, preventing the program from installing properly. This issue is often related to a missing or incorrectly set up %TEMP% folder, which certain installers depend on to temporarily store data during installation. If this folder is inaccessible or has been moved from its default location, the installation may fail with this error.
Another common cause is antivirus interference, where security programs like Kaspersky Endpoint Protection or Windows Defender mistakenly block the installer from running its scripts. Some users have also encountered this error due to corrupted system files, which obstruct Windows from executing essential installation processes.
Additionally, certain software, such as Malwarebytes, PDFCreator, and Vensim PLE, have been known to trigger this error due to internal script execution failures.
1. Restore the %TEMP% Folder to Its Default Location
The %TEMP% folder is crucial during the installation process, allowing software to extract and store temporary files. If this folder is missing, misconfigured, or lacks proper permissions, the installer cannot perform essential operations, leading to the error.
In some scenarios, users might accidentally change environment variables, relocate system folders, or use disk cleanup tools that delete the %TEMP% directory. Restoring this folder to its default location ensures the installer has a functional workspace to manage temporary files, enabling the installation to proceed without issues.
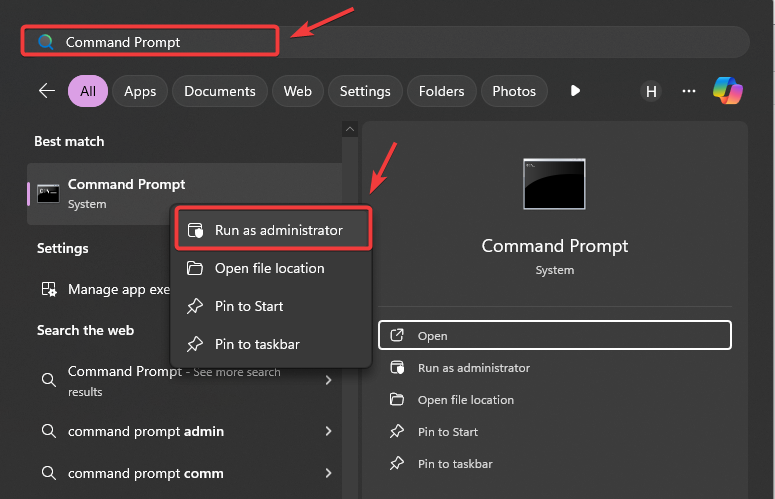
- Click the Start Menu and type Command Prompt.
- Right-click on Command Prompt and select Run as administrator.
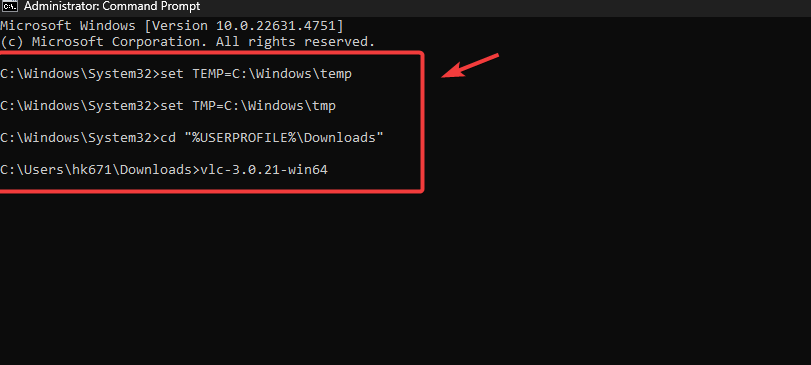
- In the Command Prompt window, enter the following commands to restore the Temp folder:
set TEMP=C:\Windows\temp
set TMP=C:\Windows\tmp
cd "%USERPROFILE%\Downloads"
- Next, open the Downloads folder in Windows Explorer and locate the setup file you want to install.
- Right-click the setup file, select Rename, and copy the full name of the file.
- Press Enter to run the setup file. This should resolve the issue.
2. Repair Microsoft Visual C++ Runtime Libraries
Microsoft Visual C++ runtime libraries are vital for running many applications and installers developed using the Microsoft Visual C++ framework. These libraries provide the necessary functions and dependencies required by the software.
If these runtime libraries are damaged, the installation will likely fail, resulting in this error message. Therefore, we can try repairing the Microsoft Visual C++ runtime libraries to ensure they are not damaged.
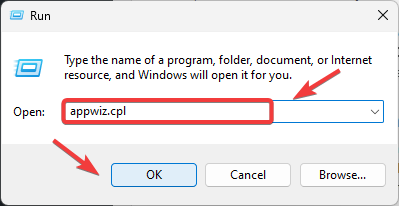
- Use the Win + R keys on your keyboard to open the Run dialog box.
- Type appwiz.cpl in the input field and click OK to open the Control Panel Programs and Features.
- Find Microsoft Visual C++ Libraries, double-click on them, and select Repair.
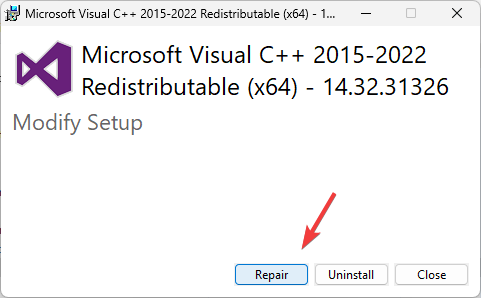
- Repeat these steps for all remaining Microsoft runtime libraries, then check if the error is resolved.
3. Reinstall Microsoft Visual C++ Runtime Libraries
If the error persists, we can proceed with reinstalling the Microsoft Visual C++ runtime libraries. This will ensure that all necessary components required for executing processes are properly installed and functioning. Since repairing the runtime libraries did not resolve the issue, reinstalling them may help.
- Click the Start Menu and type Control Panel in the search bar.
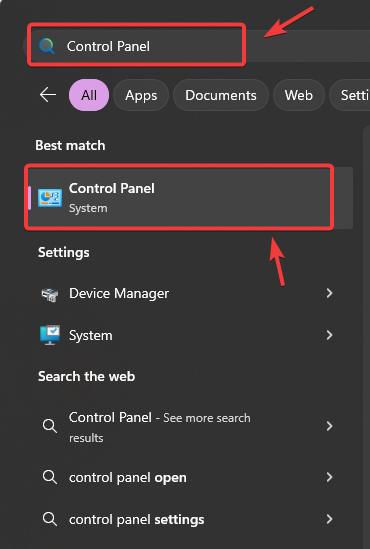
- Open the Control Panel, then navigate to Programs > Programs and Features.
- Locate Microsoft Visual C++ in the list, right-click on it, and select Uninstall.
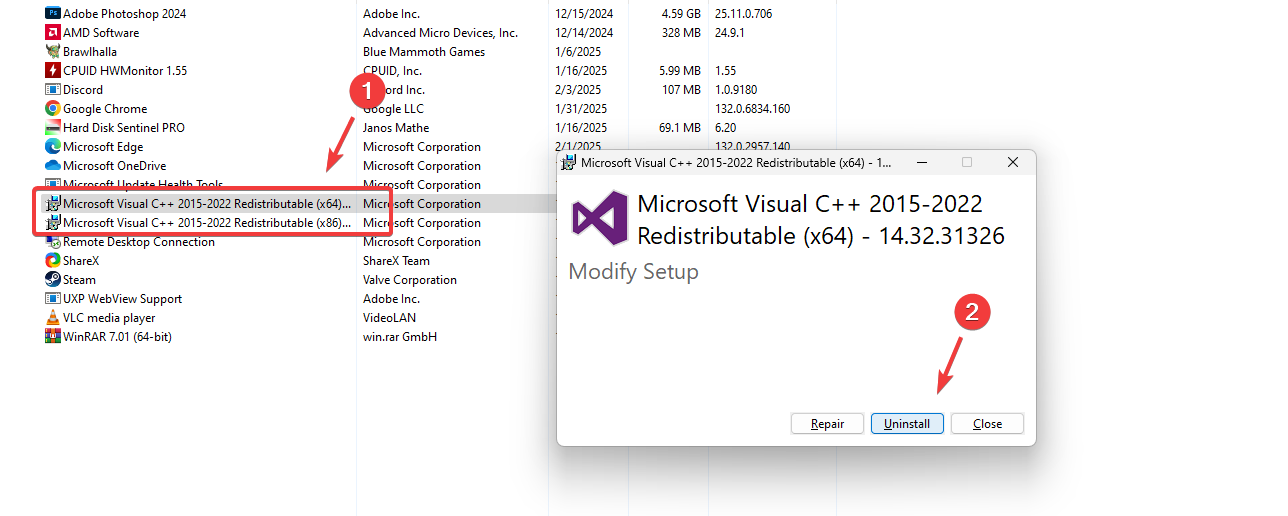
- Repeat this step for all versions of Microsoft Visual C++ listed.
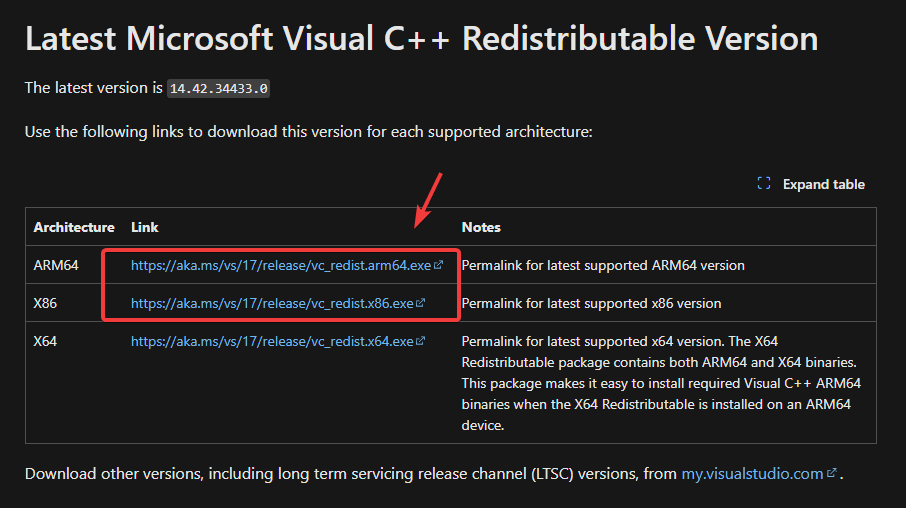
- Once uninstalled, download the latest versions of Microsoft Visual C++ Redistributable (x86) and (x64) from the official Microsoft website.
- Run the installers and follow the on-screen instructions to complete the installation.
4. Run the SFC and DISM Repair Commands
Since this error occurs when a required Windows function fails to execute, scanning and repairing system files ensures that all necessary components are intact. The System File Checker (SFC) scans and fixes damaged files, while the Deployment Image Servicing and Management (DISM) tool repairs deeper system-level issues that SFC cannot handle. Running both commands increases the chances of enabling the missing functions and allowing the installation to complete successfully.
- Press Win + S to open Windows Search.
- Type Command Prompt, right-click on it, and select Run as administrator.
- In the Command Prompt window, enter the following commands one by one, pressing Enter after each:
DISM /Online /Cleanup-Image /RestoreHealth
sfc /scannow
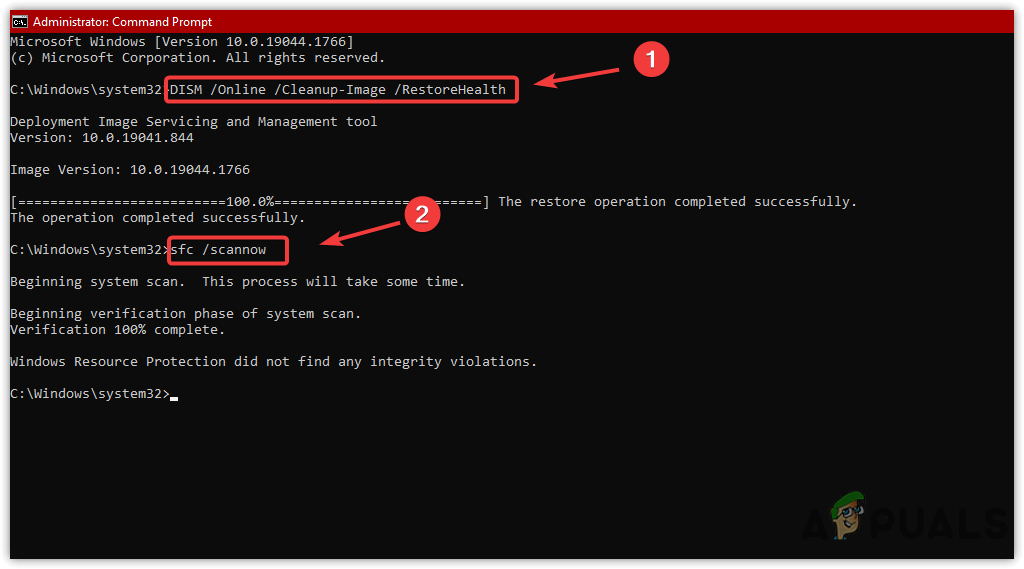
- Wait for the commands to complete. Once done, restart your computer and attempt the installation again to see if the issue is resolved.
5. Use a System Restore Utility
If this issue started after a recent system change, restoring your PC to a point where everything was working correctly can undo any problematic modifications. System Restore preserves personal files but rolls back system configurations, registry changes, and installed programs to a stable state. This is especially useful if other troubleshooting methods have failed, as it restores essential Windows functions that may have been altered or corrupted.
- Press the Windows + R keys simultaneously to open the Run dialog box.
- Type rstrui in the input field and click OK to launch the System Restore utility.

- Click Next to view available restore points, then select a Restore Point from the list.
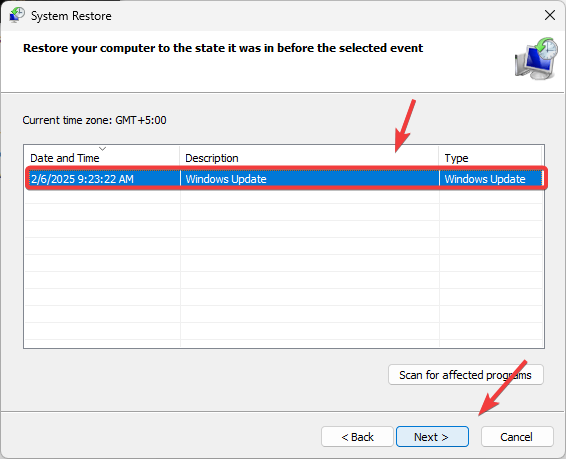
- Click Next again, then select Finish to confirm and begin the restoration process.
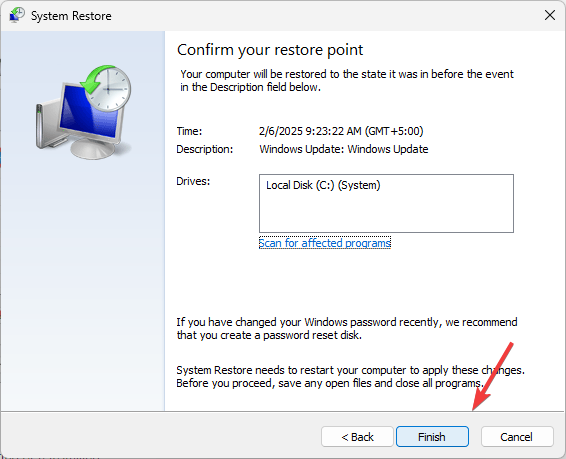
- Once the process is complete, restart your PC. The error should no longer occur.
Finally, if the problem is still not resolved, consider resetting or reinstalling Windows. Resetting or reinstalling Windows will restore all the corrupted runtime functions required for the installation process.


