Fix: Corrupt SD Card via Chkdsk
Google may have removed support for SD cards since the release of Ice Cream Sandwich a couple of years ago, but some OEMs like Samsung continue to include an SD slot in their devices to support expandable storage.
Having an SD slot in your mobile device offers numerous advantages: you don’t have to worry about using up the internal storage of your device, as you can store your images, movies, music, documents, and contacts on the SD card.
Sadly, this can also lead to issues with the SD card, particularly with the content stored on the card becoming corrupted. While there may be programs and apps that can be used to retrieve corrupted data, these same apps and programs need to be set up before any corruption occurs.
In my case, I have used chkdsk in the past. Although I cannot guarantee that using this method will allow you to retrieve everything from your corrupted SD card, you might get lucky and salvage some of what was lost. More importantly, it may prevent any further corruption from occurring.
If you have a computer running Windows, the steps below will show you how to use chkdsk to fix a corrupted SD card:
1. Insert the corrupted SD card into a memory card reader, and plug the data cable of the card reader into your computer’s USB port.
Make sure though that the card is not write-protected as this will prevent the computer from accessing the contents of the card.
Once the memory card has been inserted into your computer, a window will pop up displaying the name of the card and asking whether you want to open the card’s contents or transfer any files. Simply close that window.

Click ‘Start’ on your Windows taskbar and open ‘Computer.’ Look for your SD card under ‘Devices with Removable Storage’ and take note of the drive letter assigned to it. We will need this information later when we use the ‘chkdsk’ program.
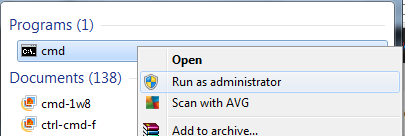
2. On your computer, click ‘Start’ and type ‘cmd’ in the ‘Search programs and files’ text box.

3. Right-click “cmd” under Programs, and select “Run as administrator.” This action will open a command window, which allows you to run chkdsk and fix your corrupted SD card. The said window will look something like this:
In the command window, type “chkdsk” followed by the drive letter corresponding to the SD card, then a colon, and /f.

Press Enter, and chkdsk will begin checking your corrupted SD card; afterwards, it will fix any corruption present on the card. This process may take several minutes, depending on the size of the storage and the extent of corruption.
Once chkdsk has finished checking the card, it will prompt you to save lost chains. Click ‘Yes’ and wait for chkdsk to display all the lost data files that have been repaired.
4. Open Computer again by clicking Start on your Windows taskbar. Click the assigned drive letter for your SD card, and voila! All repaired files are now visible, and you can access them again on the SD card.
Fingers crossed, the steps outlined above have helped with the recovery of deleted files from a corrupted SD card and prevented any further corruption. It is also highly recommended that you reformat your SD card to the appropriate format for your mobile device before using it again.