Fix: Can’t Type into Text Fields on Some Browsers
Some users are reportedly unable to type (letters or numbers) in any field boxes. Other affected users are reporting that the issue only occurs with some specific field boxes. The issue is not exclusive to a certain browser as there are reports of it occurring with Internet Explorer, Edge, Chrome, Firefox, and Opera. Even more, the issue is reported on multiple Windows versions (Windows 7, Windows 8 and Windows 10).
What is causing the ‘Can’t Type in Any Browser Text Field’ issue?
We investigated this particular issue by looking at various user reports and the repair strategies that they used to get the issue resolved. From what we gathered, there are several common scenarios that will trigger this particular error message:
- Windows 7 glitch – As a lot of users have pointed out, the issue is often occurring on because of a glitch that causes various text boxes to become unresponsive. Several users in a similar situation have managed to get the issue resolved by using various procedures that will refocus the active window.
- Internet Explorer is being used in 32-bit mode – This issue is typically reported to occur with 64-bit based machines that are using the 32-bit version of Internet Explorer. In this case, the solution is to start using the 64-bit version of IE.
- Hardware acceleration is not supported by the machine – This particular issue can also occur because the CPU is not equipped to handle hardware virtualization. Chrome and a few other browsers might be fooled into thinking that hardware virtualization can be achieved on the machine, thus producing the error message.
- IDM integration module is breaking keyboard input – The IDM Integration Module is an extension of the Internet Download Manager. As it turns out, there is a well-known glitch in its Chrome extension that will cause some type of text boxes to become unresponsive.
- Scroll Key is enabled on a laptop computer – On laptops, the issue can occur if the Scroll key has been enabled by the user or by a 3rd party application. Since this is a legacy key, some modern input boxes will stop functioning while this option is enabled.
- A corrupt registry key is causing the issue – Some users have reported that the issue went away for good after they scanned their system with CCleaner. This seems to suggest that a registry key might be responsible for the error. As of now, we haven’t been able to identify the precise registry key.
- Some required DLL keys need to be re-registered – There are several DLL files that are used my Windows-powered machines during the process of typing text into an input box. Several users have managed to get the issue resolved by re-registering these keys.
If you’re currently struggling to resolve this particular error message, this article will provide you with a selection of verified troubleshooting steps. Down below, you’ll discover a selection of filtered methods that other users in a similar situation have used to get the issue resolved.
To make the whole process as efficient as possible, follow the methods below in the order that they are presented. You should eventually find some steps that will resolve the issue in your particular scenario.
Method 1: Pressing the Windows key twice
This might sound like a weird fix, but several users that have been encountering exclusively on the Chrome browser have reported that the text boxes become typable after they hit the Windows key twice. Keep in mind that this method is mostly reported to be effective on Windows 7 versions with older Chrome builds, but you can try it regardless of your operating system since it’ll only take 2 seconds.
All you have to do is click inside the type box, press the Windows key twice and start typing. If the method is successful, you should be able to type normally.
Update: Another temporary solution that some users have discovered is to minimize and maximize the browser window in one or two quick successions. Apparently, this forces the OS to make the window again, allowing the text field boxes to be edited again.
If you found this method to be ineffective or you’re looking for a more lasting approach, move down to the next method below.
Method 2: Opening the browser in 64-bit mode
Some affected users have only been encountering this issue on Internet Explorer have reported that the issue is no longer occurring if they open the browser in 64-bit mode. This is typically reported to occur with users that have machines with a 64-bit architecture OS but prefer using the 32-bit mode of IE.
If you’re only encountering this issue with Internet Explorer, let’s try opening the browser in 64-bit mode and see if the issue is still present. Here’s a quick guide on how to do this:
- Open File Explorer and navigate to the following location:
C:\Program Files (x86)\Internet Explorer
- Double-click on iexplore.exe to open the browser in 64-bit mode. Then, make your way to a text field and see if the issue is still occurring.
- If the issue is no longer happening, return to the Internet Explorer folder, right-click on iexplore.exe and choose to Send to > Desktop (create shortcut).
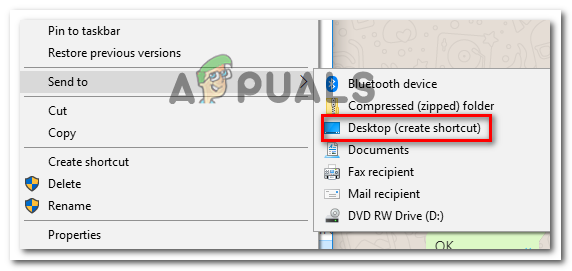
Creating a desktop shortcut for the 64-bit version Keep in mind that this is merely an improvised shortcut. If you found this method to be effective in your particular scenario, you’ll have to remember to open Internet Explorer from the shortcut you’ve just created in order to circumvent the issue.
If this method wasn’t effective or you’re looking for another way of resolving the issue, move down to the next method below.
Method 3: Disabling hardware-acceleration on Google Chrome
Several users encountering the same symptoms exclusively on Chrome have reported that the issue was resolved as soon as they disabled hardware acceleration from Chrome’s Settings menu. This is typically reported to be effective with machines working with an older CPUs where hardware virtualization is not available.
Note: This solution is only confirmed to work with Google Chrome, but you can apply the steps below on a different browser.
Here’s a quick guide on disabling hardware-acceleration on Google Chrome:
- Open Google Chrome and click the action button (three-dot icon) from the top-right corner of the Chrome window. Then, click on Settings.
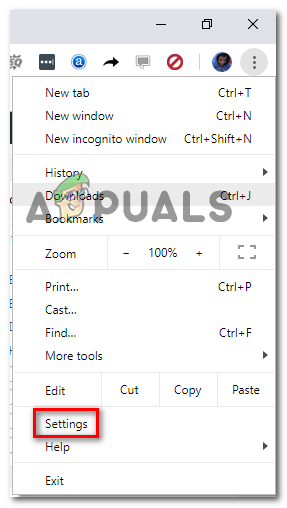
Accessing Chrome’s settings menu - Inside the Settings menu of Chrome, scroll down to the bottom and click on Advanced to expose all the available entries.

Accessing the Advanced menu of Google Chrome - Inside the Advanced menu, scroll down to the System section and disable the toggle associated with Use hardware acceleration when available.
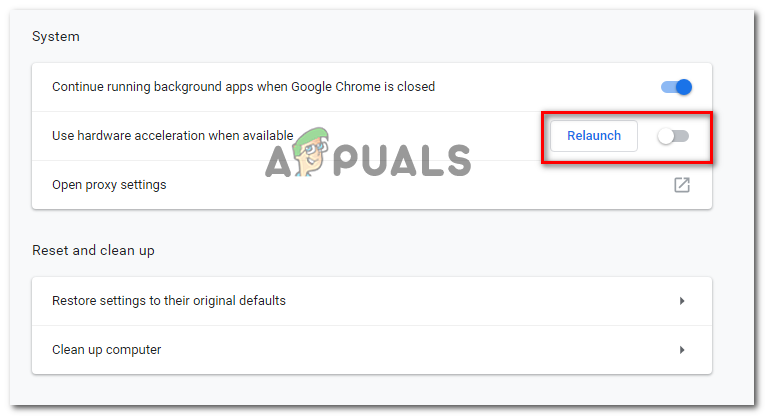
Disabling hardware acceleration in Chrome - Click the Relaunch button to restart Google Chrome and check if the issue has been resolved.
If you’re still unable to type into all or some text fields, move down to the next method below.
Method 4: Disabling the IDM Integration Module
Some affected users that have been encountering the issue primarily on Google Chrome have reported that the issue was fixed as soon as they disabled the IDM (Internet Download Manager) Integration Module.
If you’re using Internet Download Manager to intermediate your downloads on Google Chrome, you installed a Chrome extension IDM Integration Module. This one is primarily used to obtain video/sound files.
As it turns out, there’ a well-known glitch of the IDM Integration Module that causes the keyboard input to become broken.
If you find this scenario to be applicable to your current situation, the fix is as simple as disabling the IDM Integration Module extension. Here’s a quick guide on how to do this:
- Open Google Chrome and click the action button (three dot icon) in the top-right corner. Then from the newly appeared menu, go to More tools and click on Extensions.

Opening the extensions menu - Inside the Extensions menu, scroll down to IDM Integration Module and simply disable the toggle associated with it or click Remove to uninstall it completely.
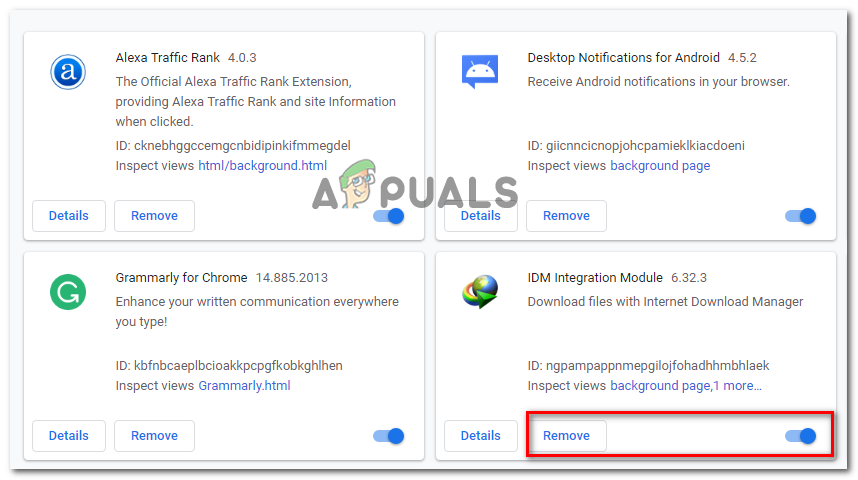
Disabling or uninstalling the IDM Integration module extension - Once the extension has been uninstalled, restart your computer and see if the issue has been resolved. If you’re still experiencing the same symptoms, move down to the next method below.
Method 5: Enabling Screen lock via on-screen keyboard
Several laptop users have reported that in their case, the problem occurred because their laptop keyboards didn’t have a Scroll Key. As it turns out if the ScrlLock key is enabled, some modern input boxes will not function properly.
Since you don’t have a physical button on your laptop keyboard to disable ScrlLock, you’ll have to use the on-screen keyboard to get the job done. Here’s a quick guide on how to do this:
- Press Windows key + R to open up a Run dialog box. Then, type “osk” and press Enter to open up the On-Screen Keyboard.
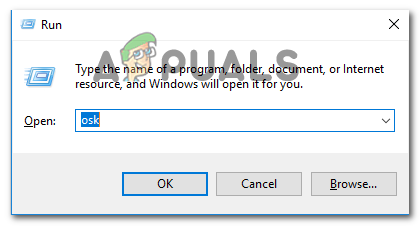
Opening the On-screen keyboard via a Run box - Inside the On-Screen keyboard, click on ScrLk to disable Scroll lock.

Disabling Scroll Lock via the On-Screen keyboard - Return to the typing box and see if the issue has been resolved.
Method 6: Scanning the registry with CCleaner
A lot of users encountering this particular issue have reported that they were able to resolve the issue by running a complete CCleaner scan. As it turns out, CCleaner is equipped to fix the registry file responsible for causing this particular malfunction.
Here’s a quick guide on installing and using CCleaner to fix the typing issue in your browsers:
- Visit this link (here) and wait for the download to start. It should commence in a few seconds.
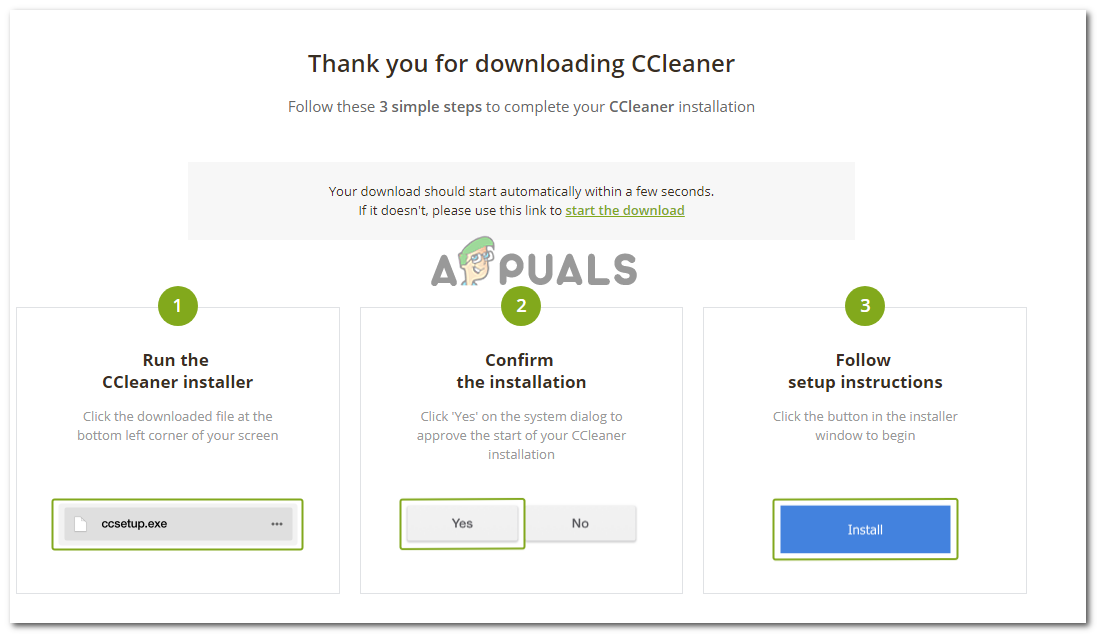
Downloading CCcleaner - Open the installation executable of CCleaner and follow the on-screen prompts to install the utility on your system.
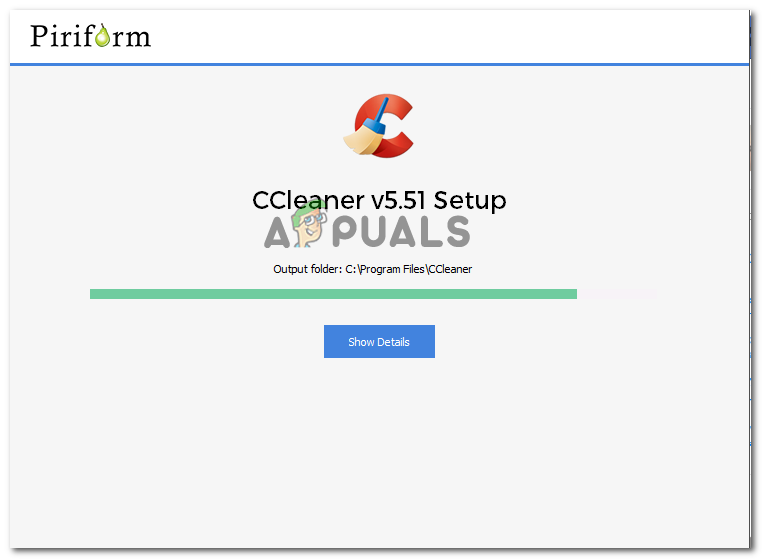
Installing CCleaner - Once CCleaner has been installed, open it and navigate to the Registry tab. Once you get there, leave the default settings selected and click on Scan for issues.
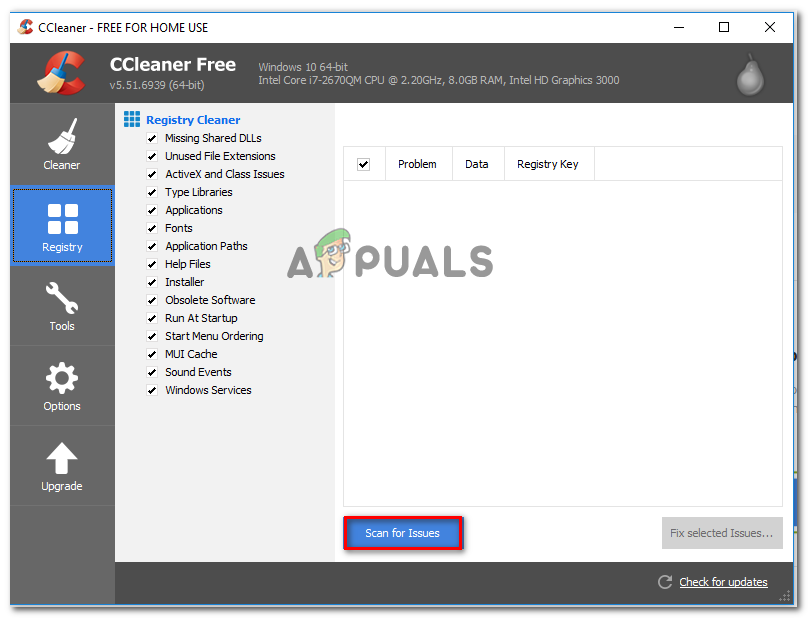
Scanning for registry issues with CCleaner - Once the initial scan is complete, make sure every problem is selected, then click on Fix selected issues.
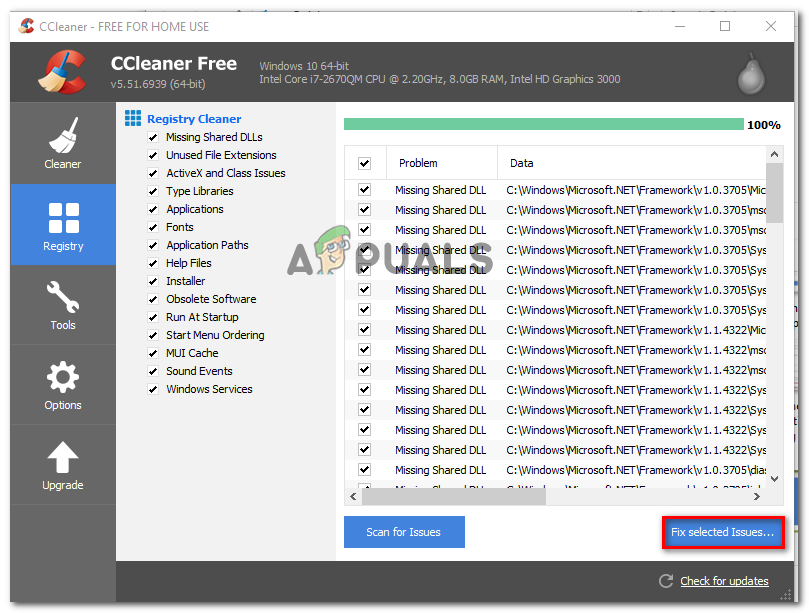
Repairing broken registry entries with CCleaner - Once the process is complete, restart your computer and see if the issue is resolved at the next startup.
If you’re still encountering the same issue once the next startup is complete, move over to the final method below.
Method 7: Registering some required DLL files
A handful of people have managed to get this issue resolved by re-registering some DDLs needed for the keyboard input inside browsers. The DDL files that need to be re-registered are:
- mshtmled.dll
- jscript.dll
- mshtml.dll
This method was especially effective for people who were encountering the issue with multiple browsers (Internet Explorer, Chrome and Firefox)
Re-registering DDLs can be done in several different ways. Follow the instructions below to learn how to do it straight from a run dialog box:
- Press Windows key + R to open up a Run dialog box. Then, type “regsvr32 /u mshtmled.dll” and press Enter to register the first DLL.
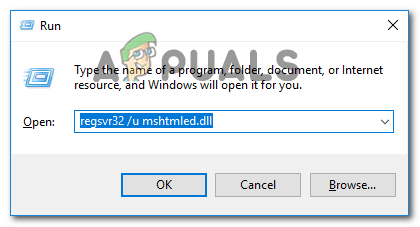
Registering the first DLL Note: When the DLL file is registered successfully, you’ll get the following success message:
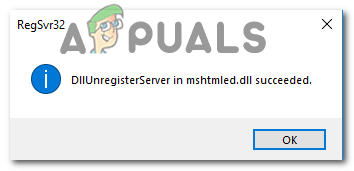
DLL is registered to work successfully - Press Windows key + R to open up a Run dialog box. Then, type “regsvr32 /u jscript.dll” and press Enter to register the second DLL.
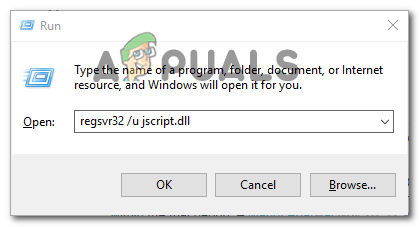
Registering the second DLL - Press Windows key + R to open up a Run dialog box. Then, type “regsvr32 /u mshtml.dll” and press Enter to register the third DLL.
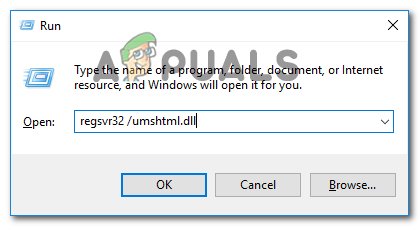
Registering the 3rd DLL - Once all DLL files have been re-registered, restart your computer. The issue should be resolved at the next startup.


