Fix: Can’t Move Desktop Icons on Windows
An icon is a small picture or object that represents a file, program, web page, or command. Based on the default icon, users will know more information about files, is that photo, video, Word document, or something else. When we decide to install some application, the application will create an icon on the Desktop. End users will be able o rearrange and move icons on the Desktop, by their own wishes.
If there are some issues with the system, application, or Desktop, users will not be able to do some changes on the Desktop. One of the issues is the impossibility to move icons on the Desktop. There are different issues why this problem occurs, including system issues, wrong configuration, applications are blocking changes on the Desktop, and others. Also, after upgrading Windows 7 and Windows 8 to Windows 10, users can’t move desktop icons. Also, this issue occurs on Windows 7 and Windows 8, too.
We will show you how to solve this issue on your Windows machine. So, let’s start.
1. Test your Mouse or Touchpad
In this method, you will need to test your mouse or touchpad. If your mouse or touchpad is not working properly, you will not be able to move icons, files, or folders. How will you do it? There are two ways how to test your mouse or touchpad, one is to create a text document (Microsoft Word, Wordpad, or Notepad) and write some text using a keyboard. After that, you will need to select part of the text and right-click on the selected text to see additional options. By using this method, you will test left and right-click. Also, you will need to test the scroll wheel by scrolling the text in the document.

The second method is to plug another mouse into your computer or notebook and the test is there a problem with a mouse or operating system. If everything is working properly with another mouse, then you will need to replace your mouse. If the problem is still there, there is not an issue with the mouse or touchpad. There are system issues that should be solved by using the next methods. Both methods are compatible with computers and notebooks, including operating systems from Windows 7 to Windows 10.
2. Auto-arrange Icons
One of the reasons why you can not move your icons is the wrong configuration with arranging options. You should be able to arrange your desktop icons however you want. We will show you how to change arrange options in Windows 10. The same procedure compatible with Windows 7, Windows 8, and Windows 8.1.
- Right-click on a blank area on your Desktop
- Hover on View
- In the right pane, look for Auto arrange icons. If it’s checked, make sure to uncheck it.
- Hover on View, again
- This time, check Align icons to grid.

- Move your icons anywhere on the Desktop
3. Hit ESC Key Three Times
In this method, you will need to hit the ESC key three times and after that try to move icons on your Desktop. This method is compatible with all keyboards and operating systems from Windows 7 to Windows 10.

4. Change Icon Size
One of the easiest methods which helped end-users to solve this issue is to change icon size. We will show you how to change icon size on Windows 10. The same procedure is compatible with previous operating systems.
- Right-click on a blank area on your Desktop
- Hover on View
- Change icon size. You have three options including large, medium, and small icons. You should change the current size to another one. In our example, the current is Small icons and we will change to Medium Icons

- Move your icons anywhere on the Desktop
5. Change the Size of Text, Apps, and Other items
In this method, you will need to change the size of text, apps, and other items through Control Panel or Settings. We will show you how to do it on operating systems from Windows 7 to Windows 10. If you are using Windows 7, Windows 8, and Windows 8.1 you will need to https://appuals.com/fix-remote-procedure-call-failed-error-opening-photos-pictures/ by following method 7. If you are using Windows 10, you should follow the next steps:
- Hold Windows logo and press I to open the Settings tool
- Choose System and then Display tab
- Under Change size of text, apps and other items change the current configuration to a new one as described in the text above

- Move your icons anywhere on the Desktop
6. Uninstall Software for Optimizing Desktop Icons
Are you using software for organizing desktop icons on your Windows machine? If yes, we are recommending you to uninstall software through Program and Features. This type of software is controlling your desktop icons and you will not be able to do some changes, as moving icons. We will show you how to uninstall software named Fences which blocked moving icons on the Windows 10 machine. This procedure is compatible with the previous operating system and similar applications.
- Hold Windows logo and press R
- Type appwiz.cpl and press Enter to open Program and Features
- Navigate on Stardock Fences 3
- Right-click on Stardock Fences 3 and choose Uninstall

- Wait until Windows is finished uninstalling software
- Navigate on Stardock Start10
- Right-click on Stardock Start10 and choose Uninstall

- Wait until Windows is finished uninstalling software
- Restart your Windows machine
- Move your icons anywhere on the Desktop
7. Reset Folder Options
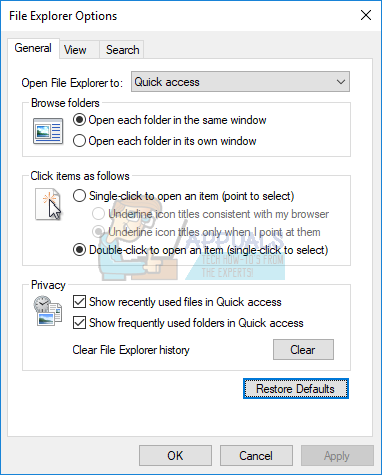
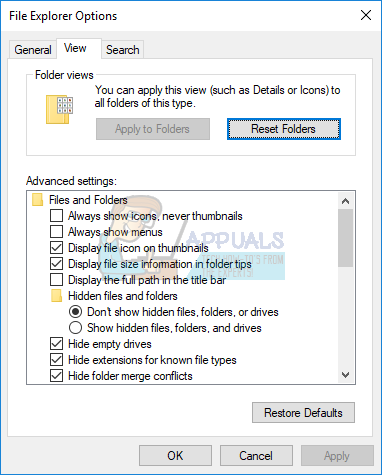
In this method, you will need to reset folder settings to default. We will show you how to do it on Windows 10. The same procedure is compatible with previous operating systems.
- Hold Windows logo and press R
- Type control panel and press Enter to open Control Panel
- View applets by Category
- Click on Appearance and Personalization
- Click File Explorer Options if you are using Windows 10, or Folder Options if you are using Windows 7 and Windows 8
- or Folder Options (Windows 7, Windows 8)
- Under the General tab click Restore Defaults

- Under View tab, click Reset Folders and then click Restore Defaults

- Click Apply and then OK
- Close Control Panel
- Restart your Windows machine
- Move your icons anywhere on the Desktop
8. Turn off Tablet Mode
In this method, you will need to turn off tablet mode, which is a new feature in Windows 10. Windows 10 is developed as a combination of Windows 7 and Windows 8 operating systems. In Windows 10 you can switch between Desktop mode and Tablet mode. Desktop mode is the traditional mode of Desktop where you see all icons, files, and folders and you are accessing them from the Desktop. Tablet mode will automatically activate when you detach a tablet from its base or dock if it is enabled. If you are using a touchscreen notebook or AIO, tablet mode will provide you better user experience while working on your Windows machine. This method is compatible only with Windows 10. If you are using previous operating systems, please read the next method.
- Click on Notification center on the right side of the Taskbar
- Turn off Tablet mode by clicking on Tablet mode In our example, it is turned off.

- Move your icons anywhere on the Desktop
9. Perform a System Restore
Implementation of a backup and restore strategy is a crucial action for the home and business environment. There are different solutions for Windows or data recovery, and one of them is System Restore. What can you with System Restore? If System Restore is enabled on your Windows machine, you can revert the operating system to the previous state when everything worked without any problems. Please note that you can not restore your Windows machine to the previous state if System Restore is turned off. Please read how to perform a System Restore, by following method 17.
10. Change Registry settings
In this method, you will need to change icon spacing in Registry Editor. Before you do any registry configuration, we are recommending you to the backup registry database. Why do you need to do registry backup? In the case of some misconfiguration, you can revert the registry database to the previous state when everything worked without any problems. For this method, you will need to use a user account with Administrator privilege, because a Standard user account is not allowed to do any system changes. Please check the steps to back up the registry database. After you backup your Registry database, you will need to continue the next procedure. Windows 10 icon arrangement is created by a design that’s why it automatically set to its recommended settings. To manually change the horizontal and vertical spacing of desktop icon using Registry Editor, you can follow these steps:
- Navigate to the following location HKEY_CURRENT_USER/Control Panel/Desktop/WindowsMetrics
- On the right side of Registry Editor navigate on IconSpacing
- Right-click on IconSpacing and choose Modify

- Adjust value between 480 and -2730 and then click OK. In our example, it is -1128.

- Close Registry Editor
- Restart your Windows machine
- Move your icons anywhere on the Desktop
11. Change BIOS or UEFI version
In this method, you will need to change the version of your BIOS or UEFI. At first, we are recommending you update your BIOS or UEFI to the newest version. If that does not solve the issue, please try to downgrade the version of BIOS or UEFI. How will you do it? There are a lot of articles that can teach you how to change the version of your BIOS or EUFI. Please read the instructions on how to update the BIOS. Before changing the version of BIOS or UEFI, we are recommending you to read the technical documentation of your motherboard.