Fix: Blue Yeti Not Recognized
If you own a Blue Yeti microphone then you might experience the issue with Blue Yeti drivers or with the working of the microphone. If you look in the device manager, you will notice that the microphone isn’t listed under Sound, video and game controllers. The most common place where you will find Blue Yeti is the Other devices section in device manager. You might also see a yellow warning sign as well. For some users, they might get a “No drivers found” error message when connecting the Blue Yeti to their systems especially Windows. These issues will obviously prevent you from using the microphone. You won’t be able to use the Blue Yeti microphone for recording and you won’t find any drivers for this microphone as well.
The reason behind this issue is that Windows will recognize the Blue Yeti microphone with another name. So, yes, technically your microphone is being recognized but it isn’t showing up with the exact name i.e. Blue Yeti microphone. For people who are experiencing issues with the working of this microphone, it is mainly because of the settings problems that can easily be adjusted from sound recording settings.
Do you need the drivers for Blue Yeti?
If you are looking to download Blue Yeti drivers then you should stop looking. Blue Yeti doesn’t have any drivers and it works with the regular built-in audio drivers of Windows (or any other machine you are using). It is basically a plug and play device. So, that is why you won’t find any drivers and you shouldn’t waste your time in looking for drivers.
Method 1: Check Microphone in Devices and Printers
The first step is to check whether your microphone is recognized or not. If you are seeing the microphone in Other devices then you can skip this section.
Basically, Windows will recognize the microphone with a specific name, other than the Blue Yeti, and you can check that from the Devices and Printers section.
- Hold Windows key and press R
- Type control panel and press Enter

- Click View devices and printers
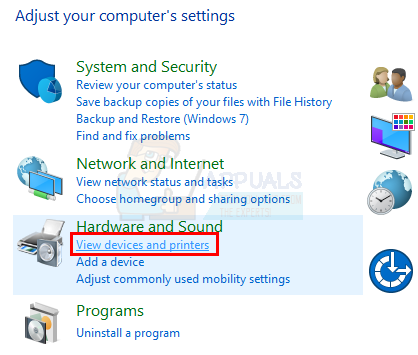
- If you are seeing an entry named USB Advanced Audio Device then you should be good to go. It is a bit weird but users have noticed that Windows recognize the microphone with this name. You can confirm whether this entry is Blue Yeti microphone or not by simply disconnecting the microphone. If the entry disappears then it is confirmed.
So, if you are wondering why the microphone isn’t showing up then this is the reason. If you want to change the name of the device then you can try the steps given below.
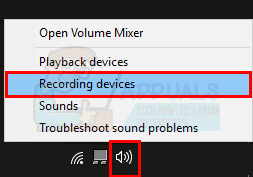
- Right click the speaker icon from the system tray (bottom right corner)
- Select Recording devices

- Locate the microphone named USB Advanced Audio Device
- Right click USB Advanced Audio Device and select Properties
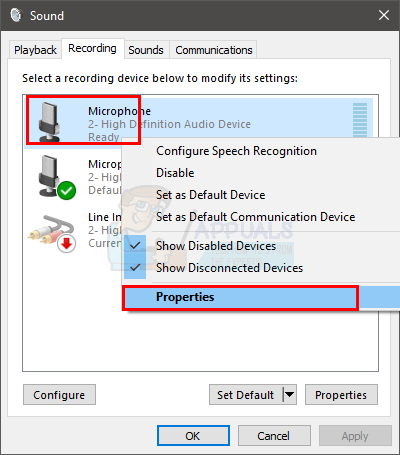
- You will see a text box with the name of the device. You can simply overwrite and name this device whatever you want.
- Once done, click Apply then select Ok

You should be good to go and your device should be showing up as the name you entered.
Method 2: Fix Blue Yeti Volume
This method for people who are experiencing issues with the Blue Yeti recording or the level of sound. If you aren’t hearing anything from the microphone or the recording audio is very low then follow the steps given below to fix that issue.
- Right click the speaker icon from the system tray (bottom right corner)
- Select Recording devices
- Locate the microphone named USB Advanced Audio Device
- Right click USB Advanced Audio Device (or the name you gave to this mic by following the steps in method 1) and select Set Default Device
- Once done, click Apply then select Ok
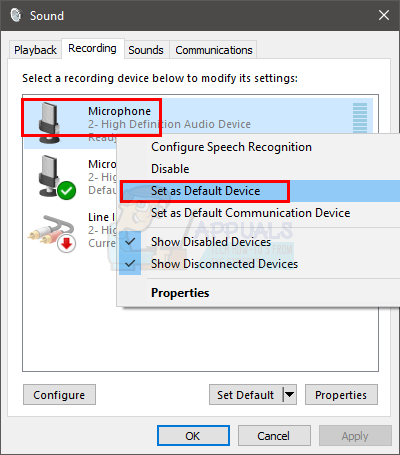
You should be able to use the microphone once your Blue Yeti is set to the default recording device. If you still can’t record anything from the microphone then follow the steps given below
- Right click the speaker icon from the system tray (bottom right corner)
- Select Recording devices

- Locate the microphone named USB Advanced Audio Device
- Double click USB Advanced Audio Device (or the name you gave to this mic by following the steps in method 1)
- Select the Levels tab
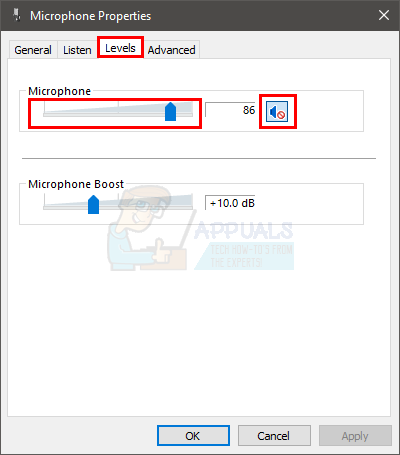
- Make sure the volume of the microphone is appropriate and the microphone isn’t mute. Click the speaker button if you see a red icon on it. That means it muted. Note: If you are experiencing a lot of noise with the microphone then simply reduce the volume of the microphone. The Blue Yeti is very sensitive so keeping it to 0 or around those levels should fix the issue of background noise.
Method 3: Change USB port
If you are still experiencing the issue then the problem might be with the USB port that you are using. The Blue Yeti will not work on USB 3.0 ports. So, connect the Blue Yeti with a USB 2.0 and check if that works. If you don’t know which USB port is 2.0 or 3.0 then check your computer’s manual or simply try each USB port to see which one works.
Once your microphone is connected to a USB 2.0, it should work just fine and Windows will most likely recognize the microphone.
That’s really weird that this mic is not compatible with USB 3.0. I thought 3.0 was supposed to be backward compatible through 2.0? I mean don’t me wrong, this is a great microphone when it’s working, but I don’t think I’ve ever had any piece of hardware that was harder to get working to boot.
I don’t suppose there are any known issues with USB hubs? It doesn’t work on my USB 2.0 hub, either; I have to line it directly, which is really inconvenient.