Fix: Ark Server not Responding
Ark: Survival Evolved is a game which is more or less, new in the gaming industry. It still has a lot of issues which it needs to address in order to move to a more stable phase. Players even have the option to host different servers for players to join and play.
Despite efforts by the developers and Steam, there are still some abundant issues which occur from time to time. One of these issues is where the servers go into a not responsive state. This is a common issue and mostly, can be fixed in a short span of time. In this article, we will go through all the causes which might cause this issue and look at the solution to solve it.
What causes Ark: Survival Evolved Server not to Respond?
We created servers under different conditions on our test computers and came up with several different reasons why the server goes into a not responsive state. We also analyzed several different user cases. Here are some of the reasons listed below:
- Antivirus Software: Antivirus software is one of the most common causes of why the server doesn’t respond. When you are creating a server, a lot of network modules get involved. Antivirus software is known to protect usage of these modules from different applications so it blocks access.
- Too many Mods: Ark Server can also be modded personally so if there are too many mods enabled, the server might go into a not responsive state.
- Error state: The server configurations in Steam might be in an error state which might prevent the server itself run as expected. Refreshing the server might solve the issue.
- Background programs: If any background applications are running which make use of the same network architecture, it is possible that there is conflict on resources and Ark cannot use the resources it needs.
- Steam Ports: Steam ports are the main ports through which the server is hosted. If this is in an error state, the server will not respond.
- DNS Server issues: Even though the server parameters are predefined, there can be cases where the DNS server doesn’t respond or act as needed. Using a temporary Google DNS might help to troubleshoot the problem.
- Corrupt installation files: Steam games have a habit of getting corrupt, mostly after updates. Checking for corrupt installation files might solve the issue if this is so.
Before we move on to the implementation of the solutions, make sure that you are logged in as an administrator on your account. Furthermore, you should also have an active and open internet connection on your computer without any firewalls or proxy servers involved. Make sure to have your credentials at hand.
Solution 1: Waiting for Mods to Load
If you are using a heavily modded server, chances are that your server will take a lot of time to load properly to the fullest. Using mods in the game are different than implementing mods in your server. When you implement mods in your server, whoever connects to that server will see the modded experience.
Hence you should wait for the game to load entirely. If you see the not-responding scenario where the window of the game blurs out to be whitish, you shouldn’t press any key or any application. Just let the game be and wait the issue out. Mods are usually loaded in 4-5 minutes in the server.
Solution 2: Disabling Antivirus Software
Since servers demand different requirements as of normal games, there are some instances where Antivirus software limit their permissions and usage of resources. They might flag the application as a threat, thus marking a ‘false positive’. This usually means that a normal application is flagged unnecessarily.
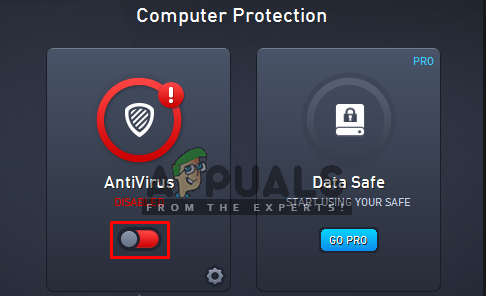
You should temporarily disable all antivirus software running on your computer. You can check our article on How to turn your Antivirus off. If the game doesn’t go into a not-responding case after the Antivirus software was disabled, consider adding an exception. If you cannot add an exception in your Antivirus of Hearthstone, you can go ahead and search for other antivirus alternatives and uninstall the current one.
Solution 3: Verifying Integrity of Game Files
Like mentioned earlier in the causes, there are several different cases where Ark might be corrupt or have some of its files missing. This is a very common scenario and mostly occurs when the game is shifted manually from another directory or the client was closed unexpectedly during an update. This solution, we will open the Steam client, navigate to Ark, and check if the installation files are in a correct state.
- Open your Steam application and click on Games from the top bar. Now select Ark: Survival Evolved from the left column, right-click it and select Properties.
- Once in Properties, click on Local Files category and select Verify Integrity of Game Files.
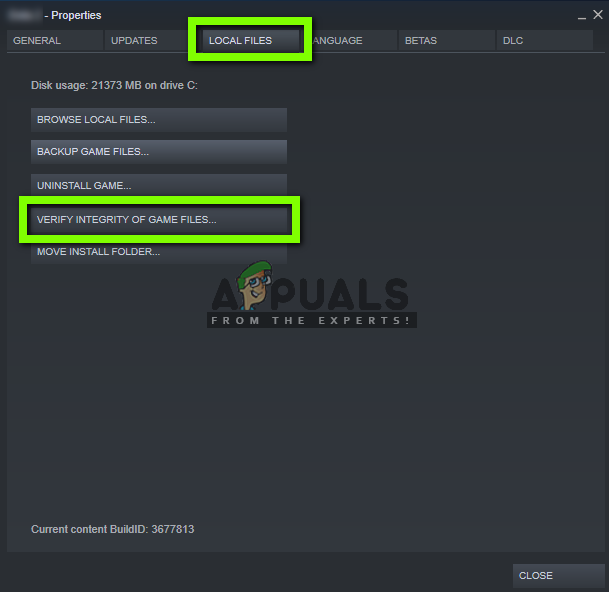
- Now, wait until the process is complete. Restart your computer after the verification is complete and launch Ark again. Check if the server not responding issue is fixed.
Solution 4: Setting Google’s DNS
Ark Survival usually has all the networking defaults saved in the game internally. But it still uses the DNS services on your computer to get operations done. DNS systems usually resolve names of websites when requested. There are several cases where the default DNS server on your computer might refuse to connect. So in this solution, we will navigate to your network settings and set Google’s DNS. If this fixes the issue, you will know what was wrong. Otherwise, you can always revert the changes.
- Press Windows + R, type “control” in the dialogue box and press Enter. Once in the control panel, click on Network and Internet. Then click on Network and Sharing Center. Now click on the current network that you are using under Active Networks. Once the window pops up, click on Properties.
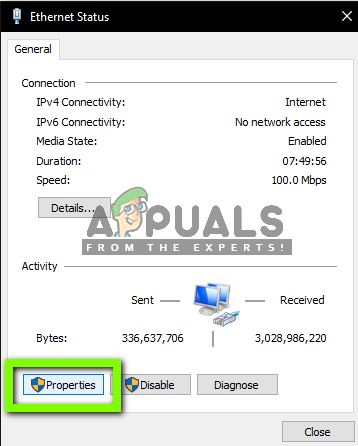
- Double-click on “Internet Protocol Version 4 (TCP/IPv4)” so we can change the DNS server.
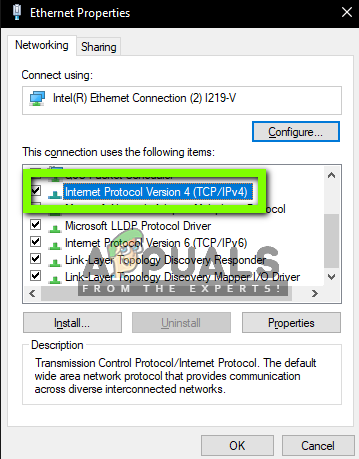
- Click on “Use the following DNS server addresses:” so the dialogue boxes below become editable. Now set the values as follows:
Preferred DNS server: 8.8.8.8

Alternate DNS server: 8.8.4.4

- Press OK to save changes and exit. Now restart your computer and see if this solved your problem.
Solution 5: Forwarding Additional Port
Usually, Steam’s ports get forwarded automatically as this is necessary in order to run the game and Steam services properly. However, there are several cases where you have to forward some additional ports yourself manually so you can easily host games like Ark Survival on their server.
This solution is for advanced user who know their networking interface and how to forward ports. If you are a regular user, carry on and skip this solution.
- Open your router’s web interface. This might be an IP address printed on the back of the router or in its box (usually of the kind ‘192.168.1.1’).
- Now open and forward the port 25147. Save changes to the settings.
- Now make sure that your IP address is static by configuring it with the router’s DHCP service.
- Now restart your computer and launch the server again. Check if the issue is resolved.
Solution 6: Refreshing the Network Interface
Making a server on Steam for Ark Survival includes several networking modules to be working together synchronously. If any one of these modules go into an error state, you will experience several difficulties and have issues like the not-responding one. In this solution, we will open the command prompt of your computer in an elevated state and refresh your network interface so everything gets reset to default conditions.
- Press Windows + R, type “command prompt” in the dialogue, right-click on the application and select Run as administrator.
- Once in elevated command prompt, execute the following commands:
ipconfig /release

ipconfig /renew

netsh winsock reset

- After all the settings are reset, try launching the game again and see if the issue still remains.
Note: Make sure that there are no other applications consuming the internet on your computer. You can check this using the resource manager inside the task manager.
Solution 7: Changing Server Port
If you are trying to join a server in Steam and are getting the ‘not responding’ prompt, it probably means that there is a problem in the connectivity. After our initial tests and reports by users, we saw a bizarre scenario where all the servers having the port ‘27015’ were experiencing similar problems in the not responding issue. In this solution, we will navigate back into the servers in Steam and change the port manually.
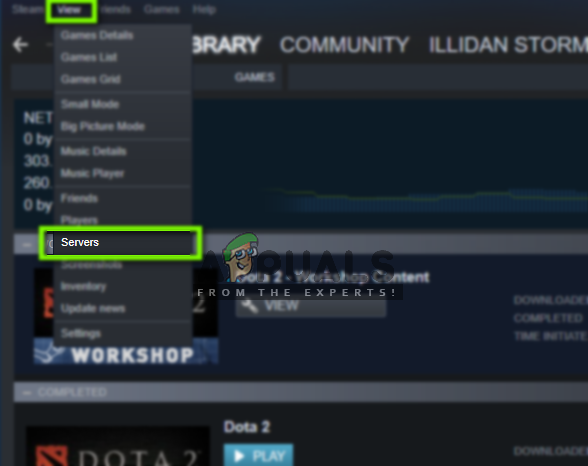
- Launch Steam and click on View. Now select Servers from the drop-down menu.
- Now click on Favorites. All your favorite and saved servers will be listed here. Right-click anywhere in the window and select Add server by IP Address.

- Now type in the IP address of the server which you want to join. Now when you enter the IP address, write the port “27016” instead of “27015” which you were writing earlier.
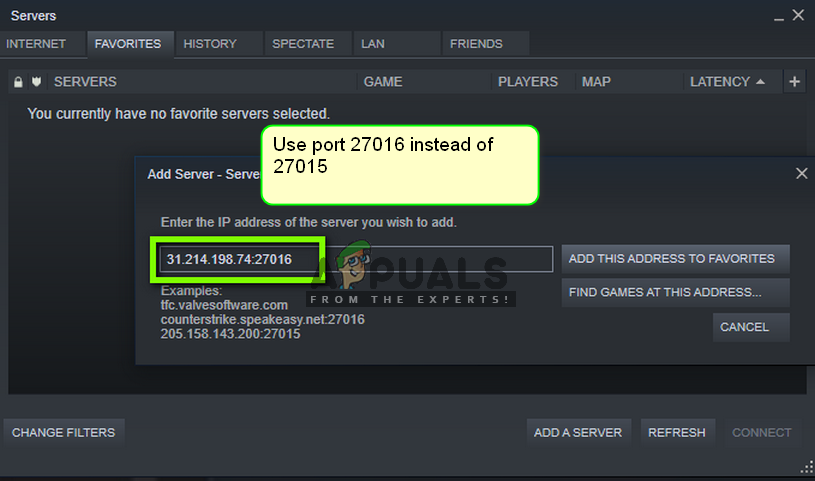
- Add the server and save changes. Now wait and the server will automatically be connected and you will be able to play the game.
Note: Make sure that you are entering the correct IP Address.


Thank you so much. Solution 3 really solved the problem for me. There were 3 corrupt files identified and downloaded again. Afterwards no freezes anymore. 🙂