[FIXED] api-ms-win-crt-runtime-l1-1-0.dll is missing error
An api-ms-win-crt-runtime-l1-1-0.dll is a Dynamic Link Library (DLL) file associated with Microsoft Visual C++. If the file is missing or corrupted, you will encounter this error while installing or opening a program.
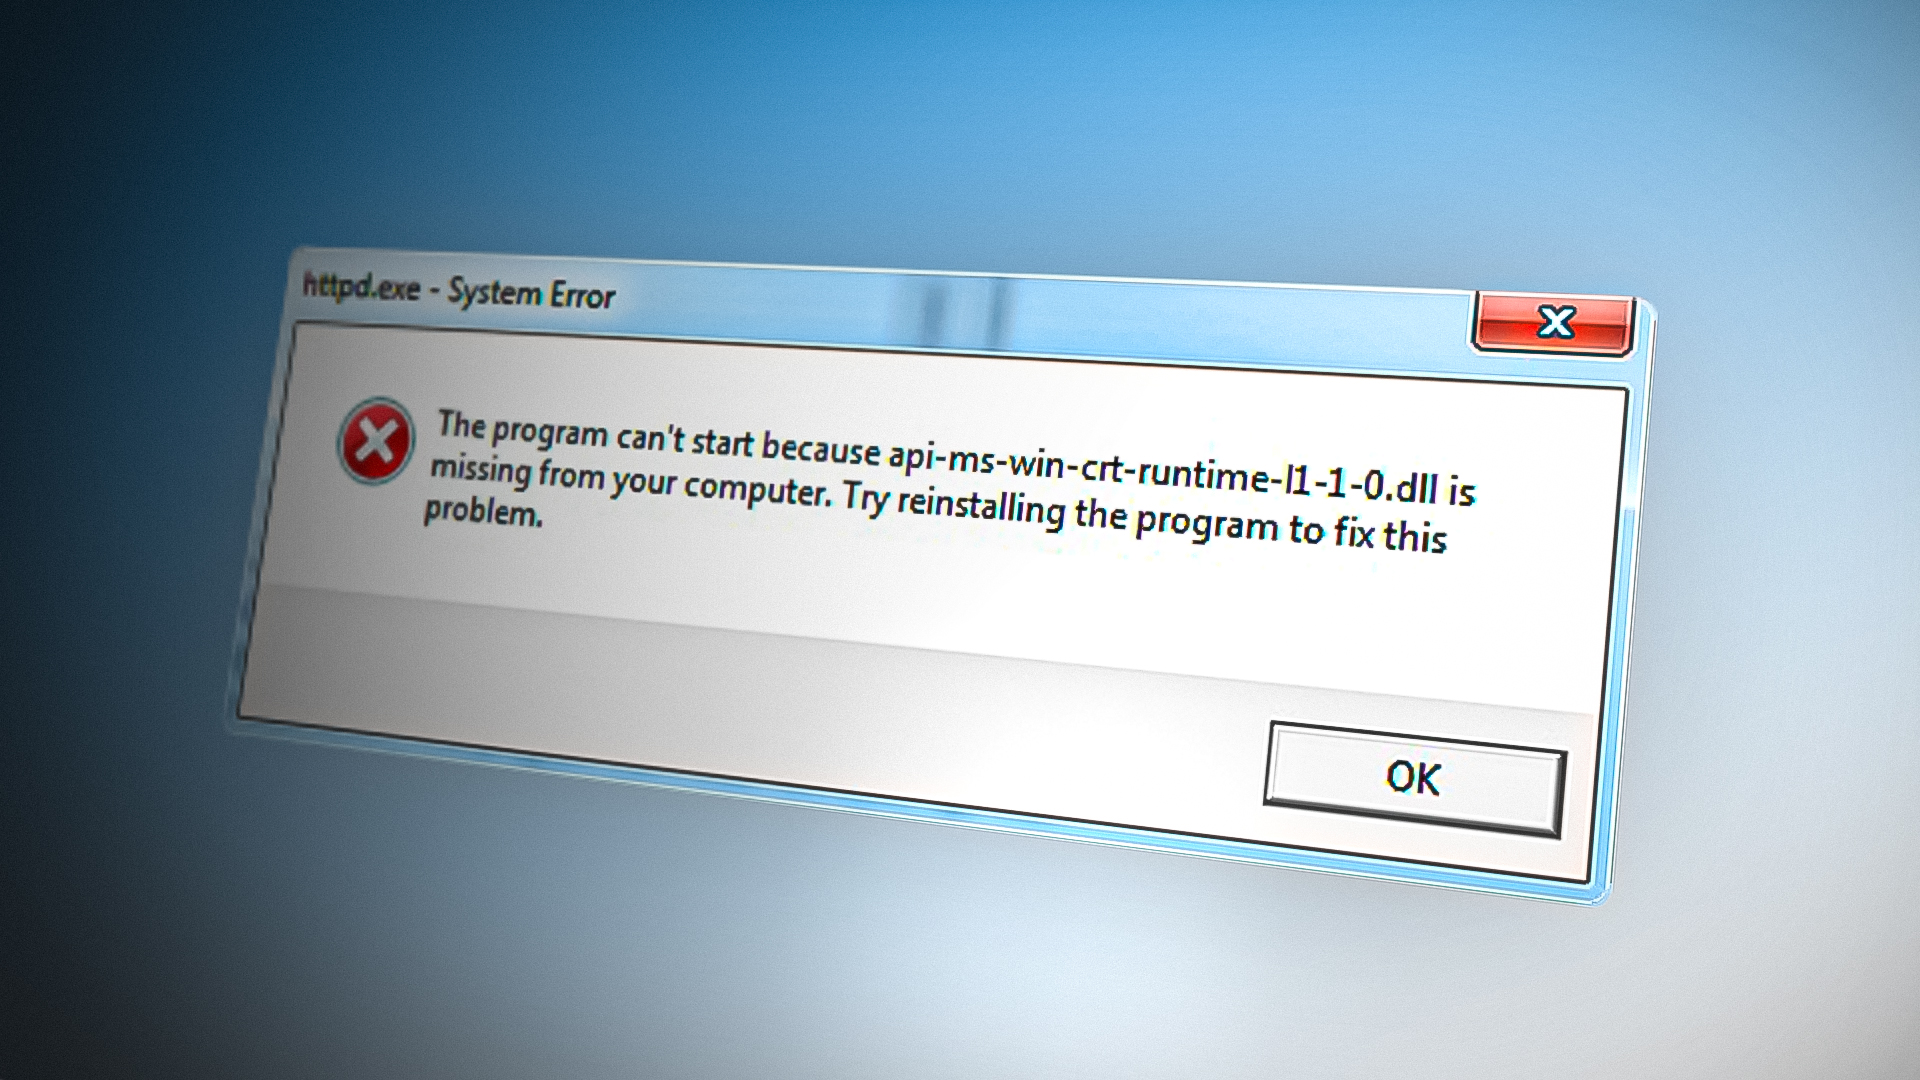
To fix this error, you will have to apply some fixes to restore a missing or corrupted DLL file, such as re-installing or repairing Microsoft Visual C++, manually downloading and replacing the DLL file, updating Windows to restore the DLL file, repairing the corrupted DLL file using SFC and DISM commands and restoring Windows to a previous state.
Since this DLL file belongs to Microsoft Visual C++, the root cause of this error can be missing Microsoft Visual C++ from Windows, or it needs to be repaired. Microsoft Visual C++ is a required component for Windows and can also be installed individually or through the Windows update utility.
1. Install or Repair Microsoft Visual C++ Redistributable
Since the api-ms-win-crt-runtime-l1-1-0.dll comes with the Microsoft Visual C++ Redistributable, we can start with reinstalling or repairing the Microsoft Visual C++ Redistributable.
If you already have Microsoft Visual C++ Redistributable, you can try repairing it by following the instructions. If that does not work, then go for reinstalling it. However, If you don’t have Microsoft Visual C++ Redistributable, installing it will fix this error. To do so, follow the steps:
Re-install Microsoft Visual C++ Redistributable
- Press the Windows + R keys, type appwiz.cpl, and click OK.
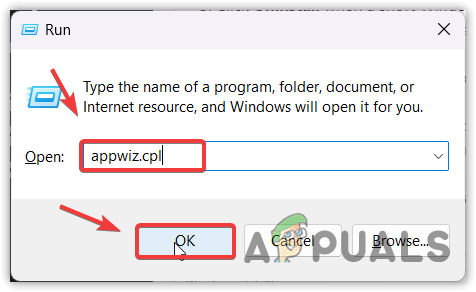
Navigating to the control panel apps and features - Find and double-click the Microsoft Visual C++ Redistributable.
- Click Uninstall when a short Window appears.
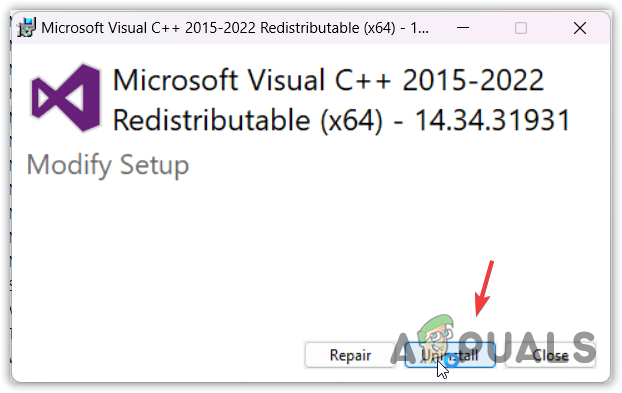
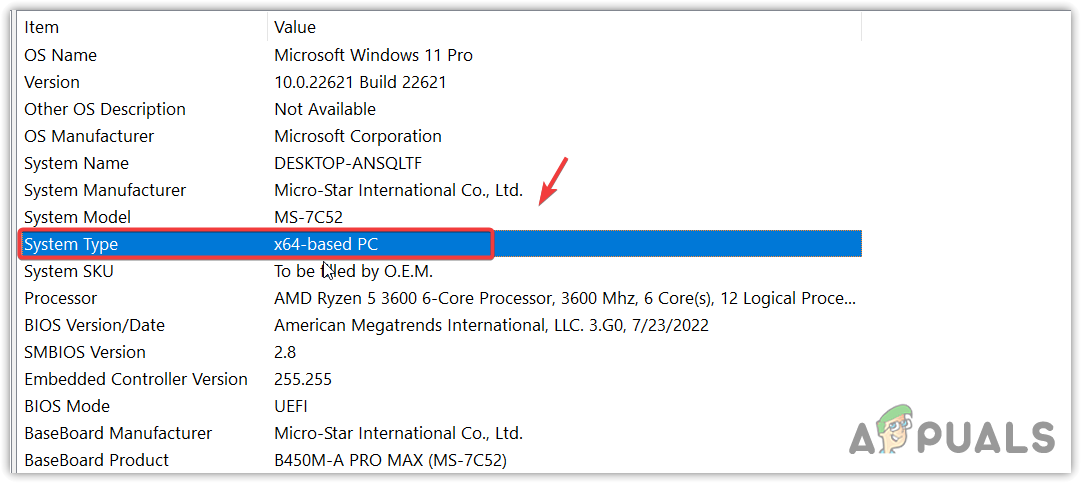
Uninstalling Microsoft Visual C++ - Once done, download Microsoft Visual C++ Redistributable according to your system type.
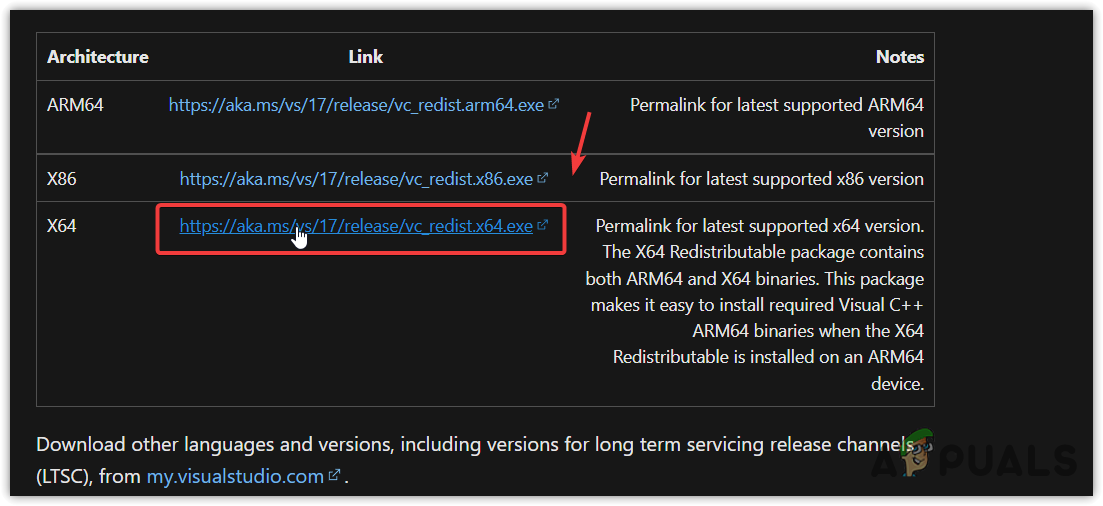
Downloading Microsoft Visual C++ installer - To check the system type, press the Win + R keys together to open the Run program.
- Type msinfo32 in the search box.
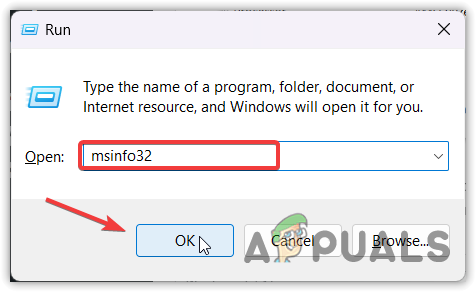
Opening System Information Window - Once the System Information Window is opened, check the System type and download Visual C++ Redistributable from the link.
Checking Windows system type - Once the downloading is finished, double-click on it to open it.
- Tick I agree to the license terms and conditions.
- Then, click Install.
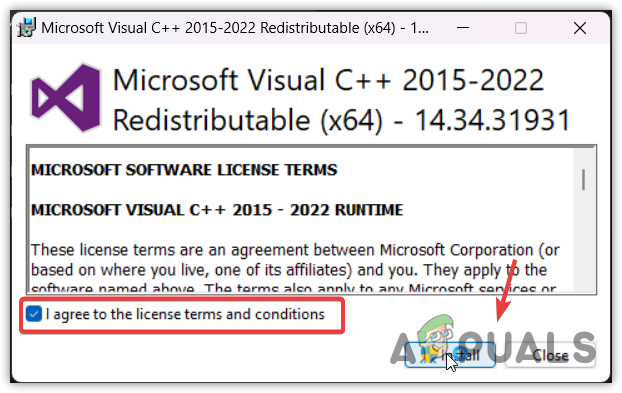
Installing Microsoft Visual C++ - Once done, try to launch the application causing the error.
2. Manually Download and replace the DLLL file
Another method to fix this issue is to download and replace the api-ms-win-crt-runtime-l1-1-0.dll file with the corrupted one. We can use this website to download any DLL file to replace with the corrupted one. To do that, follow the steps:
- Visit dll-files.com and search for a DLL file.
- Click the DLL file from the results.

Clicking the DLL file from the results - Scroll down a little bit and download the DLL file according to the Windows architecture by clicking the Download button.

Downloading a missing DLL file - Once the downloading is finished, right-click the Zip folder and select Extract to “api-ms-win-crt-runtime-l1-1-0.dll\”. If you have Windows 11, right-click the folder, hover WinRar, and select Extract to “api-ms-win-crt-runtime-l1-1-0.dll\”.
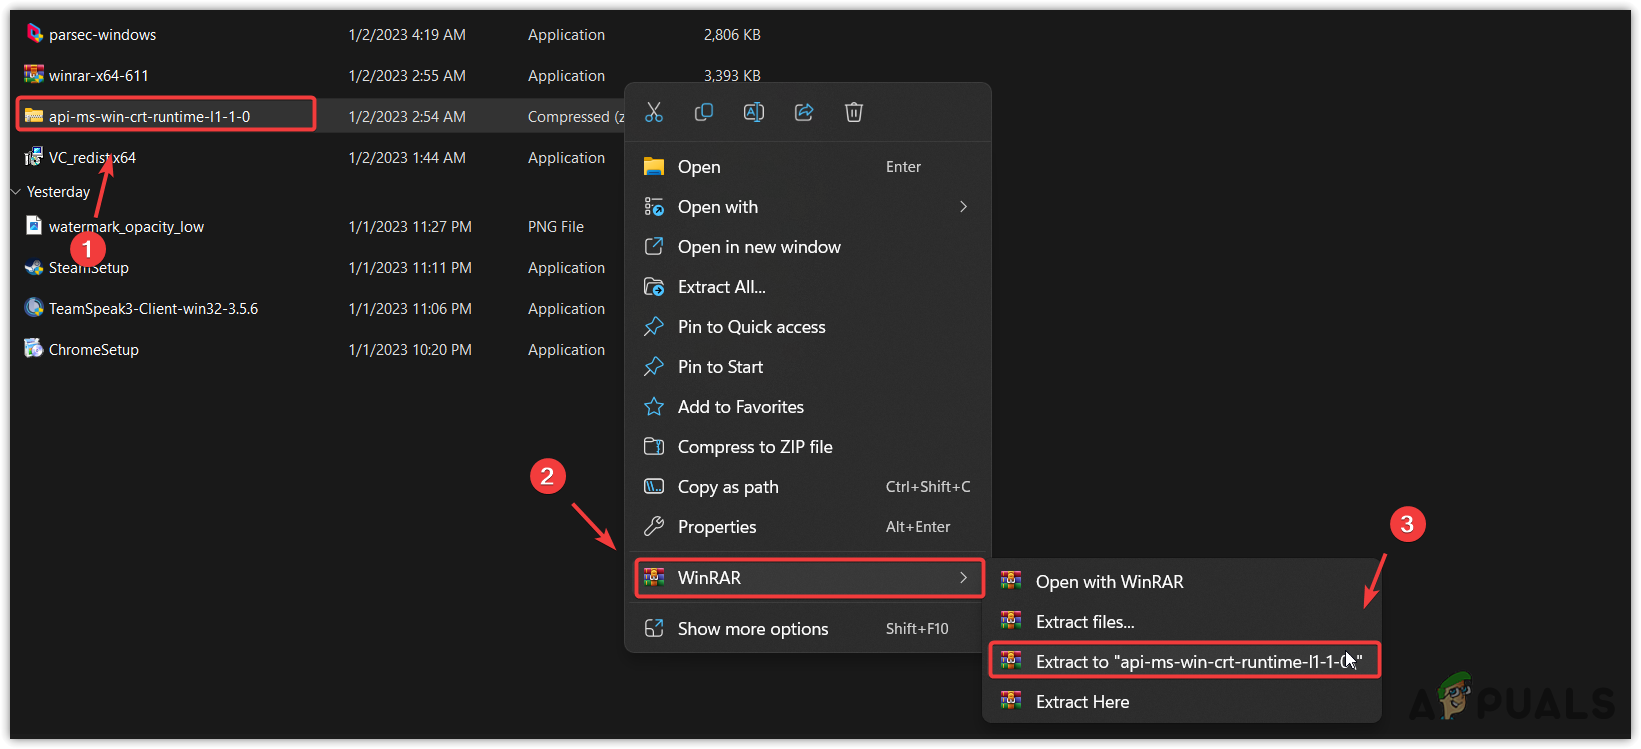
Extracting DLL file - Navigate to the extracted folder, and right-click the DLL file.
- Select Copy from the options.
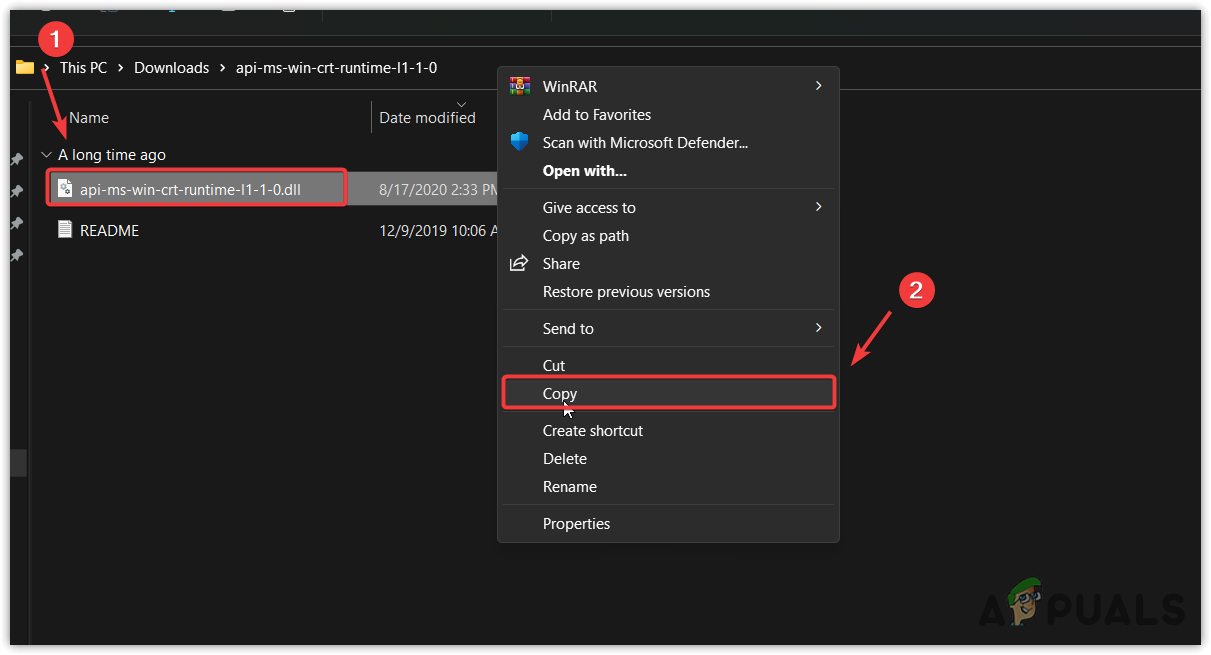
Copying a DLL file - Then, go to the following directory and paste the copied DLL file there.
C:\Windows\System32
- If you see the dialogue box asking to replace the existing file with the copied one. Select Replace the file in the destination.
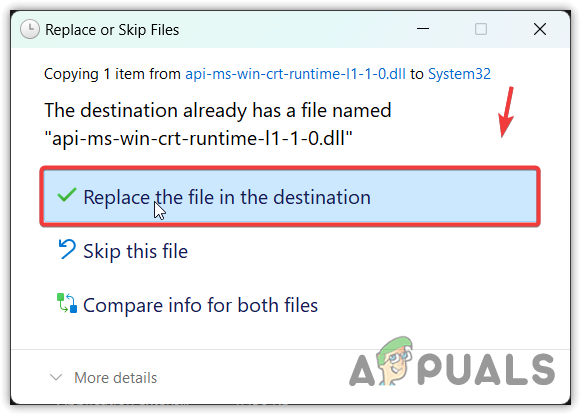
Replacing the file to its destination - Once done, launch the program that gives you the error message.
3. Update your Windows
If the issue is not fixed yet, another method you can try is downloading the available updates for your Windows. Since Microsoft Visual C++ is required to run various Windows programs and third-party applications, you can install it via the built-in Windows update utility. To do so, follow the steps:
- Press the Windows key and type Check for updates.
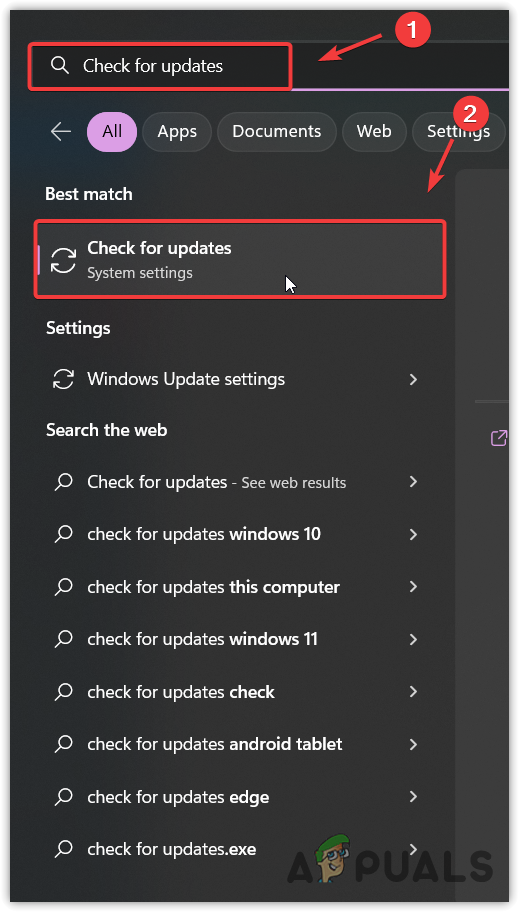
Opening Windows Update settings - Click Install all to install all the pending updates.
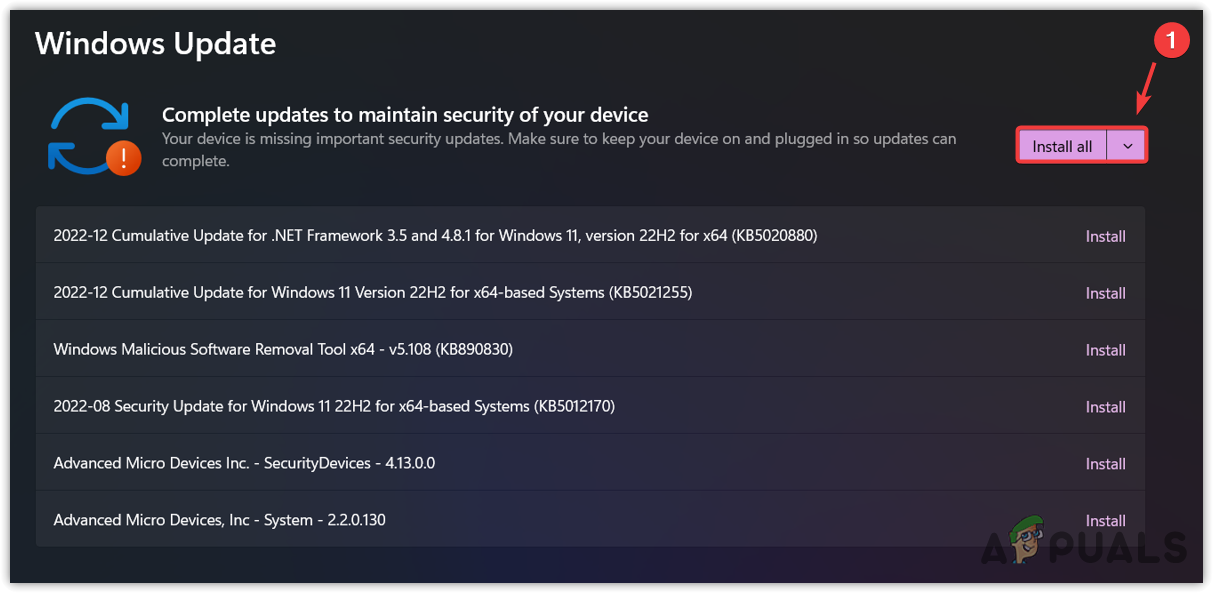
Installing Windows updates - Once the installation is finished, you may need to restart your computer once.
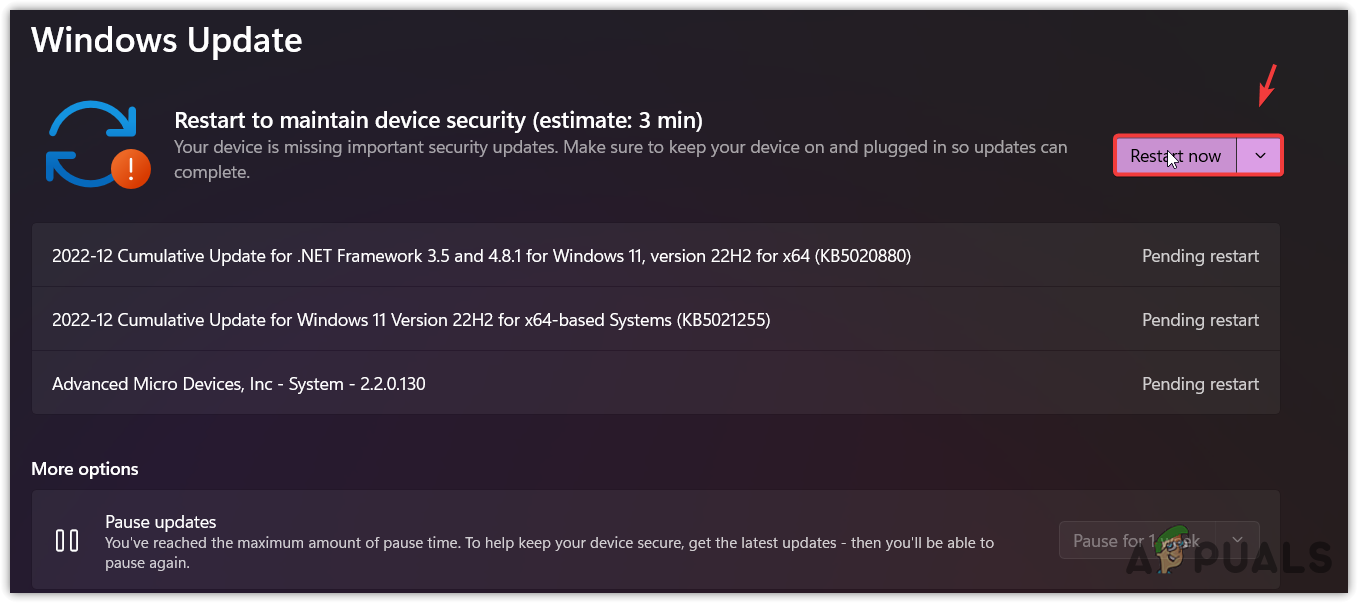
Restarting Windows after updating Windows - Once done, try to launch the program to see if the error is fixed.
4. Execute DISM and SFC Commands
DISM, or Deployment Image Servicing and Management, is an in-built utility that downloads the required files through the Windows update utility and replaces them with the corrupted ones.
The SFC or System File Checker is known to fix the system files, especially the DLL. It scans the protected system files and replaces them with a cached copy located in the compressed folder at %WinDir%\System32\dllcache.
To fix this error, try executing DISM, and SFC commands one by one with the help of the following instructions.
- Press the Windows key and type Command prompt.
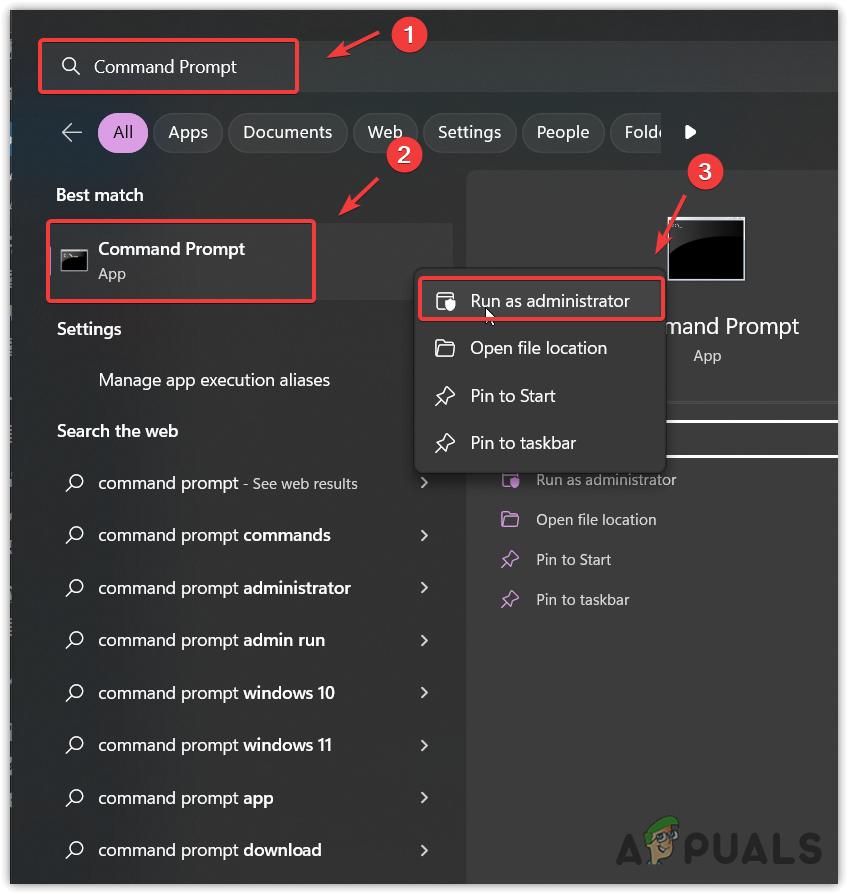
Opening command prompt as administrator - Right-click the Command Prompt and select Run as administrator.
- Once it is launched, enter the following commands.
DISM /Online /Cleanup-Image /RestoreHealth
sfc /scannow
Note: This may take some time to finish the verification.
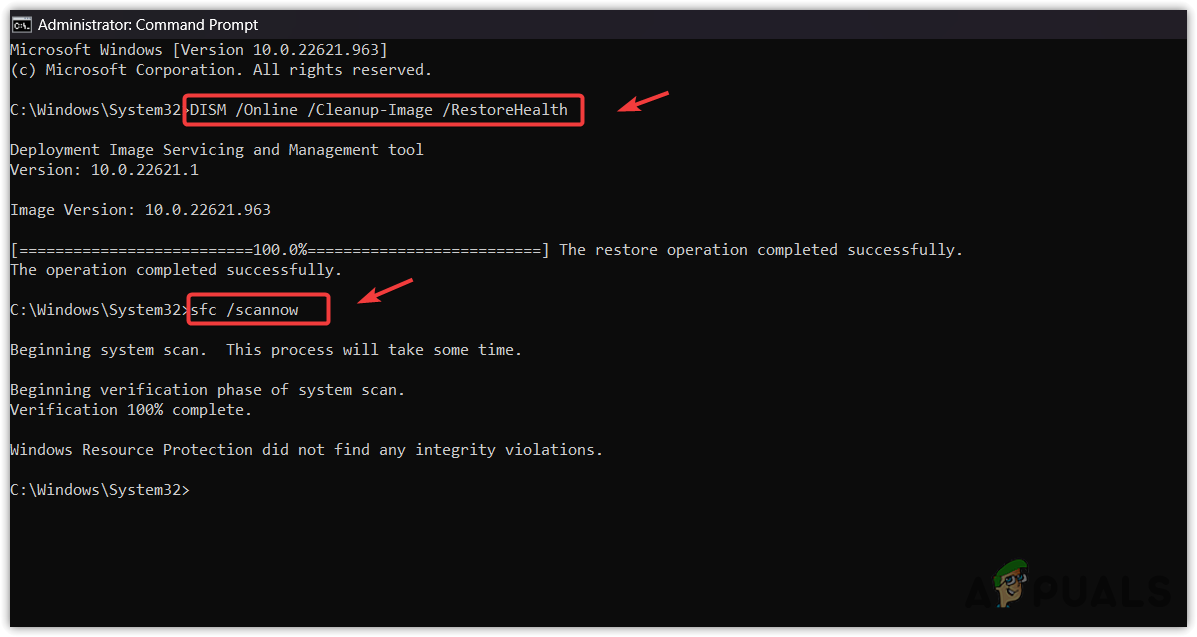
Repairing DLL and System files - Once done, now check if the problem is resolved.
5. Use a System Restore utility
If the issue is still there, the final and last solution is to restore the Windows version to an earlier state where you were not encountering this issue. To restore the Windows version, you will need a restore point created when the error was not occurring.
If you don’t have any restore points, then you cannot follow this method, and we don’t recommend you reinstall or reset Windows for this little error. Instead, take a copy of the missing DLL file from your friends’ PC, computer, or laptop with the same system type. Then, paste it into the C:\Windows\System32.
Follow the steps to restore your Windows version to its previous state:
- Press the Windows key and type rstrui in the Start Menu.
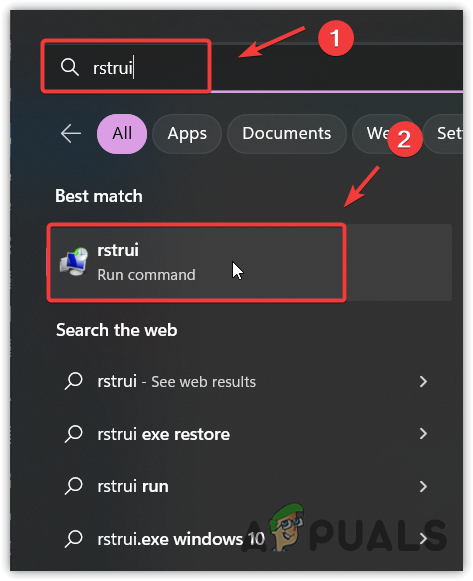
Running a Restore Command from Start Menu - Open the System Restore command and click Next.
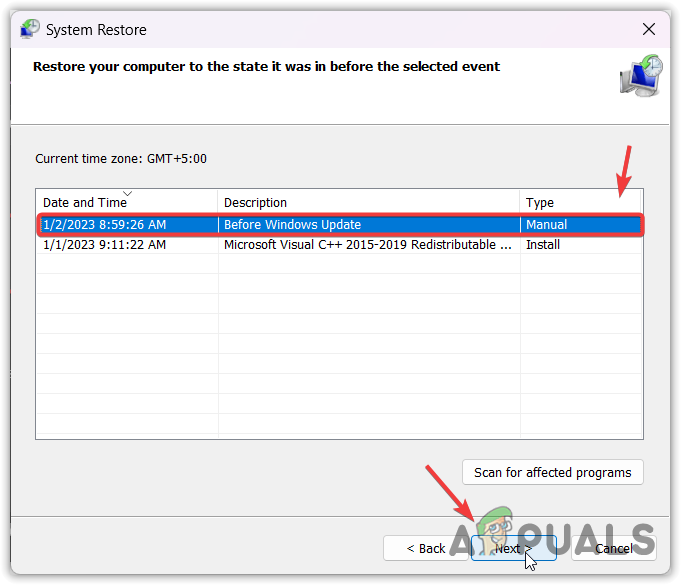
Selecting a restore point - Select the restore point and click Next.
- Click Finish to start the system restore point.
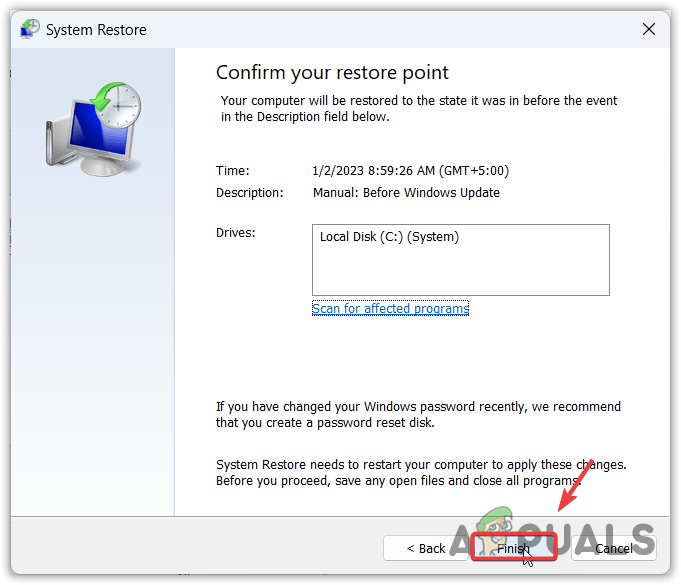
Clicking Finish to start the process


