Fix: An Error Occurred while Applying Security Information
This error usually appears when trying to change various security settings of a file or folder located on your computer or on an external media connected to it. The error message is usually preceded by an ‘access denied’ message appearing when trying to move, copy, or delete the files you don’t have proper access to.
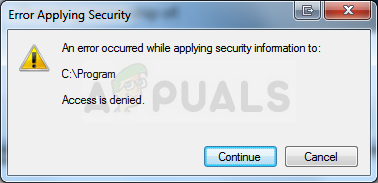
The error appears problematic because it prevents users from adding proper permissions for making the file available for use and it seems like there is no way out. Still, we have prepared several working methods for you to check out and we hope they will help you out!
What Causes the An Error Occurred while Applying Security Information?
- Read Only mode may be turned on, preventing any access to the file or folder
- You may need to be the owner of the file before you can perform any valid action over it
Solution 1: Disable the Read-Only Mode
Sometimes the file’s properties prevent it from being freely accessed, especially if the Read Only mode is active in the file’s or folder’s properties. The easiest way to resolve this specific error code is to disable the Read Only mode. It might not work for everyone but it’s the easiest way of resolving this issue.
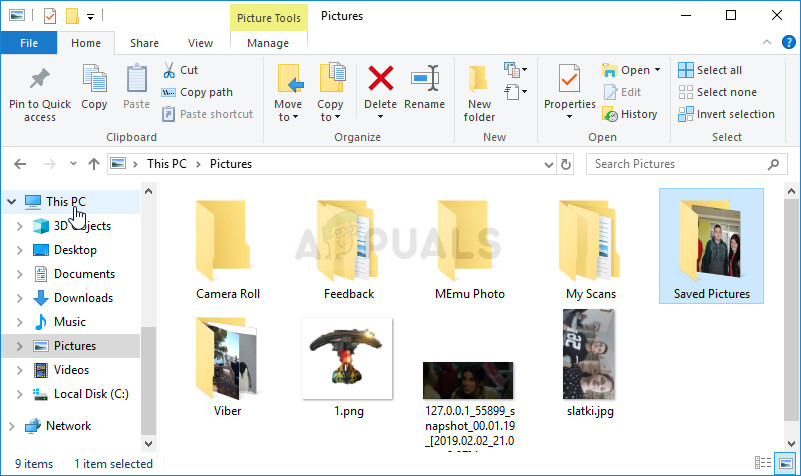
- Open your Libraries entry on your PC or open any folder on your computer and click on This PC option from the left side menu.
- Navigate to the location where your problematic file or folder is located.
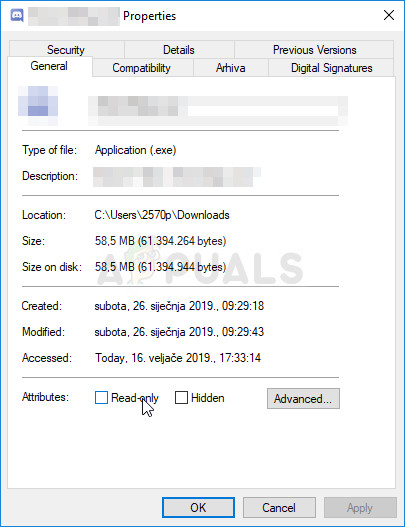
- Right-click on the problematic folder and click the Properties option from the context menu. Stay in the General tab and locate the Attributes section at the bottom. Clear the box next to the Read-only option and click on Apply before exiting. Check to see if the problem still appears.
Solution 2: Take Ownership of the File
Taking ownership of the file is sometimes vital if you want to add permissions to various user accounts to edit or copy the file. Changing the owner is generally an easy process and it will grant you full access to security properties of the file if you follow the instructions we have prepared below with great care.
- Open your Libraries entry on your PC or open any folder on your computer and click on This PC option from the left side menu.
- Navigate to the location where your problematic file or folder is located.
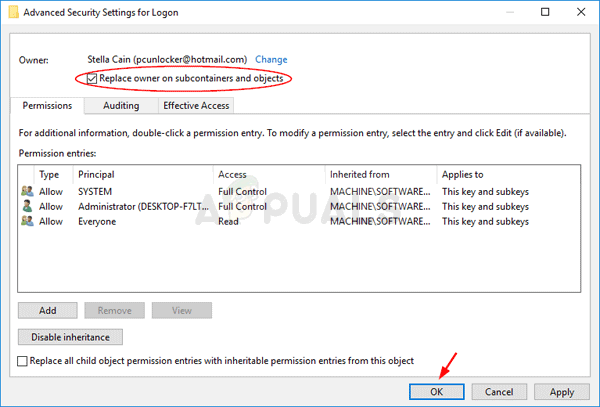
- You will need to take ownership of the file or folder located inside. Right-click the folder, click Properties, and then click the Security Click the Advanced button. The “Advanced Security Settings” window will appear. Here you need to change the Owner of the key.
- Click the Change link next to the “Owner:” label The Select User or Group window will appear.
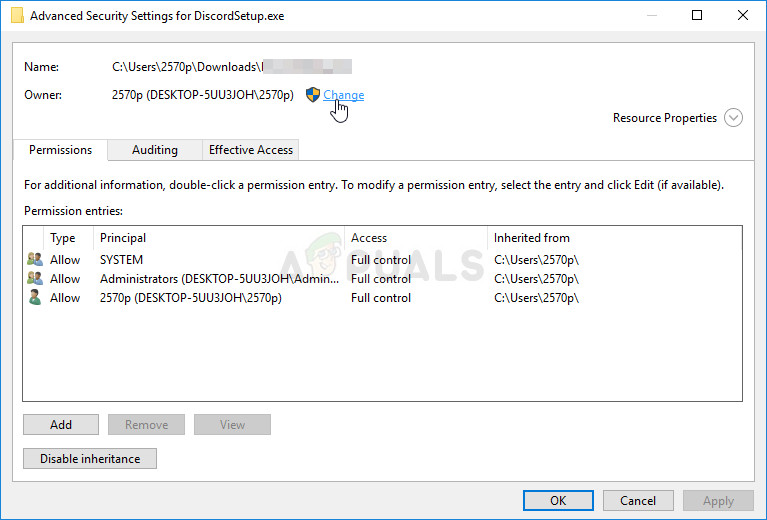
- Select the user account via the Advanced button or just type your user account in the area which says ‘Enter the object name to select’ and click OK. Add your user account.
- Optionally, to change the owner of all subfolders and files inside the folder, select the check box “Replace owner on subcontainers and objects” in the “Advanced Security Settings” window. Click OK to change the ownership.
- Now that you have complete control over the folder, open it, select everything you find inside and access the files properly. Restart your computer and the problem should be resolved.
Alternative: Since some users have still failed to take ownership of the file or folder via the means explained above because of lack of permissions or administrator access, the best alternative thing you can do is to use Command Prompt to resolve the problem. The end result is essentially the same!
- Search for “Command Prompt” by typing it either right in the Start menu or by pressing the search button right next to it. Right-click the first entry which will pop up as a search result and select the “Run as administrator” context menu entry.
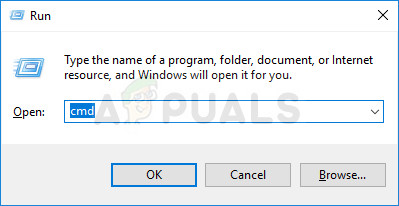
- Additionally, you can also use the Windows Logo Key + R key combination in order to bring up the Run dialog box. Type in “cmd” in the dialog box which appears and use the Ctrl + Shift + Enter key combination for admin Command Prompt.
- Type in the following commands in the window and make sure you press Enter after typing each one. Wait for the “Operation completed successfully” message or something similar to know that the method worked.
takeown  /f   "F:\ProblemFolder"   /a   /r   /d y
icacls "F:\ProblemFolder"  /t /c /grant administrators:F  System:F  everyone:F
- If the commands above report no errors, then you have managed to change the permissions and the ownership of the file or folder!
Solution 3: Changing Drive Ownership
If the whole external or internal is refusing to cooperate by displaying this exact same error message, you can try the fix below which will essentially use hidden administrator permissions in order to give ownership to the administrator account and fix things. The solution is lengthy but it worked for plenty of people!
- On the login screen of your computer, when the computer boots or after you log out, click on the Power icon and hold the Shift key while clicking restart.
- Instead of restarting, a blue screen will appear with a couple of options. Choose Troubleshoot >> Advanced Options >> Command Prompt.
- Of course, you can open Command Prompt simply by using the Windows Key + R key combination and typing “cmd” before clicking OK or by searching for it.
- Copy and paste the following command in Command Prompt and click Enter. You should be able to see the “The command completed successfully” message in no time.
net user administrator /active:yes
- Log into this admin account and wait for a couple of minutes before everything is ready.
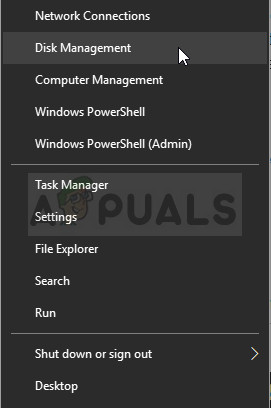
- Open the Disk Management utility by searching for it in the Start menu or the search bar and clicking the first option.
- The alternative is to either use the Windows Key + X key combination or right-click on the Start menu and choose the Disk Management option in order to open its console.
- Locate the drive you want to fix by checking out its name under the Volume column or by checking under for it. Right-click on it and choose the Properties option from within the context menu which will appear.
- Navigate to the Security tab. Click the Advanced button. The “Advanced Security Settings” window will appear. Here you need to change the Owner of the key.
- Click the Change link next to the “Owner:” label The Select User or Group window will appear. Navigate to the Advanced tab and click Find Now.
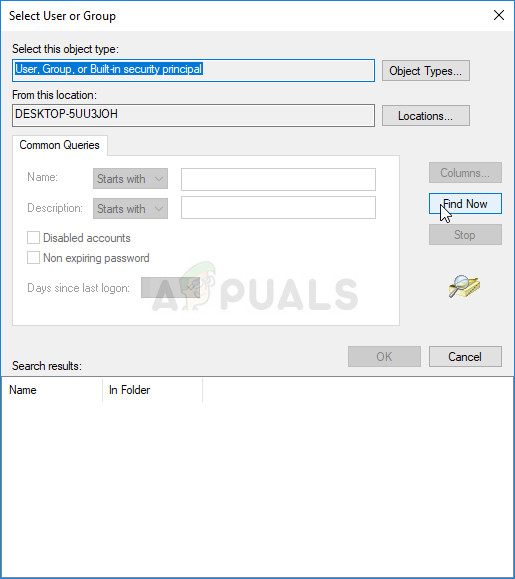
- Select the Administrator user account via the Advanced button under your computer name and not your username.
- Also, to change the owner of all subfolders and files inside the folder, select the check box “Replace owner on subcontainers and objects” in the “Advanced Security Settings” window. Make sure you check the “Replace all child object permission entries with inheritable permission entries from this object” option at the bottom.
- Click OK and you’ll see a security window pop up but make sure you click yes for each appearance.


thanks you a lot