How to Fix Black Screen Issues When Using ALT+TAB?
Black screen issue in Windows can occur when users switch between applications using ALT+TAB, causing the screen to go completely black for a few seconds. Sometimes, the screen recovers, but in others, it remains unresponsive.

This issue is primarily caused by GPU-related conflicts, where the display driver fails to render transitions between applications properly. Some users have reported that hardware-accelerated GPU scheduling interferes with the rendering process. Others have linked the issue to fullscreen optimizations, which affect how Windows handles application switching.
In some cases, Windows Explorer may fail to refresh correctly, leading to a black screen when switching back to the desktop.
Additionally, multi-monitor setups, variable refresh rate (VRR) settings, and recent Windows updates have also contributed to this issue.
Below, we’ll explore the possible causes and proven solutions to resolve this problem.
1. Update Your Windows
Before trying any other fixes, ensure your Windows is fully updated. Older versions of Windows were particularly prone to this issue. Microsoft has since released hotfixes, including the KB5044384 update, which specifically addresses the ALT + TAB black screen problem. By installing the latest updates, you can resolve the issue and avoid future display conflicts.
- Open your Windows Settings and navigate to the Windows Update tab.
- Click on Check for updates to scan for the latest available updates.
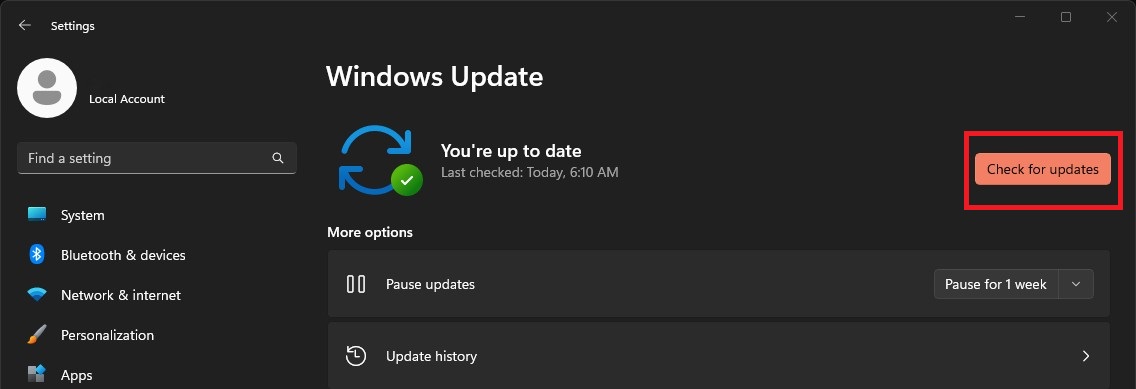
- Windows will search for and download the latest updates. Once the download is complete, you may need to restart your system to apply the updates.
2. Update Your NVIDIA Graphics Drivers
Outdated NVIDIA graphics drivers are a common cause of black screen issues when using ALT + TAB in Windows. NVIDIA has acknowledged this issue in driver version 565.90, where users experience a brief 3-second black screen when switching from a game to the desktop using ALT + TAB. To fix this problem, make sure to update your NVIDIA graphics drivers to the latest version available.
- Open GeForce Experience on your computer.
- Go to the Drivers tab.
- Click on Check for Updates.
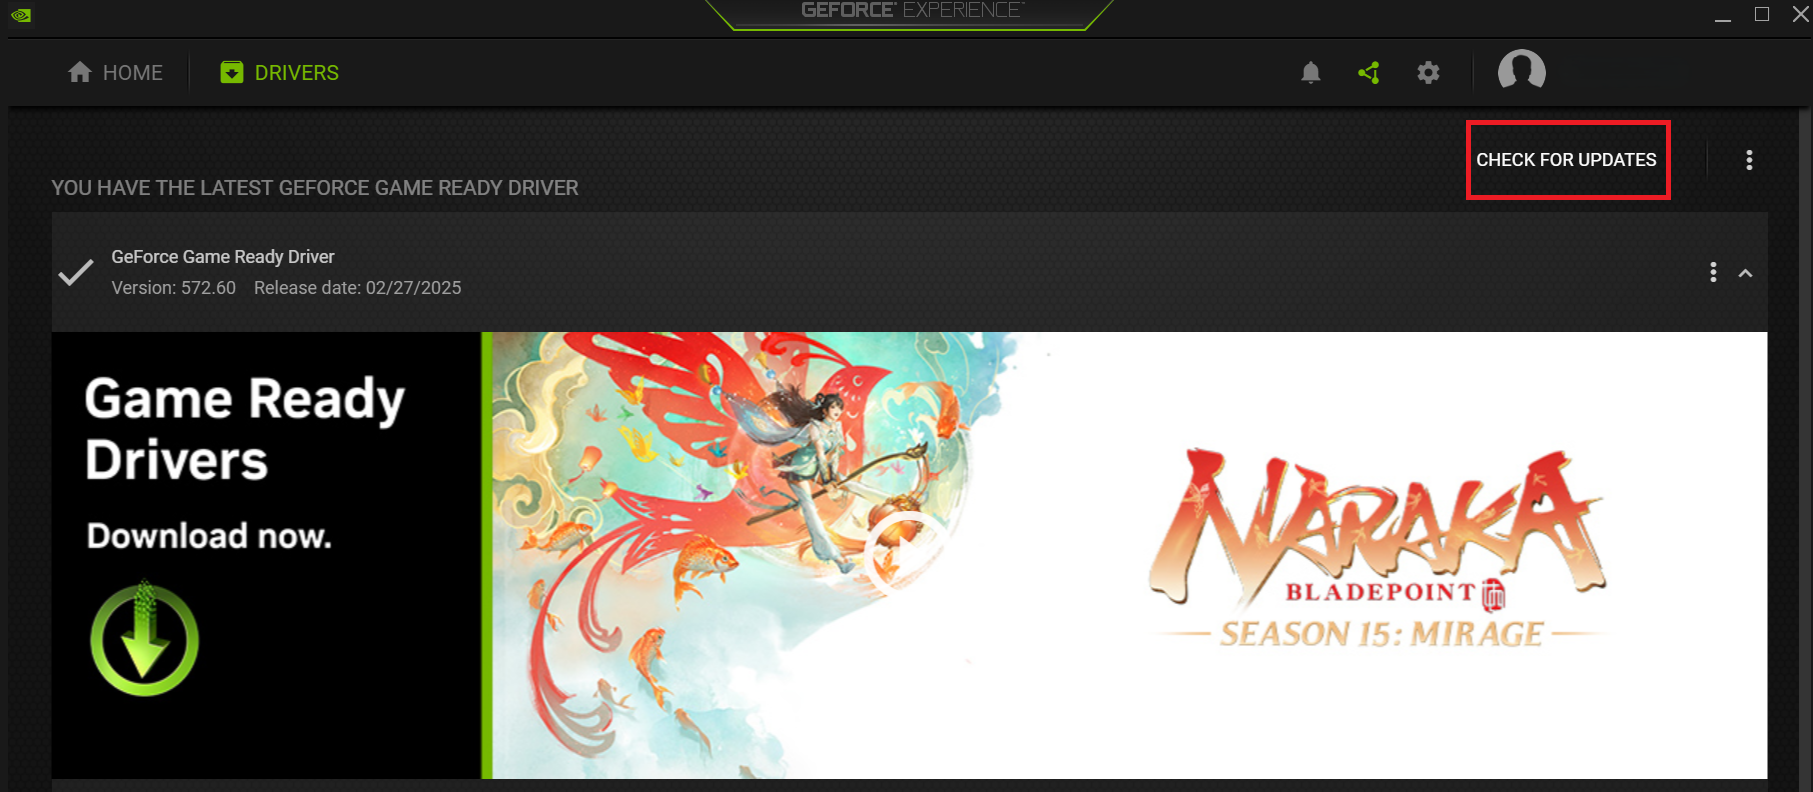
- If a newer version of the driver is available, it will be downloaded and installed automatically.
If you installed NVIDIA drivers manually without using GeForce Experience, a clean installation might be necessary to fully resolve the issue. This ensures that outdated or conflicting driver files don’t interfere with the update. Follow our detailed guide to properly clean-install your NVIDIA graphics drivers.
3. Disable G-Sync
G-Sync is a variable refresh rate technology developed by NVIDIA to eliminate screen tearing during gameplay. However, when enabled, it may cause delays when switching between windows, especially if the game and the window you’re switching to operate at different refresh rates. To resolve this issue, you can disable G-Sync.
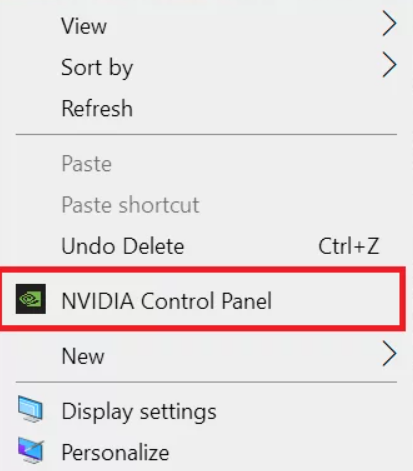
- Open the NVIDIA Control Panel.
- Navigate to the Set Up G-Sync tab under the Display category.
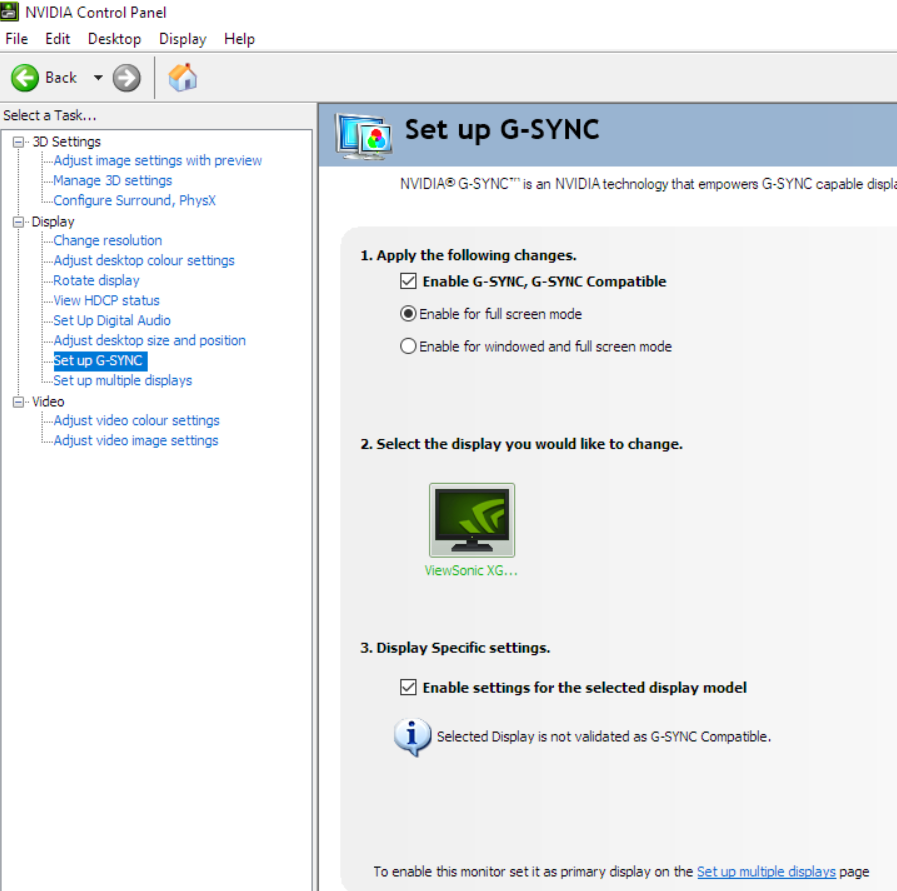
- Uncheck the Enable G-Sync checkbox and click Apply to save the changes.
4. Change Shader Cache Size
Games and applications use shaders to render graphics, and NVIDIA’s shader cache helps reduce stuttering and improve performance by storing precompiled shaders.
If the shader cache size is too small, the GPU may struggle to load necessary shaders when switching between applications (e.g., using ALT + TAB), resulting in temporary black screens or delays.
Increasing the shader cache size allows more shaders to be stored locally, reducing the need for real-time recompilation and ensuring smoother transitions between apps.
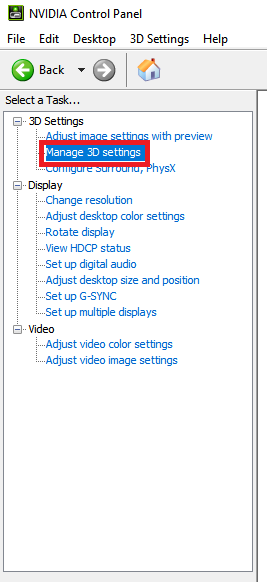
- Open the Nvidia Control Panel.
- Under the 3D Settings category, click on Manage 3D Settings.
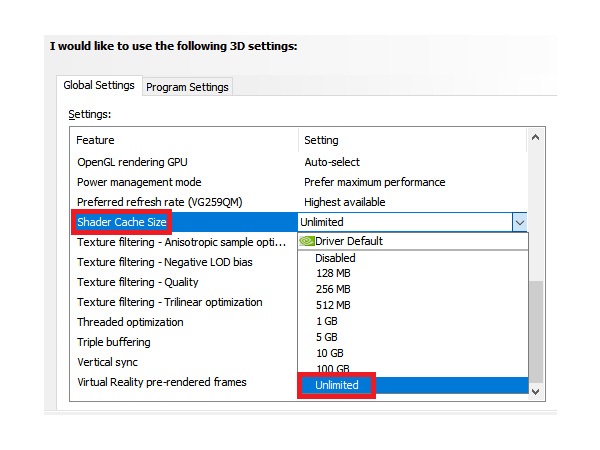
- Scroll down to Shader Cache Size. Open the drop-down menu beside it and select Unlimited. Then, click Apply in the bottom-right corner to save the changes.
5. Change Resolutions and Display Modes
Differences between your in-game resolution and desktop resolution can cause a black screen when switching between screens, especially if running the game in full-screen mode.
One solution is to run the game in borderless full-screen mode instead. You can change this setting in the display options of your game, usually under a section labeled display modes or something similar.
While this may resolve the issue, it can sometimes result in slightly downgraded in-game performance. If this isn’t ideal for you, there’s another fix you can try.
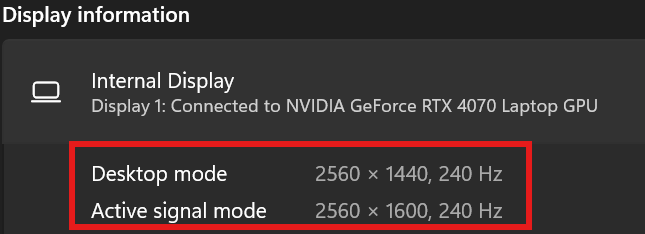
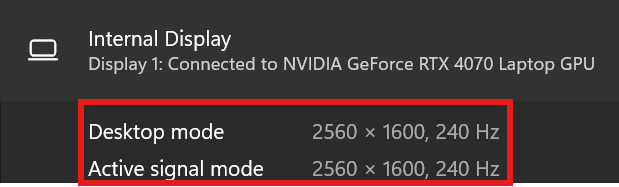
When the desktop resolution doesn’t match the active signal resolution, Windows has to adjust the display settings when switching between apps. This involves rescaling and reformatting the display, which can cause delays and result in a black screen. To avoid this, you’ll need to match your desktop resolution with your active signal resolution and ensure your in-game resolution is set to the same value.
To match your desktop and active signal resolution:
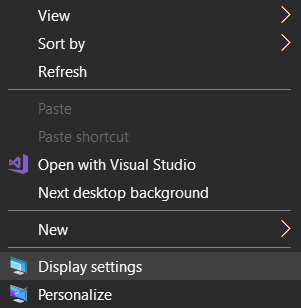
- Right-click on the desktop and select Display settings.
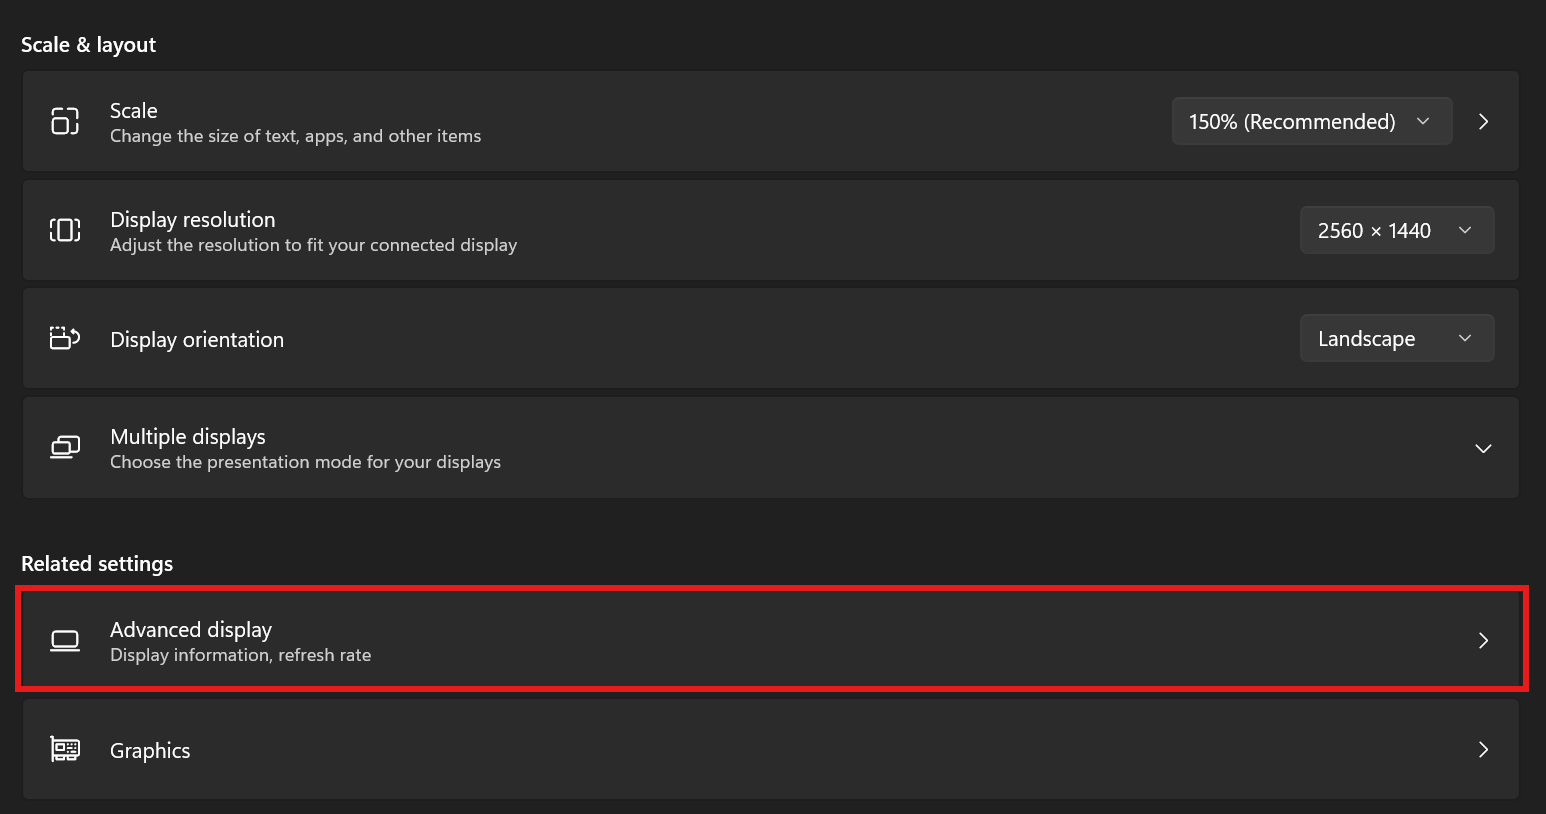
- Scroll down and click on Advanced display settings.
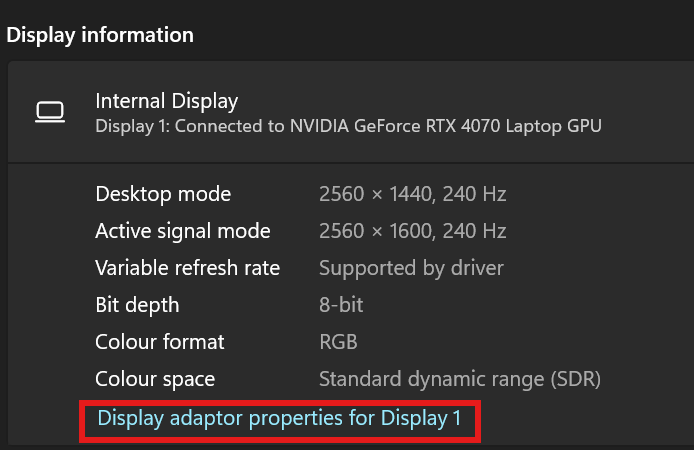
- Check if the Desktop resolution matches the Active signal resolution.
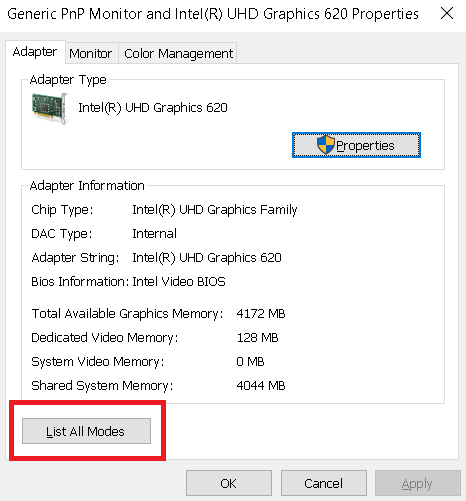
- If they don’t match, click on Display adapter properties for Display 1 (or the selected display). A new window will open.
- Click on List All Modes. A new window will appear, showing a list of available display resolutions.
- Select the resolution that matches the Active signal resolution and click OK.
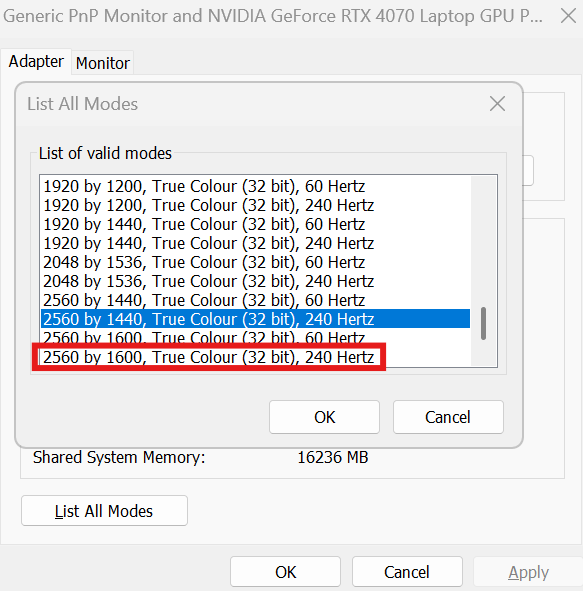
- Click Apply. The screen may flicker briefly as the resolution adjusts.
- Recheck both the Desktop resolution and Active signal resolution to ensure they match.
- In your game or application’s display settings, select the same resolution you set for your desktop resolution.


