Fix: The Active Directory Domain Services is currently unavailable ‘Windows 7, 8 and 10’
The error Active Directory Domain Services is currently unavailable means that the system is not able to find and connect to your printer, hence the process is stopped and cannot proceed further. This process allows the computer to manage and allocate resources. If this error occurs, it means that there is most probably a problem with the permissions, drivers, UAC etc.
We have listed down a number of solutions for you to check. Start with the first one and work your way down.
Solution 1: Resetting Printer Spooler Settings
The spooler service is a software program which is responsible for managing all print jobs being sent to the computer printer. The print spooler service is usually visible to users and they can also cancel a print job which is being processed. It also allows them to manage jobs which are currently on the waitlist.
We can try restarting this service and check if this solves the problem.
- Press Windows + R to launch the Run application. Type “services.msc” in the dialogue box and press Enter.
- Locate the service “Print Spooler” present in the list of services. Double-click it to open its properties. Click the “Stop” button present underneath system status and press “Ok” to save changes.

- Since we have disabled the service, we can now focus on deleting printer files. Press Windows + E to launch the quick access and click on “This PC” present in the left navigation pane.
- Navigate to the following path:
C:\Windows\System32\spool\PRINTERS
![]()
Permission might be needed to access the following folder. If prompted, press Continue.
- Once in the folder, delete all the files in the PRINTERS folder and close the window.
- Now navigate back to the Services tab and Start the “Printer Spooler” service. Also, remember to keep the startup type as “Automatic”.

- Restart your computer and check if the printer connects correctly.
Solution 2: Adding Printer Manually and Updating Drivers
If restarting the printer spooler doesn’t work for you, we can try adding the printer again to your computer. Most of the time the printer is automatically added to your PC when you connect with all the drivers being installed. We can try updating the drivers and adding the printer again.
- Before we start the process, we need to remove the printer from your connected list of devices. Press Windows + R to launch the Run application. Type “control panel” in the dialogue box and press Enter.
- Once in the control panel, select “Large icons” using the drop-down present at the top right side of the screen and select “Devices and Printers”.

- Locate your printer, right-click it and select “Remove device”. A UAC will pop up asking you to confirm your actions as an administrator.

- On the same window, click “Add a printer” present at the near top of the screen. A wizard will guide you on how to add your printer to your computer. Make sure that the printer is connected properly to your computer. If you are using the printer over a wireless network, try plugging it to your computer via a USB.

- Navigate to your manufacturer’s official website and download the latest drivers available to an accessible location. Press Windows + R, type “devmgmt.msc” and press Enter.
- Navigate to the subcategory of “Print queues”, expand it, select your printer, right-click it and click “Update Driver”.

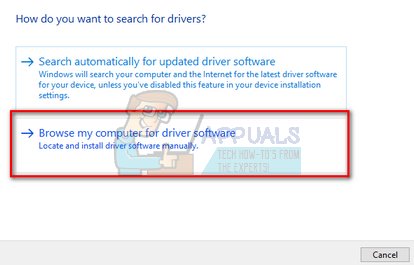
- Select the second option “Browse my computer for driver software”.

- Navigate to the location where you downloaded the latest drivers for your printer. Select it and install it by pressing “Next”. When the process is complete, restart your computer and check if the problem is solved.

Solution 3: Granting access of PrinterPorts and Windows
If both the above solutions don’t work, we can try changing the permissions of files in the registry editor. It is possible that the error keeps emerging because your account doesn’t have access to some essential keys (such as PrinterPorts etc.).
Note: Registry editor is a powerful tool. Incorrect use or changing keys which you know nothing about can hamper your computer and make it unusable.
- Press Windows + R to launch the Run application. Type “regedit” in the dialogue box and press Enter.
- Once in the registry editor, navigate to the following file path:
HKEY_CURRENT_USER > Software > Microsoft > Windows NT > CurrentVersion
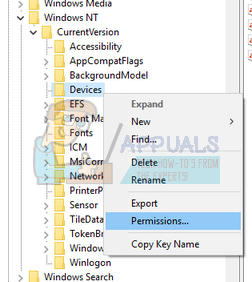
- Right-click on “Devices” and select “Permissions…”.

- Select your account from the list and click all checkboxes present under the column of “Allow”. Make sure that no item is checked under the column of “Deny”.

- Carry on the same procedure for the entries of “PrinterPorts” and “Windows”.

- Once done, restart your computer and check if the problem got solved.
Note: You should reinstall the printer again after implementing the above changes if the printer still doesn’t work.
Solution 4: Recognizing Printer using Other Applications
Another workaround to fix this issue is to recognize the printer using other applications. We will demonstrate this using NotePad as almost every computer has this application by default.
- Right-click on your Desktop, select New > Text Document

- Type anything in the blank space. Click File > Print

- A new window will pop up containing all the printers currently installed on your computer. If you can’t find your printer, click on “Find Printer…” present at the right side of the window. Now Windows will start detecting your printer and hopefully, the problem will be solved.

Note: There were also some reports where users stated that upgrading their Office suite solved the problem. It seems that there were some specific files corrupt which were causing the problem.
Furthermore, you should also make sure that your Windows OS is updated to the latest build using Windows Update manager. If the printer still doesn’t work on your computer, you can try running the Printer Troubleshooter and also try using the printer on another computer. This will help in isolating the problem.