Fix: Microsoft Office Error Code 7q6ch During Activation or Installation
The error tag “7q6ch” in Microsoft Office typically appears during the installation or update process, especially when the application attempts to load or activate Office components. This error generally indicates a problem with the activation process, often caused by a conflict with an existing Office installation or an interrupted update.
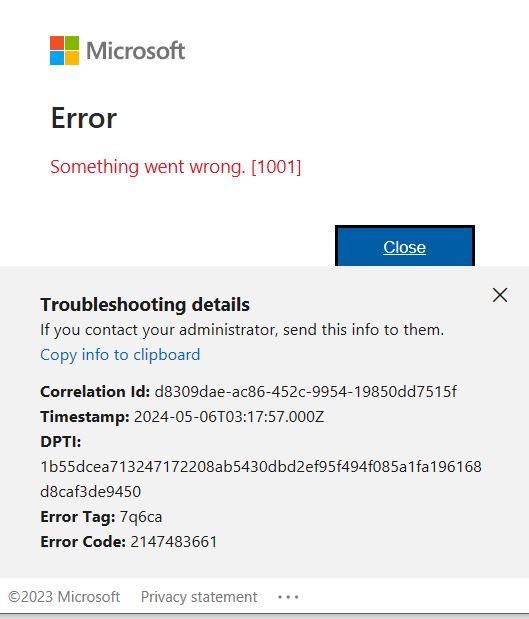
Other potential causes include incomplete or failed Office repairs, network connectivity issues, outdated system files, or multiple conflicting Office installations on the same system.
Now that you know the causes, let’s discuss the solutions.
1. Change Internet Connection
Sometimes, this error can occur due to problems with your internet connection. A weak or unstable network may interrupt the activation process, leading to errors like the 7q6ch tag. Switching to a different connection—such as a mobile hotspot or another Wi-Fi network—can help resolve the issue, as each connection may use different DNS settings or routing paths.
2. Run SFC and DISM
This error can sometimes be triggered by corrupted or missing system files. Running built-in tools like System File Checker (SFC) and Deployment Image Servicing and Management (DISM) can help resolve these issues.
SFC scans your system for corrupted or missing files and automatically repairs them, while DISM fixes problems with the Windows system image that might be affecting core components, including those used during Office activation.
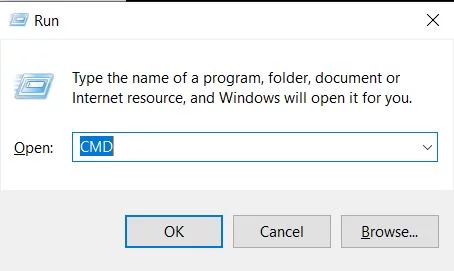
- Press Windows + R to open the Run dialog, type cmd, then hold Shift and press Enter to run Command Prompt as administrator.
- In Command Prompt, run these two system repair commands one after another (they may take 10-30 minutes to complete):
sfc /scannow
Dism /Online /Cleanup-Image /RestoreHealth
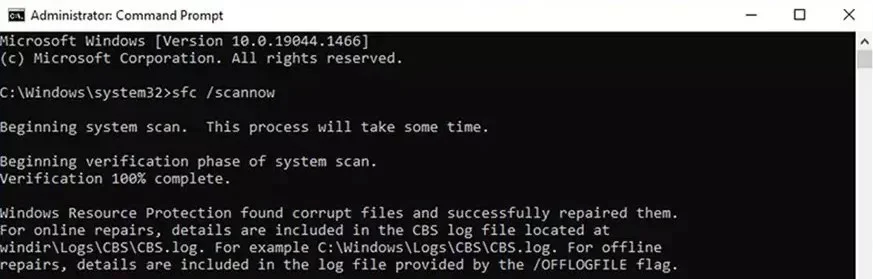 Note: The first command scans system files, while the second repairs Windows image.
 - After both commands complete, restart your computer for all repairs to take effect.
3. Add Account Manually
This issue can sometimes occur due to improper synchronization between Microsoft Office applications and your Microsoft account. Manually adding your account helps re-establish the connection, ensuring that all Office services are properly linked and synchronized.
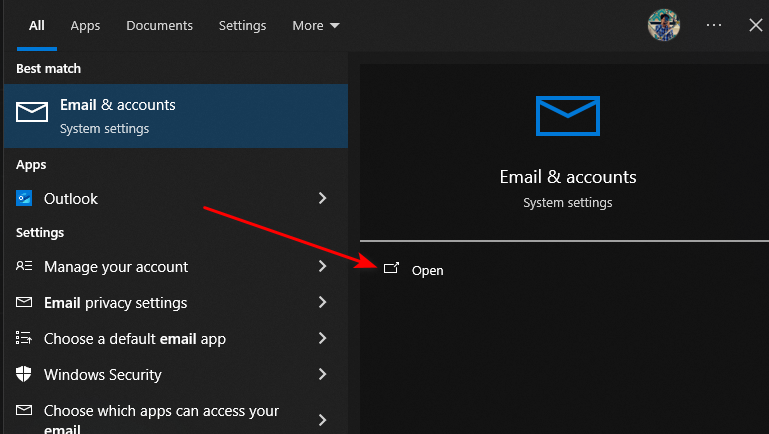
- Open Windows Search (Windows key + S), type Email & accounts, and select the matching system settings option.
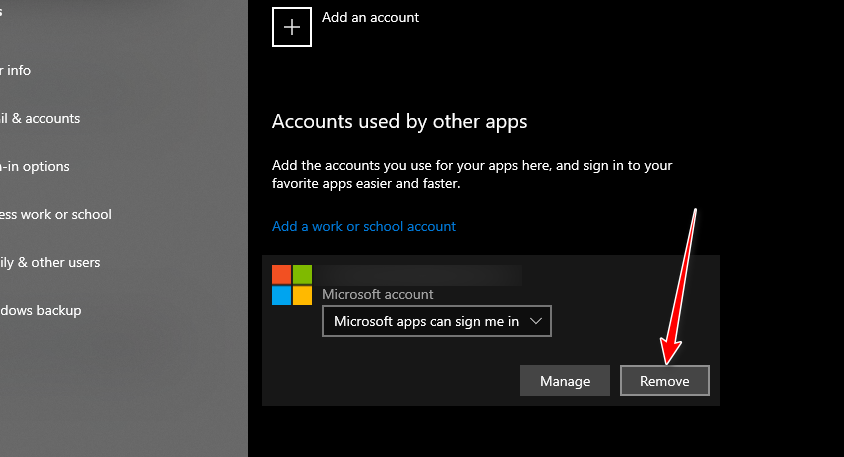
- Select your email account and choose Remove to delete it from your system.
- Restart your computer to clear any cached account data.
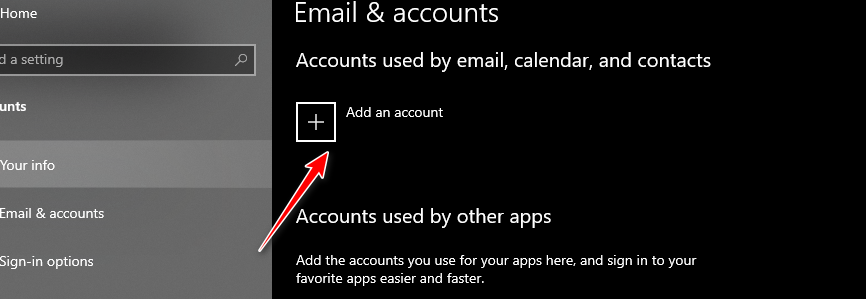
- After restarting, search for and open Email & accounts again.
- Click Add an account, select your email provider (Microsoft, Google, etc.), and follow the prompts to re-add your account.
4. Open Outlook in Safe Mode
If the error only appears when using Outlook, try launching it in Safe Mode. Safe Mode disables unnecessary add-ins, resets custom settings, and runs Outlook with its default configuration. This can help resolve the error if it’s caused by a misbehaving add-in or user-specific setting. It also helps confirm whether the issue is related to Outlook’s settings or extensions.
- Press Windows + R to open the Run dialog box.
- Type exactly:
outlook.exe /safeand press Enter.
- Wait for Outlook to open in Safe Mode (you’ll see “Safe Mode” in the window title).
- In Safe Mode, try to reproduce the issue you were experiencing:
- If the problem doesn’t occur in Safe Mode, it suggests an add-in or customization is causing the issue.
- If the problem persists, it may indicate corrupted data files.
To troubleshoot further:
- Go to File > Options > Add-ins
- Disable all add-ins and restart Outlook normally
- Re-enable add-ins one by one to identify the problematic one
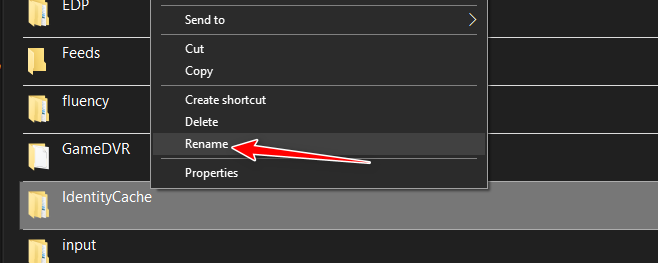
5. Rename OneAuth and IdentityCache Folders
Renaming the OneAuth and IdentityCache folders can help resolve this error, as these folders store cached authentication data used for temporarily saving login credentials. Sometimes, this cached data can become corrupted, leading to sign-in or activation errors. By renaming these folders, the system is forced to recreate fresh authentication files, which may eliminate the issue.
- Press Windows + R to open the Run dialog, type
%localappdata%, and press Enter.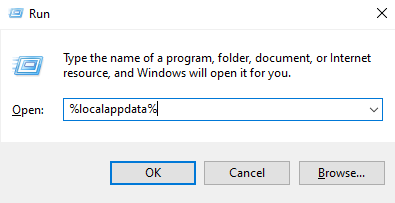
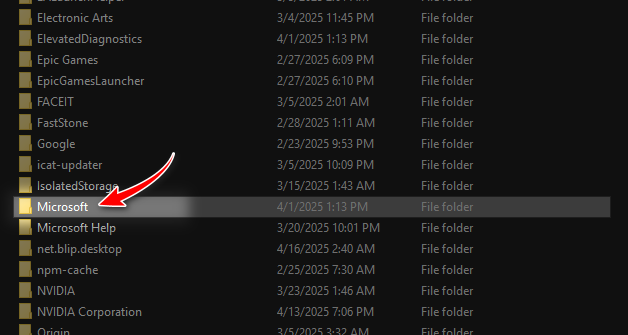
- In the File Explorer window that opens, locate and double-click the Microsoft folder.
- Find these two folders in the Microsoft folder:
- OneAuth
- IdentityCache
For each folder:
- Right-click the folder
- Select Rename
- Add .old to the end of the folder name (e.g., “OneAuth.old”)
- Press Enter to confirm
After renaming both folders, close all Microsoft applications. Restart your computer. The system will automatically recreate fresh versions of these folders.


