How To Enable or Disable Write Protection for a Disk Drive
When write protection is enabled on a disk drive, its contents cannot be modified or duplicated in any way. This is what makes write protection such a handy feature. Write protection can be enabled or disabled for any and all disk drives on all versions of the Windows Operating System. Before you continue, just to be on the safe side, create a system restore point so that if something goes wrong, you can revert to the restore point. See how to do this (the restore guide is aimed at Windows 10), but it also works for other versions of Windows.
How to enable or disable write protection for a removable disk drive
The following methods can be used to enable or disable write protection for a removable disk drive:
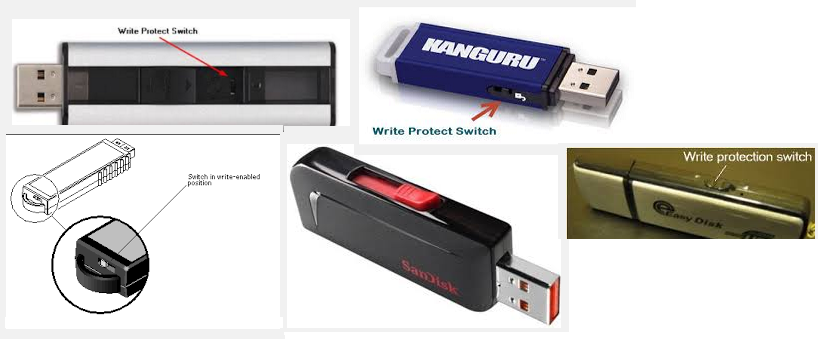
Method 1: Use a physical switch
Many removable disk drives such as MicroSD card adapters and USB flash drives come with dedicated physical switches that can be toggled to enable or disable write protection for them. These switches are most commonly located on the sides of the storage medium in question. These switches also override any write protection preferences that are set on the computer they are connected to.
Method 2: Enable or disable write protection for removable disk drives via the Registry Editor
You can also enable or disable write protection for ALL removable disk drives, and to do so, you will need to fiddle around with your computer’s Registry Editor. It should be keenly noted that using this method will turn write protection on or off for ALL removable disk drives – from USB flash drives to flash memory cards.
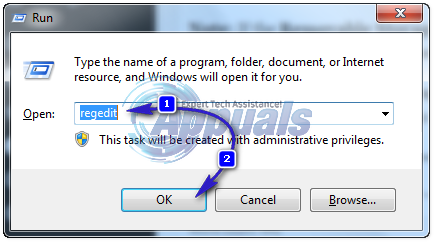
Press Windows Logo key + R to open a Run dialog. Type regedit into the Run dialog and press Enter.
Navigate to the following directory in the left pane of the window:
HKEY_LOCAL_MACHINE\SOFTWARE\Policies\Microsoft\Windows\RemovableStorageDevices
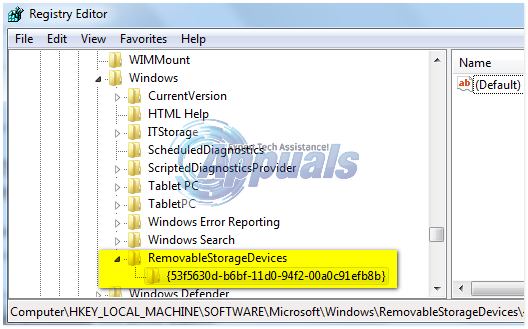
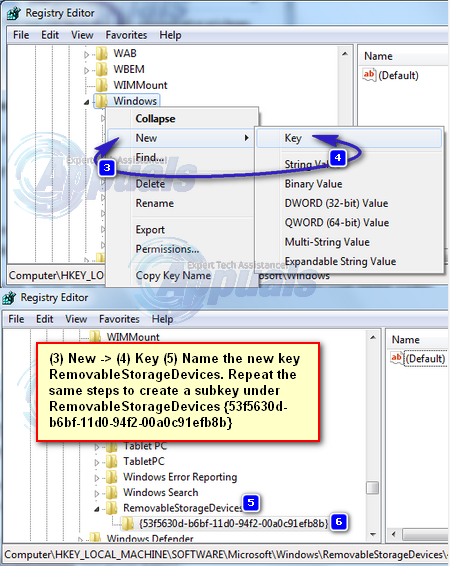
Note: If the ‘Removable Storage Devices’ key does not exist in your registry, right-click on ‘Windows’, hover over ‘New’, click on ‘Key’, name it ‘RemovableStorageDevices’, and press ‘Enter’.
Right-click on RemovableStorageDevices, hover over New, click on Key, name it {53f5630d-b6bf-11d0-94f2-00a0c91efb8b} and press Enter.
Click on {53f5630d-b6bf-11d0-94f2-00a0c91efb8b} to expand it in the right pane. To enable write protection for all removable disk drives, right-click on an empty area in the right pane, hover over ‘New’, and then click on ‘DWORD (32-bit) value’.
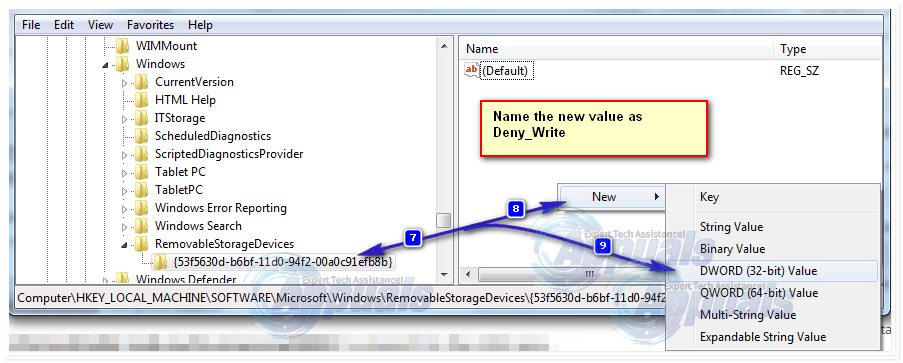
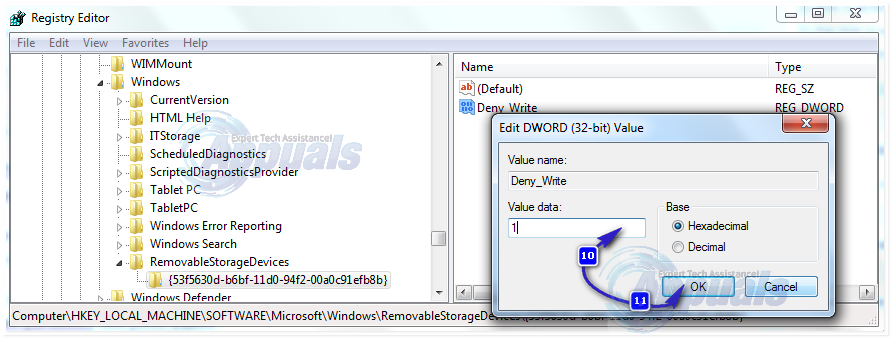
First, name the new value ‘Deny_Write’ and press ‘Enter’. Next, right-click on the ‘Deny_Write’ value and click on ‘Modify’. Type ‘1’ into the Value Data field, then click on ‘OK’. If you need to disable write protection for all removable disk drives, all you have to do is right-click on the ‘Deny_Write’ value, click on ‘Delete’, and then click on ‘Yes’ to confirm the action.
Close the Registry Editor. Restart your computer, and the changes will be applied once it boots up.
How to enable or disable write protection for any disk drive.
To enable or disable write protection on Windows 10 for any disk drive – whether it’s a removable storage device or a disk drive on an HDD or SSD – you need to follow these steps: (Don’t apply these to your main C:\ Drive). Doing so can lock up your drive as it’s in use while you’re on the computer, and it may not work. These methods are only recommended for external or secondary drives. If you want to protect your data, you can either encrypt it or use a password upon logon.
Right-click on the Start Menu button to open the WinX Menu. Click on ‘Command Prompt (Admin)’ in the WinX Menu. Alternatively, click ‘Start’, type ‘cmd’, then right-click ‘cmd’ and choose ‘Run As Administrator’.
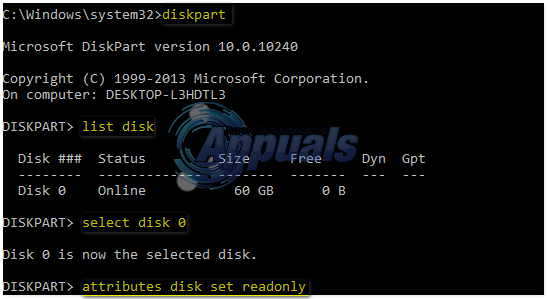
Type diskpart into the elevated Command Prompt and press Enter.
Type list disk into the elevated Command Prompt and press Enter.
The Command Prompt will now display a list of all disks connected to your computer. Take note of the Disk ### of the disk for which you want to enable/disable write protection. You can use the size of the disks to determine the one for which you would like to enable/disable write protection.
Type ‘select disk #’, substituting ‘#’ with the specific disk number (for example, 1) into the elevated Command Prompt. This is for the disk you wish to enable or disable write protection on, then press enter.
To enable write protection for the selected disk, type in attributes disk set readonly and press Enter. To disable write protection for the selected disk, type in attributes disk clear readonly and press Enter.
Once the command has been executed, write protection will have been enabled or disabled on the selected disk. You can now close the elevated Command Prompt.
thanks, easy to fallow. i started with the commodore64 waaaayyyy back, and always had to write my own code for anything i wanted, but after DOS was tossed as the primary interface, i lost touch with code and regisery writing. hung in there a bit with HTML code on myspace and live journal, but its nice to have someone go over this in a direct and easy way to understand.