Enable or Disable the Built-in Administrator Account on Windows 11
Just like with previous versions, Windows 11 includes a hidden built-in Administrator account that tech-savvy users can use without needing UAC (User Account Control) access. It’s a super useful way of avoiding the need for elevation approval.

Unlike local or Microsoft accounts, the built-in Administrator account is not protected by a password or PIN – However, you can add a password to the account if you want to ensure that unauthorized users are not permitted to use it.
What can I do with a built-in administrator account?
The built-in administrator account will give you full control over the files, directories, services, and any other resources that are stored locally. You can use the built-in admin account to assign permissions, assign different rights to different users, and even create other Local users.
Additionally, you can use the built-in administrator account to take full control of any type of local resources or change the user rights and permissions. But unlike other administrator accounts, you won’t be able to Delete, rename, or restrict the built-in Admin account.
IMPORTANT: The built-in administrator account will give you the same kind of permissions and rights as a normal Admin account. This means that you can also expose your PC to the same kind of security risks.
With that being said, it’s not recommended to use the built-in Admin account as your main choice. Our advice is to only enable the built-in admin account when you actually need to use it and disable it right back when you’re finished using it.
If you’re looking to enable or disable the built-in administrator account on your Windows 11 computer, there are actually 5 different ways to do this:
- Enable / Disable the Built-in Administrator account on Windows 11 via Powershell
- Enable / Disable the Built-in Administrator account on Windows 11 via Command Prompt
- Enable / Disable the Built-in Administrator account on Windows 11 from Local Users and Groups
- Enable / Disable the Built-in Administrator account on Windows 11 using a Local Security Policy
- Enable / Disable the Built-in Administrator account on Windows 11 using CMD at boot
Regardless of your preferred approach to doing things on Windows 11, we’ve created step-by-step instructions for each method, so feel free to stick with your favorite approach.
Enable or Disable the Built-in Admin on Windows 11 via Powershell
Note: The Windows account that you’re using needs to have admin privileges to be able to use this method.
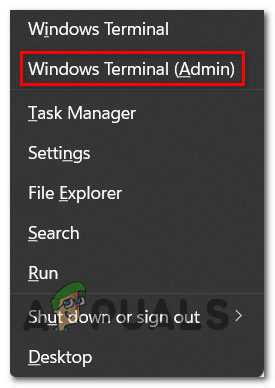
- Press Windows key + X to open up the quick selection menu, then click on Windows Terminal (Admin) from the list of available options.
Accessing the Windows Terminal with admin access - If you’re prompted by the User Account Control window, click Yes to grant administrator privileges.
- Once you’re inside the elevated Powershell window, type or paste one of the following commands depending on if you want to Enable or Disable the built-in administrator account:
Disable Admin Account
Disable-LocalUser -Name "Administrator"

Enable Admin Account
Enable-LocalUser -Name "Administrator"
Note: If you previously renamed the built-in admin account, you will need to replace “Administrator” with the actual name of the account.
Note 2: If you’ve selected a different language when you first installed Windows 11, you will need to change “Administrator” with the equivalent for your language.
- Close the elevated PowerShell prompt and reboot your computer to enforce the change.
Enable or Disable the Built-in Admin on Windows 11 via Command Prompt
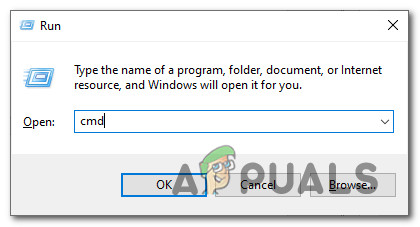
- Press Windows key + R to open up a Run dialog box. Next, type ‘cmd’ inside the text box and press Ctrl + Shift + Enter to ensure that you open Command Prompt with administrative privileges.
Opening a CMD prompt - At the User Account Control prompt, click Yes to grant administrative privileges.
- Inside the elevated Command Prompt window, type one of the following commands depending on if you want to Disable or Enable the built-in administrator account:
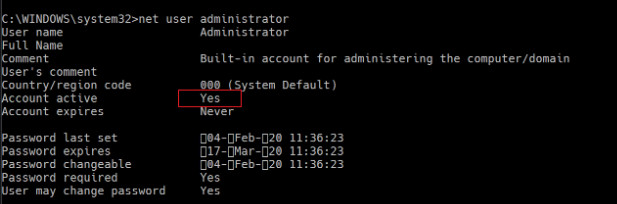
Enable Admin Account
net user Administrator /active:yes

OR

Disable Admin Account
net user Administrator /active:no
Note: Replace “Administrator” with the actual name of the built-in account if you previously changed it. Also if your default language is not English, you’ll need to change “Administrator” with the equivalent word in your language.
- Once the status of the built-in Admin account is changed, you can close the elevated CMD and restart your computer to allow the changes to take effect.
Enable or Disable the Built-in Admin on Windows 11 from Local Users and Groups
Note: The utility needed for this method (Local Users and Groups) is ONLY available with Windows 11 Pro, Windows 11 Enterprise, and Windows 11 Education. You also need to use an administrator account to use this method.
- Open a Run dialog box by pressing Windows key + R. Inside the text box, type ‘lusrmgr.msc’ and press Enter to open up the Local Users and Groups utility.

Opening the Local Users and Groups utility - At the UAC prompt, click Yes to grant yourself admin access.
- Inside the Local Users and Groups utility, click on the Users tab from the left, then double-click on Administrator from the central pane.

Accessing the Admin account - Inside the Administrator Properties screen, access the General tab, then check or uncheck the Account is disabled checkbox depending if you want to Enable or Disable the account.
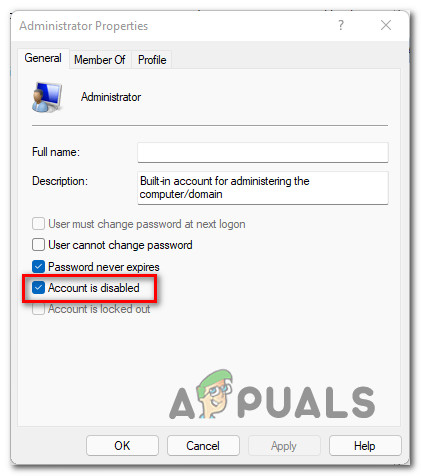
Enabling or disabling account using the Local Users and Group utility - Once the modification has been scheduled, enforce it by clicking on Apply.
- You can safely close the Local Users and Groups utility as the status of the built-in admin account should be already changed on Windows 11.
Enable or Disable the Built-in Admin on Windows 11 using a Local Security Policy
Note: You will not be able to follow this method on the Home version of Windows 11. The tool that we used below (Local Security Policy) is only available on Windows 11 Pro, Windows 11 Enterprise, and Windows 11 Education.
- Press Windows key + R to open up a Run dialog box. Next, type ‘secpol.msc’ inside the text box and press Ctrl + Shift + Enter to open up the Local Security Policy tool with admin access.
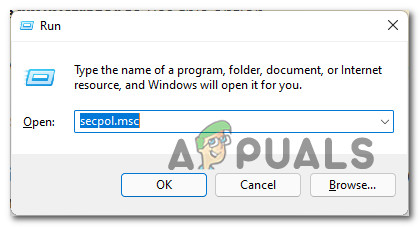
Open the SecPool utility - When you’re prompted by the User Account Control, click Yes to grant administrative access.
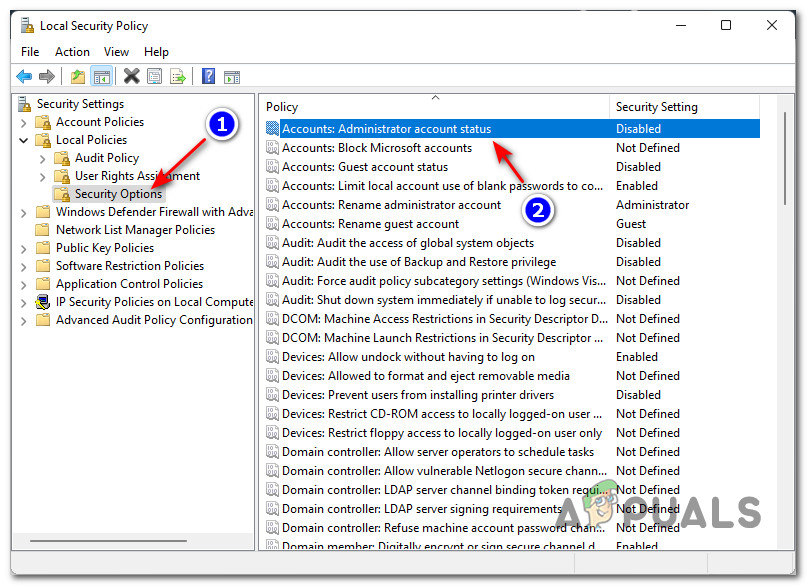
- Once you’re inside the Local Security Policy utility, use the expand the Local Policies menu on the left, then click on Security Options from the left-hand pane.
- Next, from the central pane, double-click on Accounts: Administrator account status.
Configure the Administrator account - Inside the Accounts: Administrator account status Properties, window, access the Local Security Setting tab from the menu at the top, then change the status of the setting to Enabled or Disabled depending on what you want.
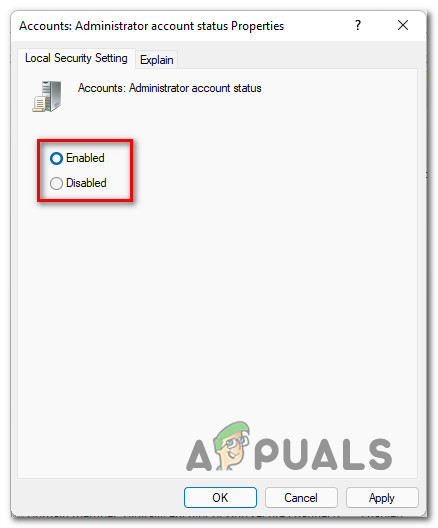
Enabling or disabling the Policy - Click on Apply to save the changes, then you can safely close the Local Security policy utility.
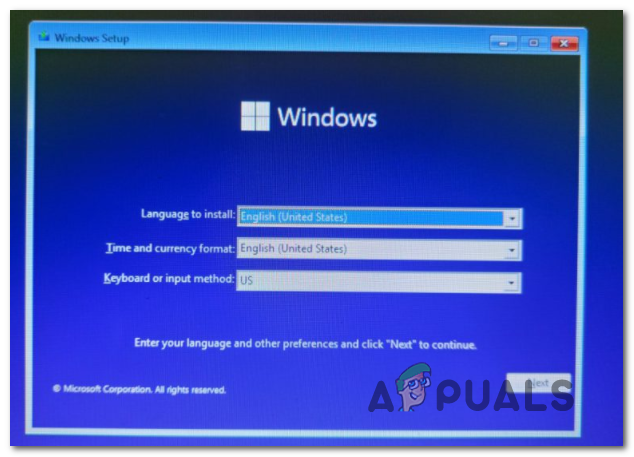
Enable / Disable the Built-in Admin on Windows 11 using CMD at boot
Note: Use this method if you are unable to sign in to Windows 11.
- Boot from a compatible Windows installation media (USB or DVD) and press Shift + F10 once you get to the initial Windows Setup screen to access an elevated Command Prompt window.
Opening CMD window from the Windows Setup screen - Inside the elevated CMD prompt, type Regedit and press Enter to open up a Registry Editor prompt.
- Inside the Registry Editor, use the menu on the left to access the HKEY_LOCAL_MACHINE key.
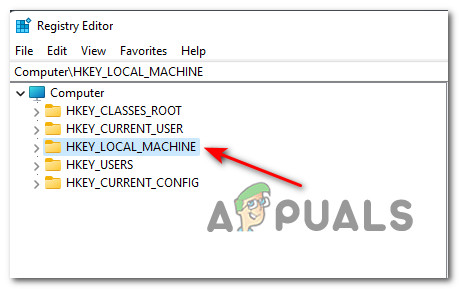
Accessing the HKEY_LOCAL_MACHINE key - With the HKEY_LOCAL_MACHINE key selected, use the ribbon bar at the top to click on File > Load Hive.
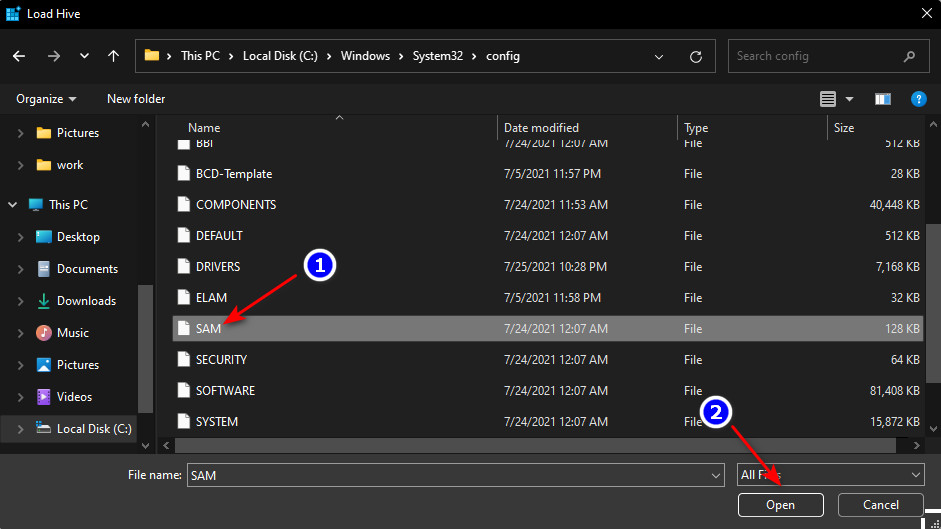
- Inside the Load Hive dialog box, open the letter that Windows 11 is installed on (most likely C:) and navigate to the following location:
C:\Windows\System32\config
- Inside the config folder, click on Sam from the list of items inside, then click Open to load it up inside Registry Editor.
Loading the Sam hive inside Registry Editor - When you’re prompted to name the recently imported hive, name it ‘REM_SAV’ and click Ok to save the changes.
- After the registry hive is successfully imported, use the navigation panel on the left side to reach the following location:
HKEY_LOCAL_MACHINE\REM_SAM\SAM\Domains\Account\Users\000001F4
- With the 000001F4 key selected, move over to the right-hand pane and double-click on the F binary value.
- To enable the Bult-In Admin account, change the 10 value to 11 from the 00000038 column and press Ok to save the changes.
Note: To disable the Built-in Admin account, select the 11 value from the 00000038 column and press the Delete key to get rid of it. - Close the Registry Editor and hit Continue to boot Windows 11 normally.


I have tried all kinds of ways including lusrmgr.msc and cmd for active:yes, still cannot enable win11 with admin account. all fix ask me to run as administrator, but the problem I have is cannot run as administrator!Please help, and I even tried safe mode, but not able to help. I can however use safemode command prompt to successful on net user administrator .active:yes. However when restart computer in normal, it is disable again.Already tried 6 hours, please help!