How to Make An Email With A Custom Domain
 Reviewed by Huzaifa Haroon
A professional email address is essential for establishing your company’s credibility and reputation. Many people are hesitant to trust businesses that use generic domains like gmail.com or outlook.com, which can negatively impact your brand image.

When communicating with potential clients or sending professional emails, using a custom email domain (such as username@domainname.extension) significantly strengthens your brand. So, how can you set one up? Setting up your custom email domain is straightforward when you know which tools to use and where to find them.
Whether you are reaching out to new clients or maintaining relationships with existing customers, your email address is often the first point of contact. It plays a vital role in your brand’s visibility and professionalism. Safeguarding and optimizing your email address enhances your business reputation and builds trust with your audience.
Using an address like “supermario139@hotmail.com” can leave an unprofessional impression, especially if you are a freelancer or business owner.
First, it may not be instantly clear who sent the email. Even if you use a more formal address like “john.doe@gmail.com,” your recipients cannot easily verify your business identity.
Anyone can create a Gmail or Outlook account with any name, making it difficult for recipients to confirm your authenticity. For business and brand communications, it is best to use addresses like firstname@yourdomain.com or contact@yourname.com to reinforce your legitimacy.
Get a Domain

To create a business-specific email address (e.g., yourbusinessname.com), the first step is to register a domain name. Domain registration is a simple and affordable process, with prices starting as low as $1/month. Reputable companies such as GoDaddy, Namecheap, and Bluehost offer robust domain registration services.
When selecting your domain name, keep these key factors in mind.
-
Availability
Choose a domain name that is available for registration. All domain registrars provide search features to check your desired name’s availability. If your preferred choice is taken, you can experiment with characters such as hyphens, dots, or underscores to create a unique domain name.
-
Relevance
Your domain name should reflect your brand or business. For bloggers, the domain might showcase personal branding or hint at the main topics you cover. This increases recognition and makes your website memorable.
-
Length
Select a domain name that is short and easy to remember. Shorter names reduce the risk of typos and make your email address more accessible for clients and partners to recall and use.
-
TLD (Top-Level Domain)
Your domain’s Top-Level Domain (TLD) is the ending after the last dot, such as .com or .org. Choose a TLD that aligns with your company’s nature and audience, as it can influence how your brand is perceived.
Choose an Email Hosting Provider

After registering your domain, you need an email hosting service to manage your correspondence. An email hosting provider stores your email and grants you access to user-friendly email management tools. Prominent options include Google Workspace (formerly G Suite), Zoho Mail, and ProtonMail.
Before signing up, thoroughly compare features, pricing, and the quality of customer support each provider offers. Selecting the right provider ensures reliable email delivery and management for your business needs.
Set Up Your Email Account
With your domain and email hosting in place, you are ready to set up your email account and configure your email client for daily use.
1. Create an Email Address
To get started, log in to your email hosting provider’s admin panel and add your registered domain. You can now create email addresses such as john@example.com, using your new domain name for a professional appearance.
2. Configure Email Settings
To ensure your email functions correctly, you need to adjust a few key settings. The specific options depend on your hosting provider, but generally, you’ll be required to enter the following details:
- Incoming server: This server receives emails from other domains. You will be prompted for the host, port, and protocol, which is usually either POP3 or IMAP.
- Outgoing server: This server sends your emails to other servers. You must input the server address, port number, and protocol, which is usually SMTP.
- Username and password: Use your chosen email address and a secure password to log into your account.
3. Test Your Email Account
After setting up your email account, verify everything is working properly. Send a test message to another email address and check that you can both send and receive emails without issues. Alternatively, have someone send you an email at your new address to confirm successful configuration.
4. Add Your Custom Email to Gmail or Other Providers
If you use Gmail as your primary email client, you can easily integrate your custom email address. Follow the steps below to connect your professional account:
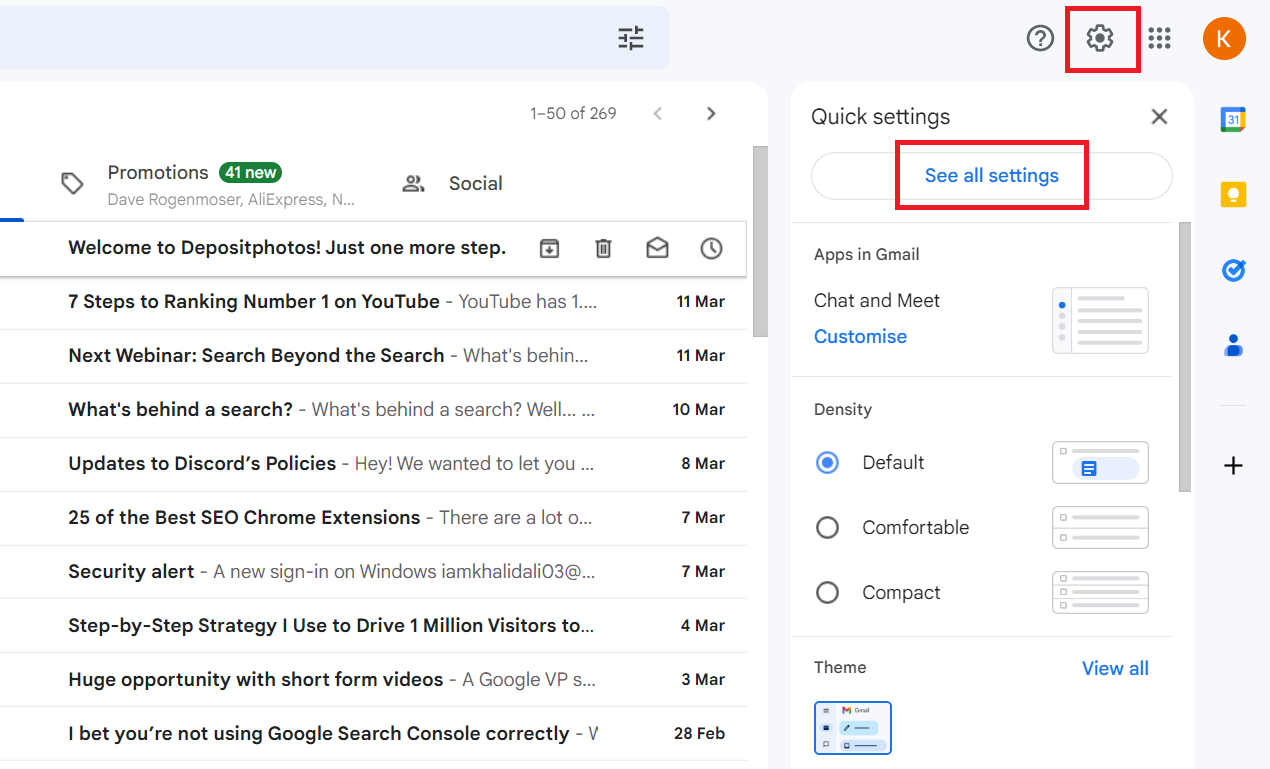
- Open your Gmail account and click the gear icon in the upper right. Select “See all settings.”
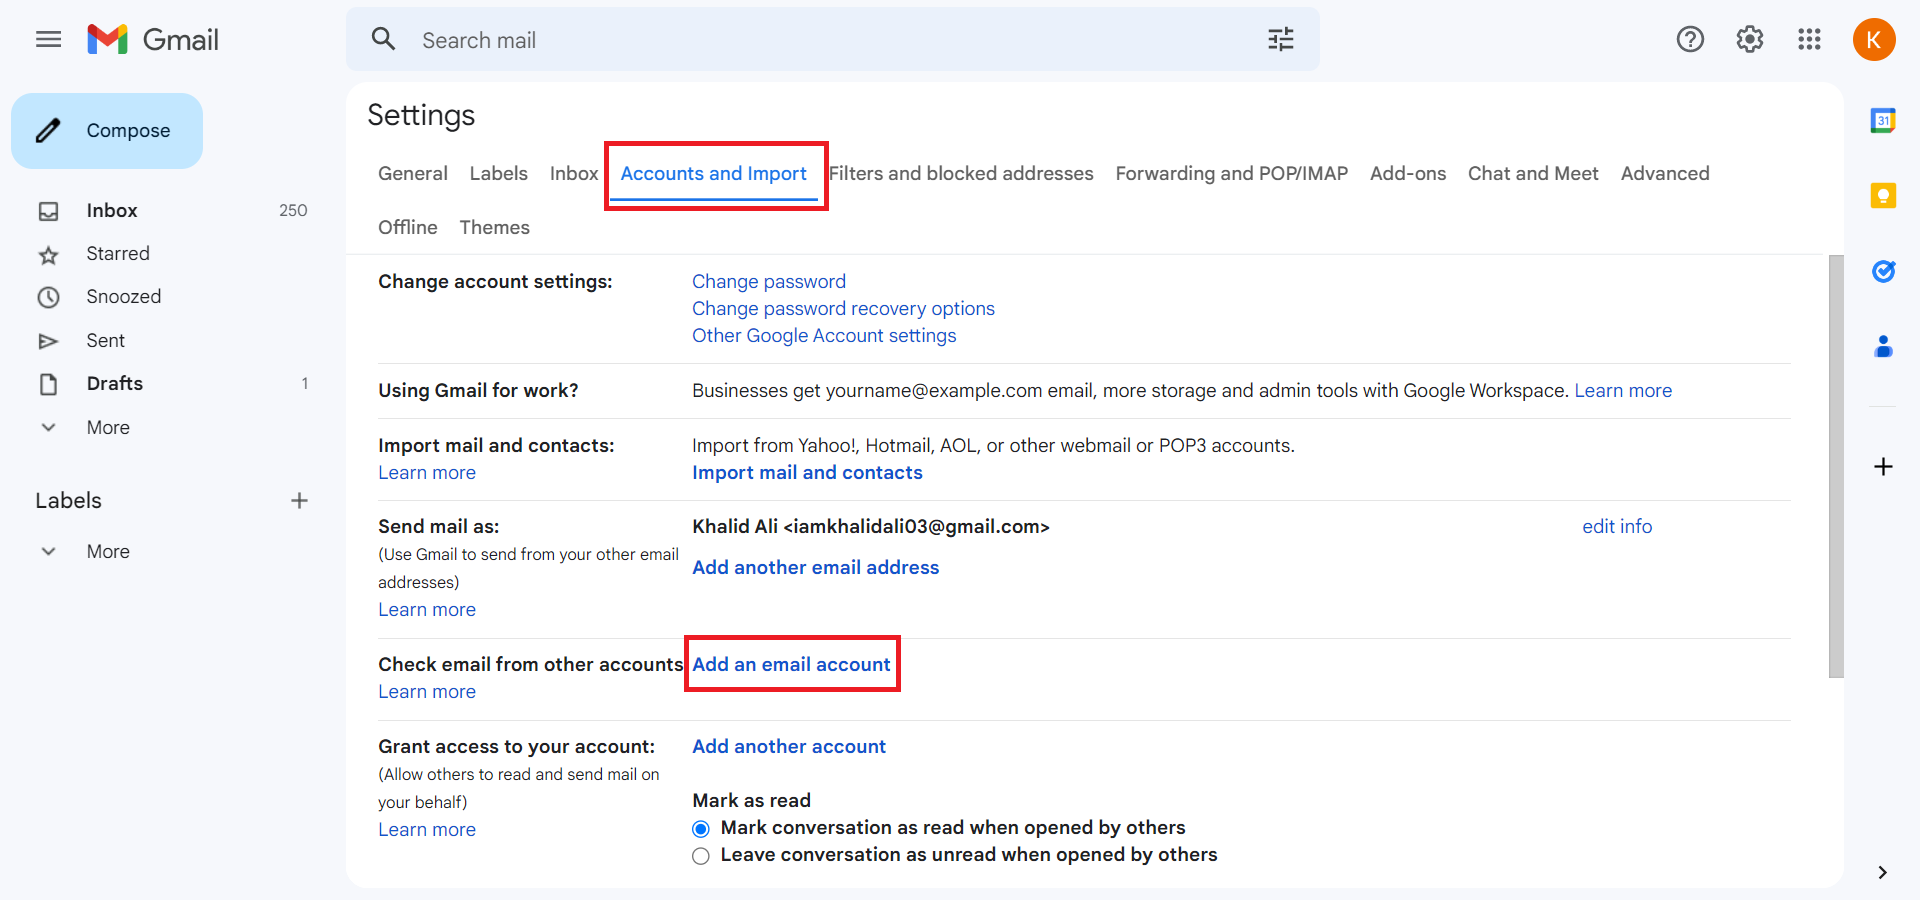
Open the Settings from your Gmail inbox - Go to the “Accounts and Import” tab. Under the “Check mail from other accounts” section, click “Add a mail account.”
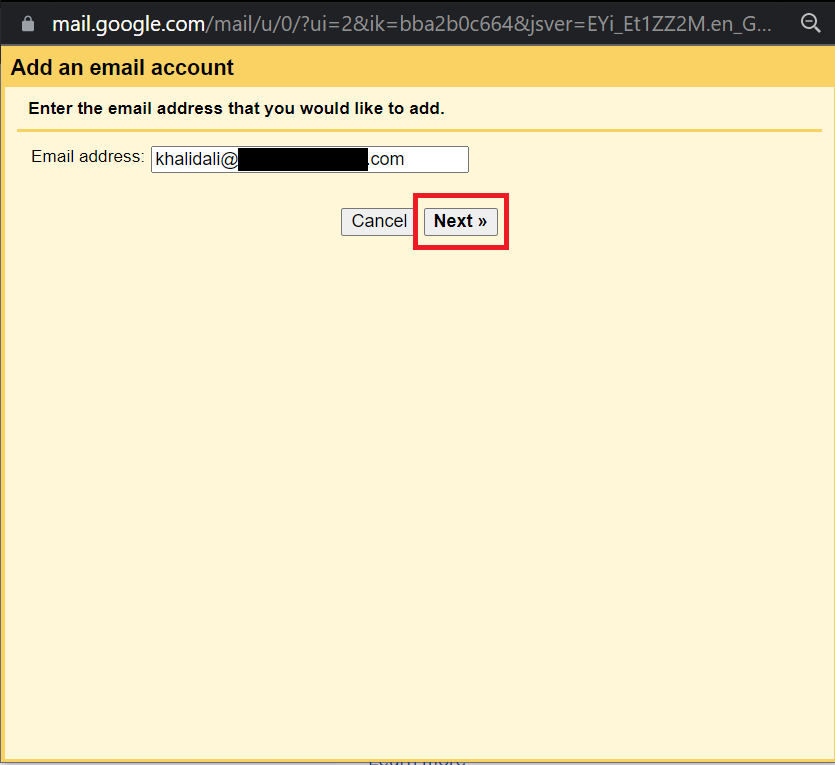
Go to “Account and Import” and select “Add an email account” - A new window will open. Enter your custom email address and click “Next.”
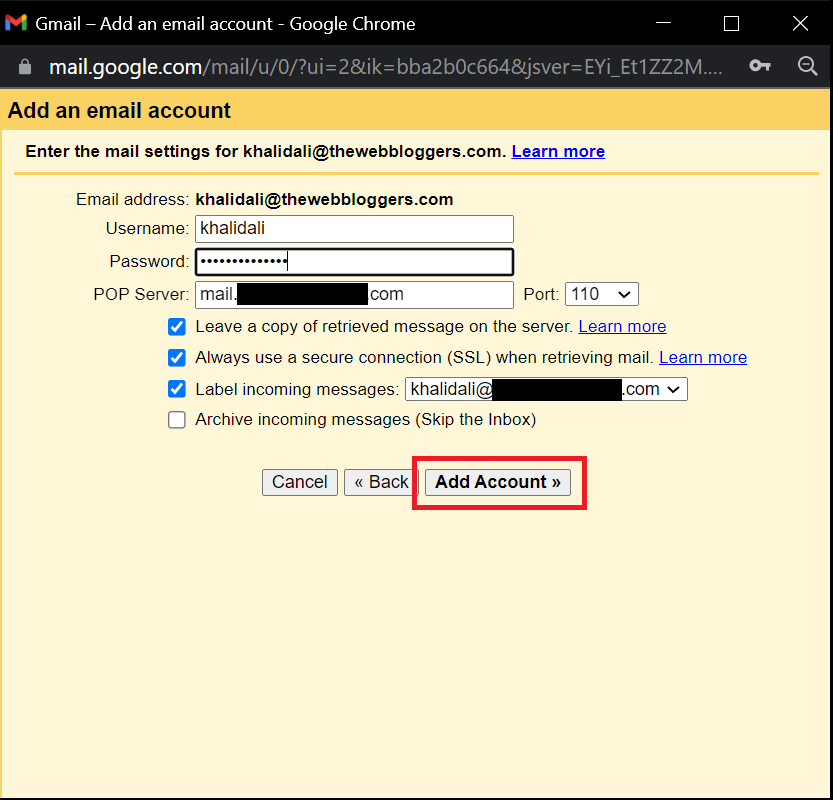
Add your custom email address and click “Next” - Provide the required details for your account (incoming server, outgoing server, username, and password). Make sure to check all relevant boxes except the last one (Archive incoming messages).
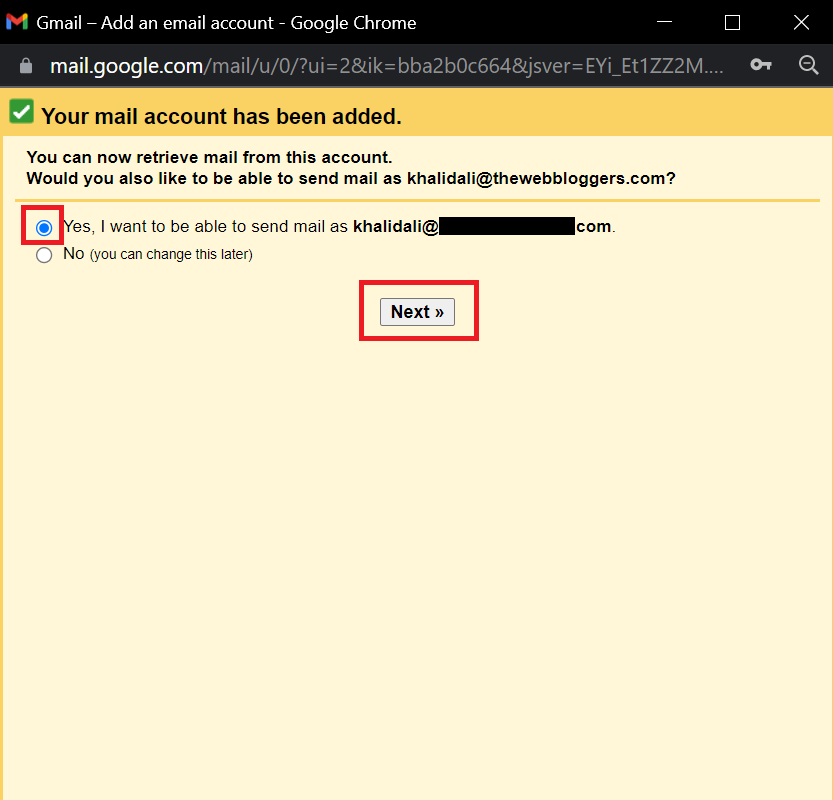
Enter the details and click “Add Account” - You will be asked if you want to send emails from your new address. If you do, select the first option and click “Next.”
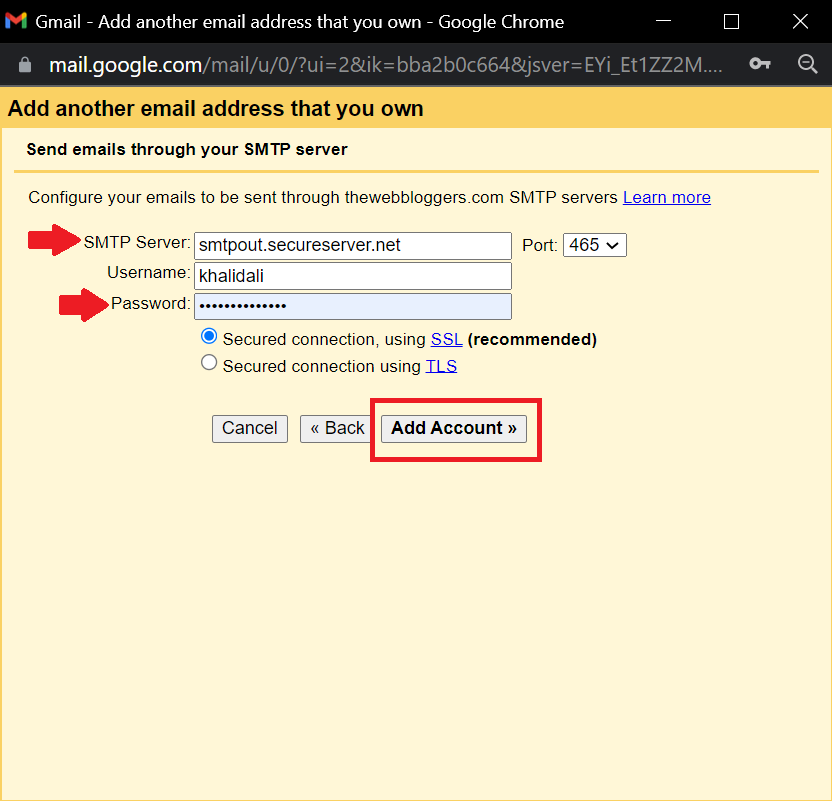
Tick the first option and click “Next” - Enter your SMTP server details and re-enter your password. For enhanced security, use an email host that provides SSL encryption.
Enter SMTP details and click “Add Account” - Finally, Gmail will send a verification code to your custom address. Retrieve the code from your email, enter it, and click “Confirm” to complete the process.
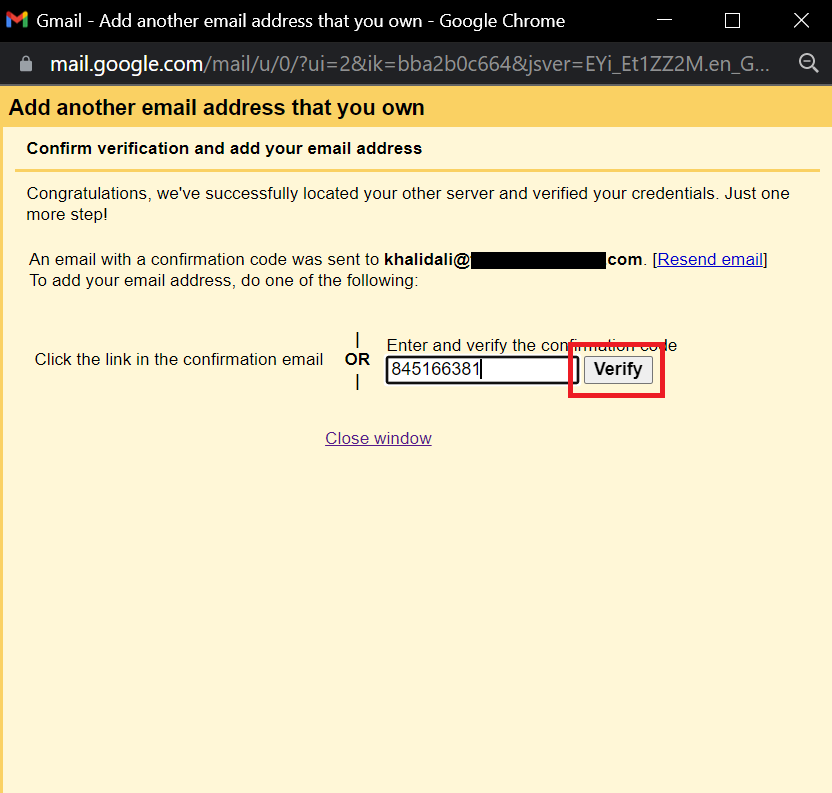
Enter the code and click “Verify”
Understanding POP3 and SMTP
Two common email protocols are Simple Mail Transfer Protocol (SMTP) for sending emails and Post Office Protocol (POP3) for retrieving them. Setting up POP3 and SMTP correctly ensures your incoming and outgoing messages function reliably across devices and servers.
Create an Email Signature (Optional)
With your business email now set up, consider creating a professional email signature to be added to every outgoing message. A free generator, such as HubSpot’s tool, makes this quick and easy.
Personalized email signatures establish trust, promote your brand, and can drive traffic to your website or social channels. Review our collection of professional email signature examples for inspiration and guidance on best practices.
How to Set Up a Custom Email Address and Domain on Google
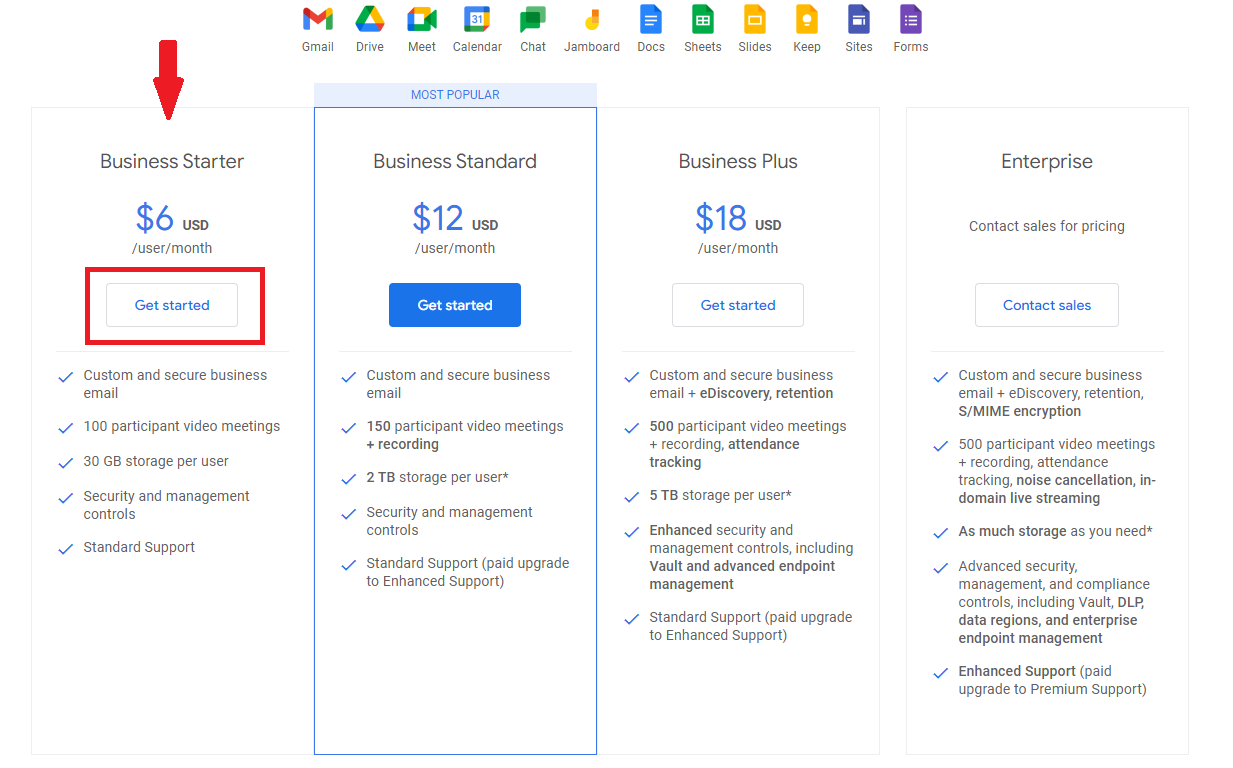
With Google Workspace, you can purchase both a domain name and email hosting that integrates seamlessly with your Gmail account. Packages start at just $6 per month for each user.
- Visit https://workspace.google.com/ and select the “Pricing” tab.
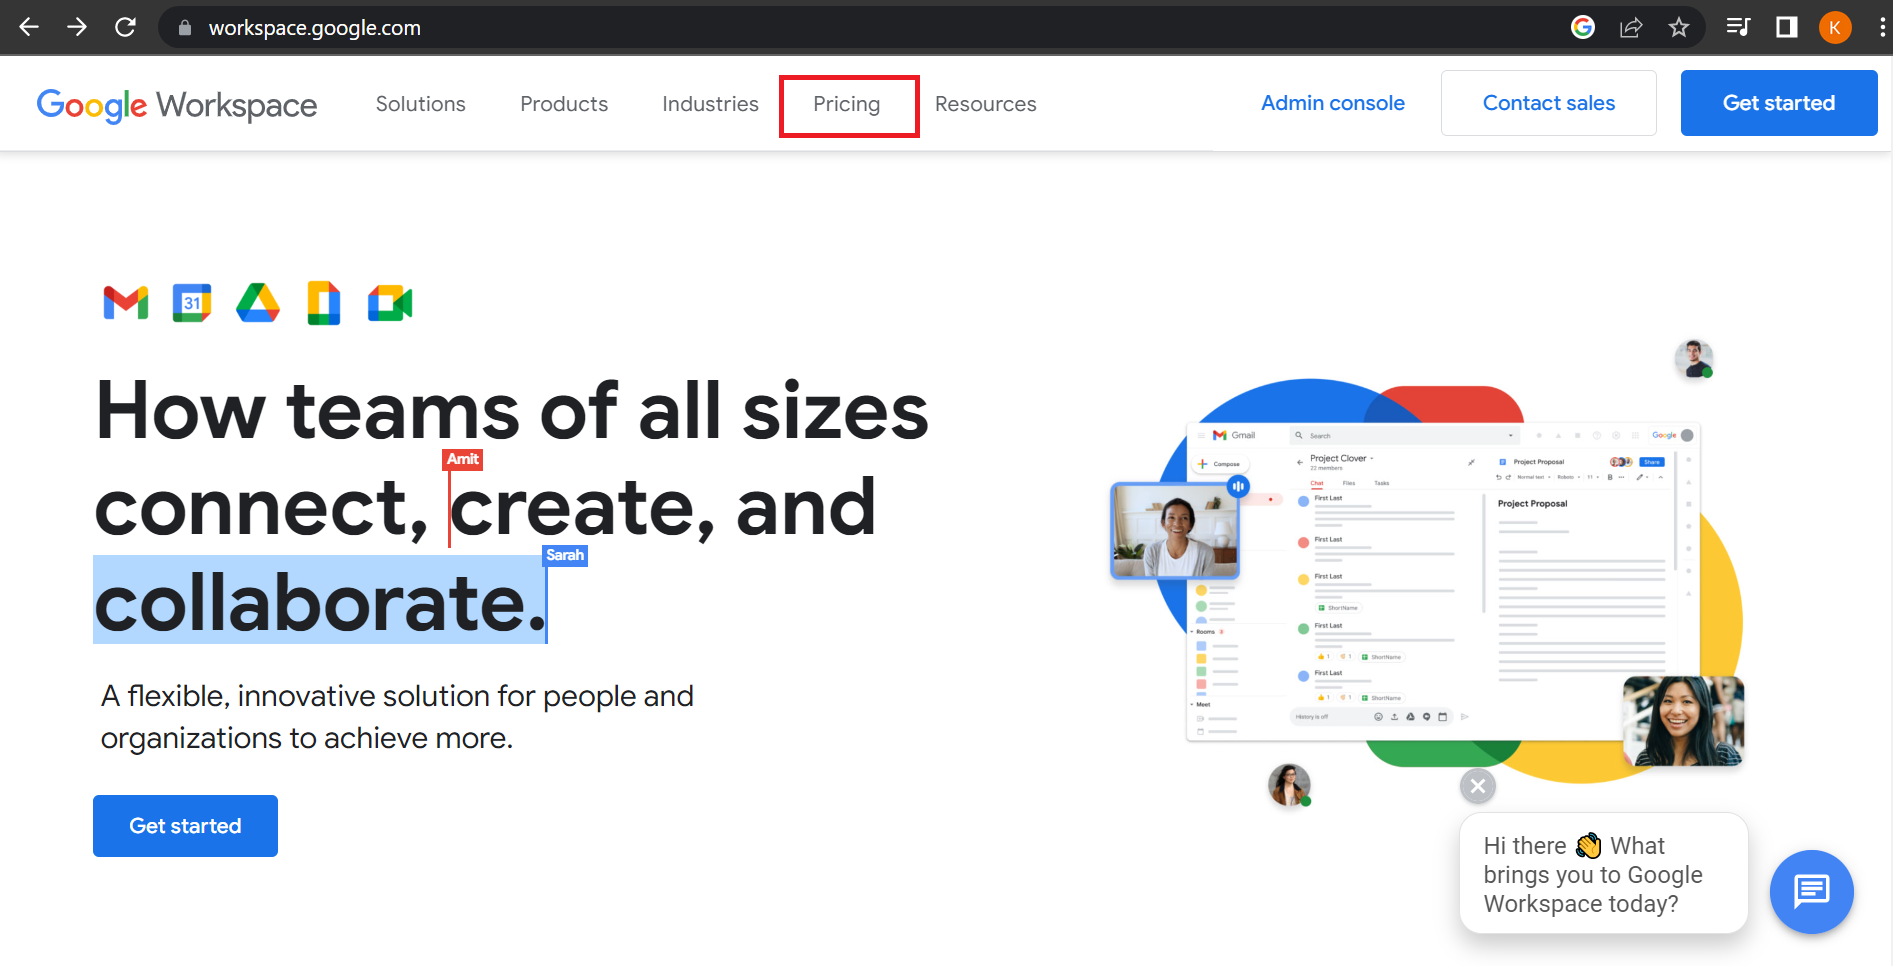
Open the “Pricing” tab - Choose the plan that fits your needs (the $6 starter plan is sufficient for a custom email address). Click “Get Started.”
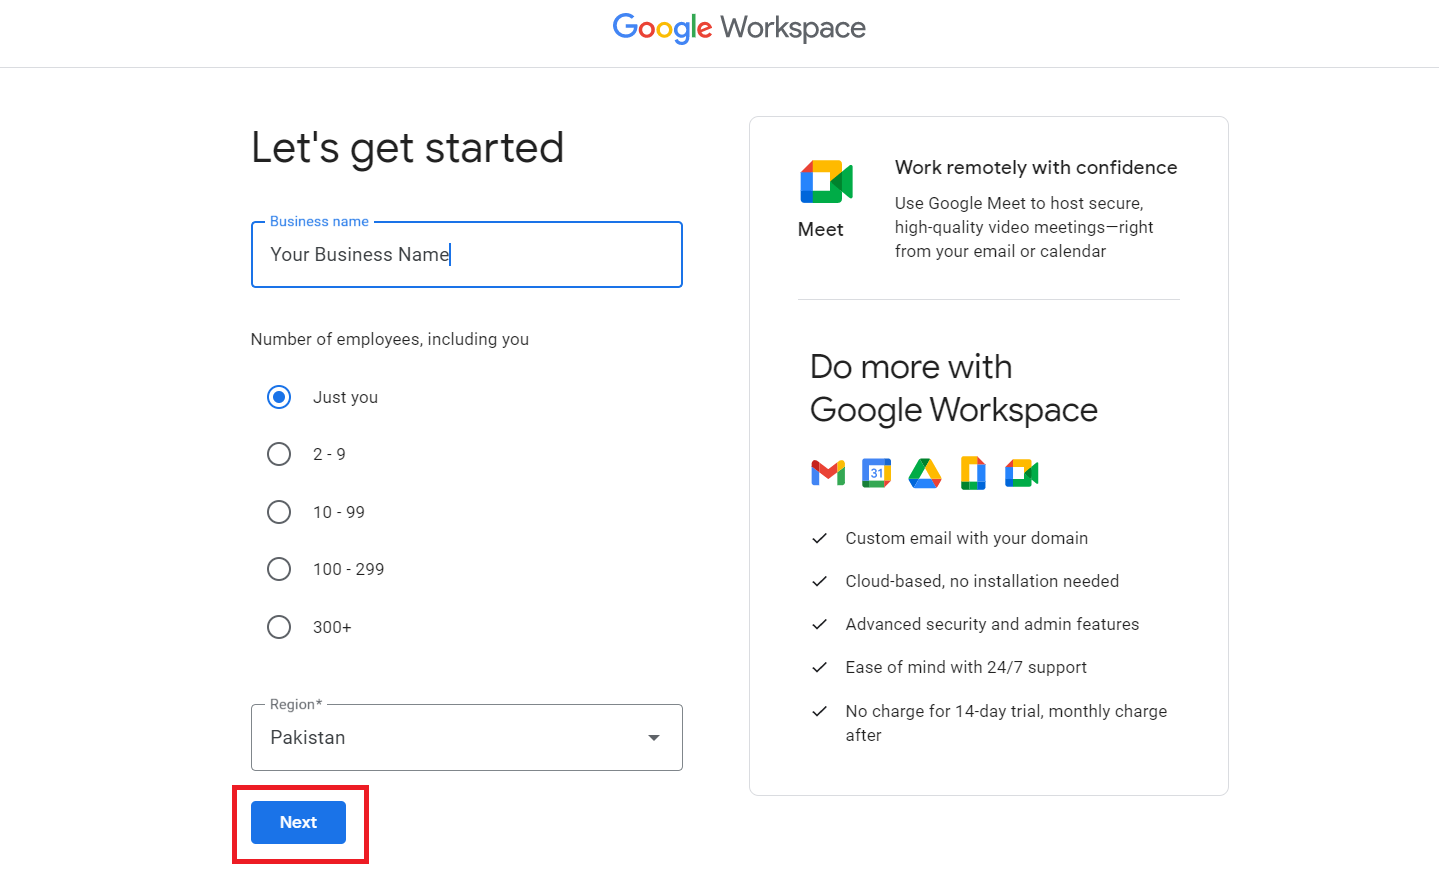
Select one plan and click “Get Started” - Enter your company details as requested and click “Next.”
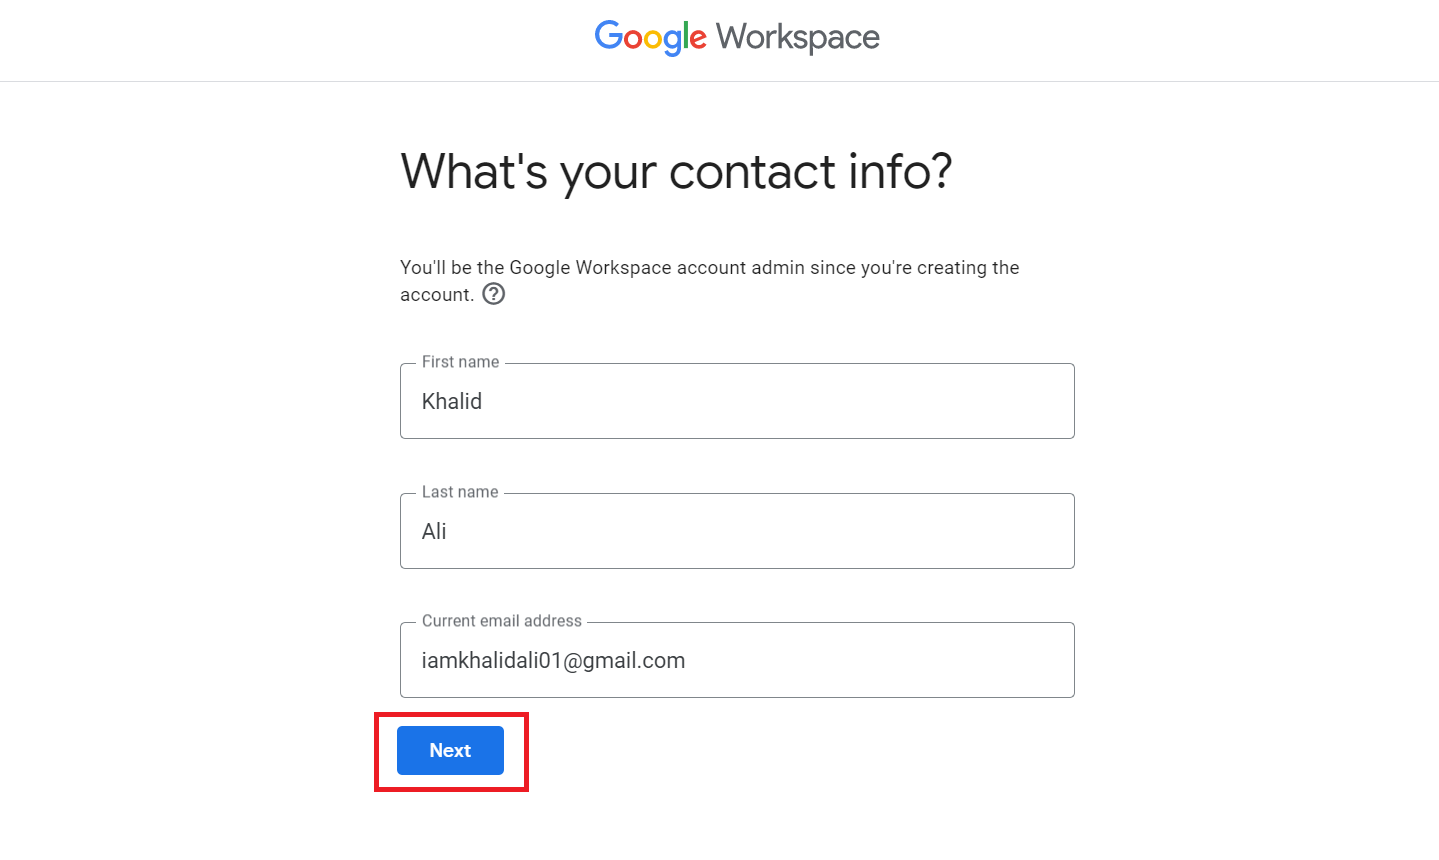
Enter your business details - Provide your contact information and click “Next.”
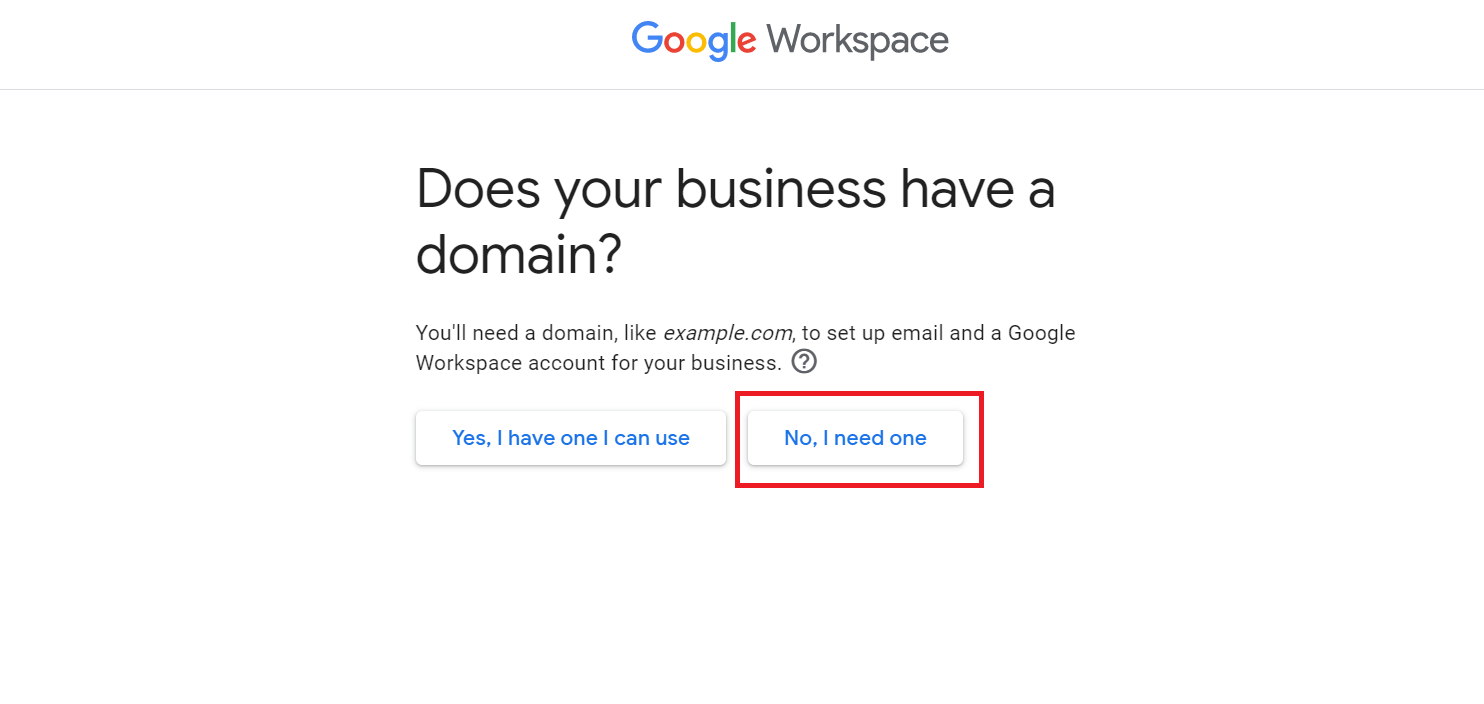
Enter your name and existing Gmail account - When asked, “Does your business have a domain?” choose “No, I need one” and begin the registration.
Click “No, I need one” - Search for your preferred domain name to check availability.
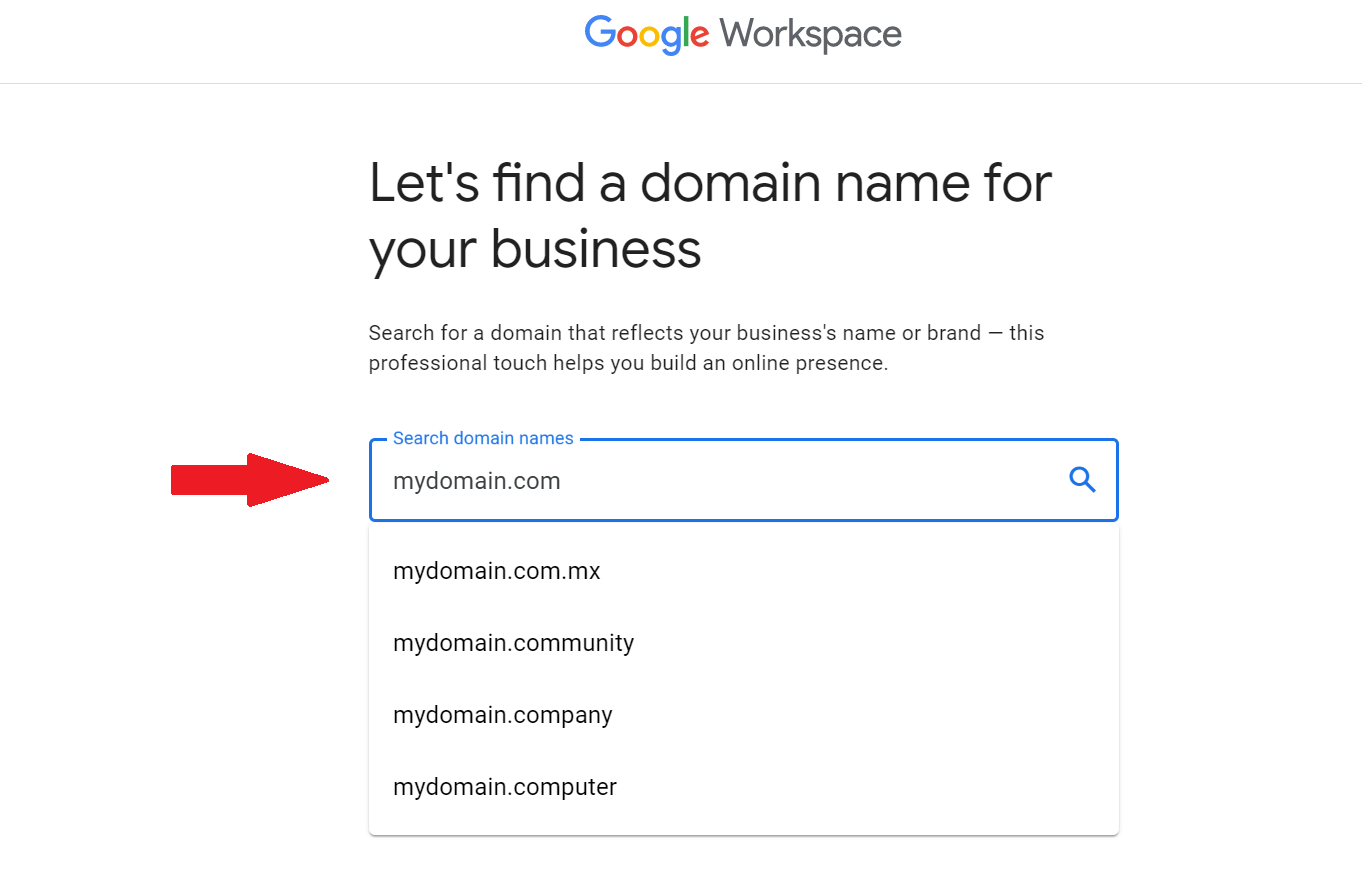
Choose your favorite domain name
After selecting your desired domain, simply follow the on-screen prompts to complete your account setup and make the necessary payment.
Reviewed by Huzaifa Haroon


