Fix: Drag and Drop Not Working on Windows
The drag and drop functionality is used by almost everyone to move or copy files/folders using mouse to organize stuff on Windows. The same can be achieved by Right Clicking on a file/folder and then selecting Copy/Cut from the pop up context menu that appears in the destination folder but many users find it easy to do this through the drag and drop functionality because of it’s easiness.
A glitch in settings, sometimes could trigger this behavior where the drag and drop functionality is seen to be lost, particularly after installing windows updates on Windows 7 and Windows 10. Users have reported, that a simple restart fixed the issue for them, therefore before you go ahead with any of the solutions bookmark this page should you need to come back; and restart your system.
Assuming you now have rebooted the system, and that didn’t fix the issue – you can proceed with the solutions below
Solution 1: The Esc key Button Trick
In most cases, what happens is if a previous drag and drop operation gets stuck in the windows memory due to interference from another program or service, it clogs the que and stops the drag/drop feature from working. Therefore, in this solution we will simply try and cancel the interference.
Go to the folder, icon or the file that you are unable to drag.
Left Click on the Target file/folder whilst Holding Down the Left Click, Press the ESC (Escape) key on your keyboard. Test to see if the issue has been resolved.
Solution 2: Registry Edit
If you have used any customization software, or if you have customized file explorer in anyway chances are that the attributes value has been modified which can lead to this. Even, if you haven’t done you should check the value to ensure that it is what it should be.
Hold the Windows Key and Press R to open run dialog.
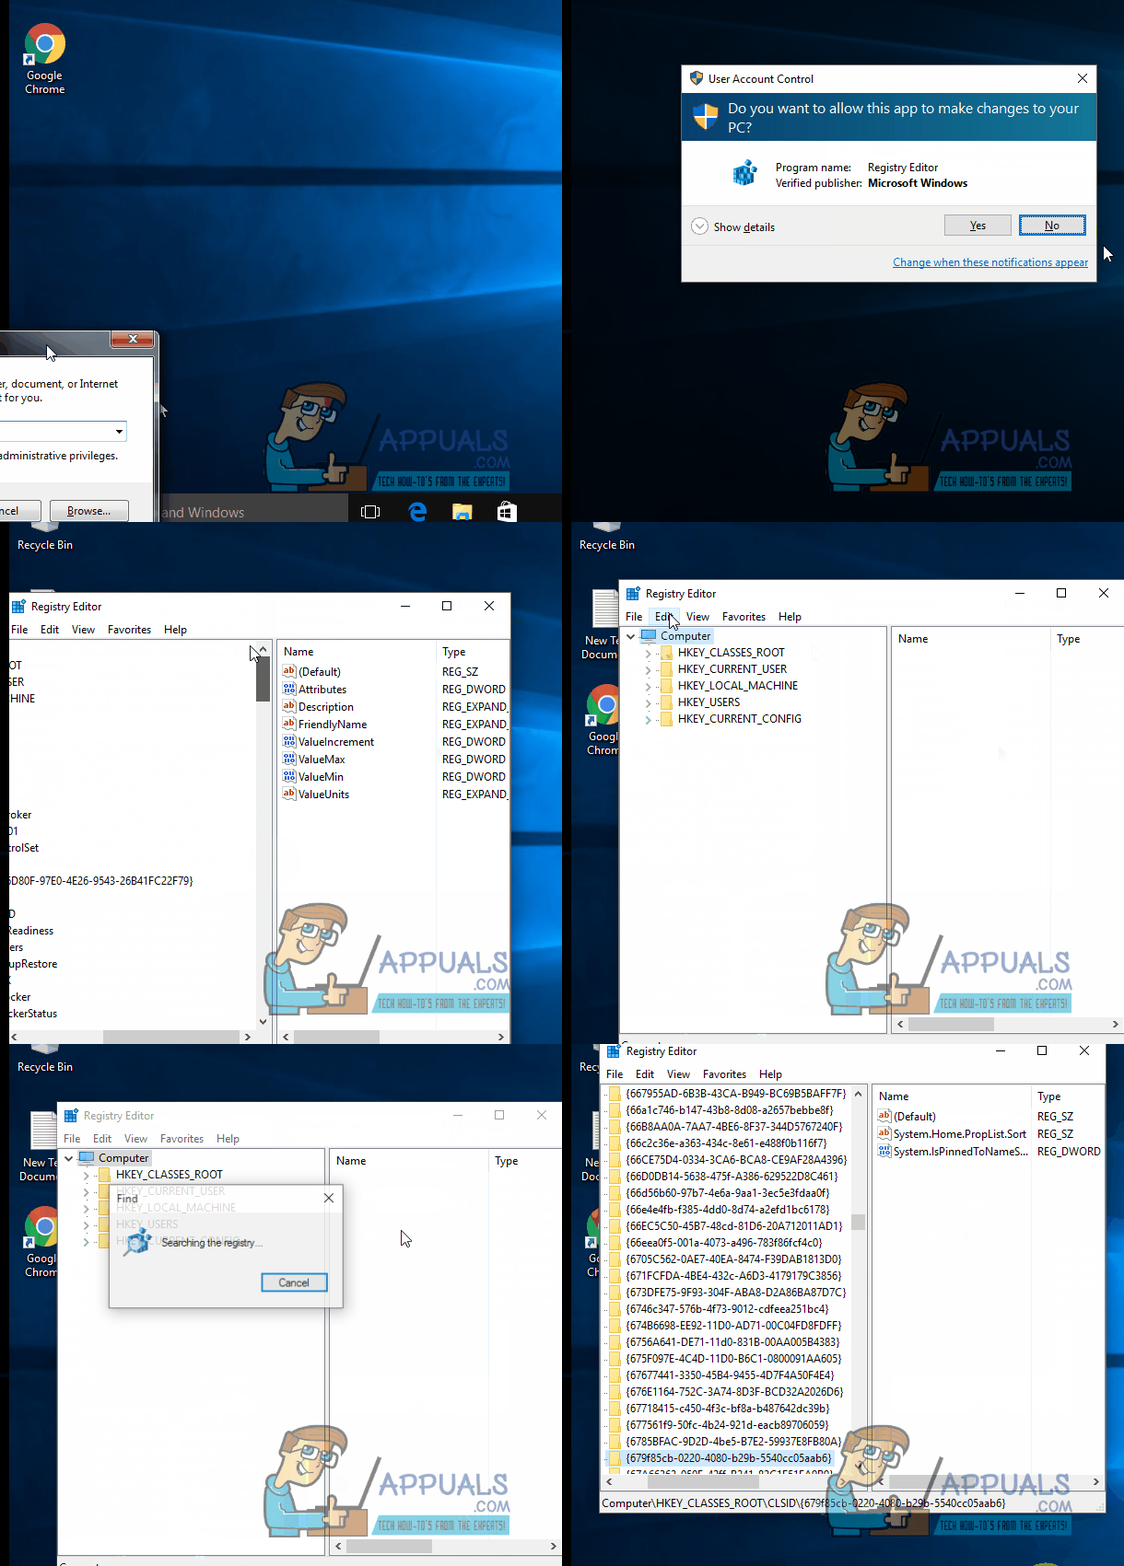
In the Run dialog, type regedit and click OK. Click Yes if the User Account Control warning message appears. Registry Editor window will open.
In the left pane, Double Click on HKEY_CLASSES_ROOT to expand it. Underneath it, locate CLSID and Double Click it to expand further. Under CLSID, locate and select {679f85cb-0220-4080-b29b-5540cc05aab6}. If you cant find, Hold the CTRL key and Press F. In the Find dialog, type 5540cc05aab6 and let the Finder, search for it. Once it has been found, verify the path from the status-bar line at the bottom of the registry editor. It should be:
HKEY_CLASSES_ROOT\CLSID\{679f85cb-0220-4080-b29b-5540cc05aab6}
Double click on the attributes value from the right pane, and make sure its value data is set to a0100000. If there is no attributes value, then your issue is not related to the registry settings.

Solution 3: Uninstall Fences from Stardock
Fences is a software for organizing desktop shortcuts and icons. It has been reported that this software conflicts heavily with Windows 10, therefore this should be uninstalled since it’s not yet fully compatible with Windows 10.
To uninstall it, Hold the Windows key and Press R. Type appwiz.cpl in the run dialog and click OK. Programs and Features Window will open.
In the list below, locate Fences. Right Click on it and choose Uninstall. Follow the onscreen instructions.
Now go to your desktop screen and Right Click on an empty space. Expand “View” from the pop menu and Uncheck “Auto Arrange Icons” and “Align icons to grid“.
Restart your computer and check if the issue resolved. You can reinstall Fences of you want to now.