How to: Disable Password After Sleep/Wake
Numerous users of Windows (7/8/8.1 and 10) have complained about their respective systems not accepting their passwords upon waking up from Sleep mode or Hibernation mode. This issue is usually caused by Wi-Fi connectivity problems. The aim of this guide is to resolve these logging in issues by disabling the password requirement after sleep/wake. In such cases, the system manages to recognize the user’s password and grants them access once it has been rebooted. However, one can understand how not being able to log into your Windows after putting it to sleep or in hibernation mode can be a significant problem. Apparently, this issue is caused by a glitch in Windows. Although this problem is not extremely widespread, it is quite significant nonetheless.
In this guide, we will learn how to disable the password after sleep/wake/hibernation. This will eliminate the password issue altogether and spare those who do not wish to type in their password every time the system wakes up from sleep.
For Windows Users:
Use the Windows 10 Settings Menu
Many basic system users can turn off the password for Windows 10 wakeup using the Settings menu.
- Right-click Windows and select Settings.
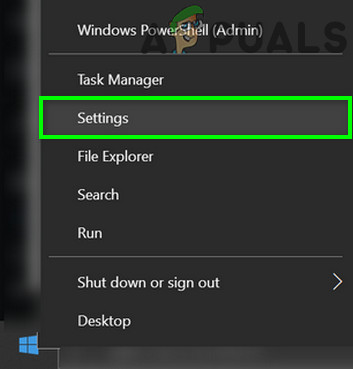
Open Windows Settings - Now open Accounts and in the left pane, head to Sign-in Options.
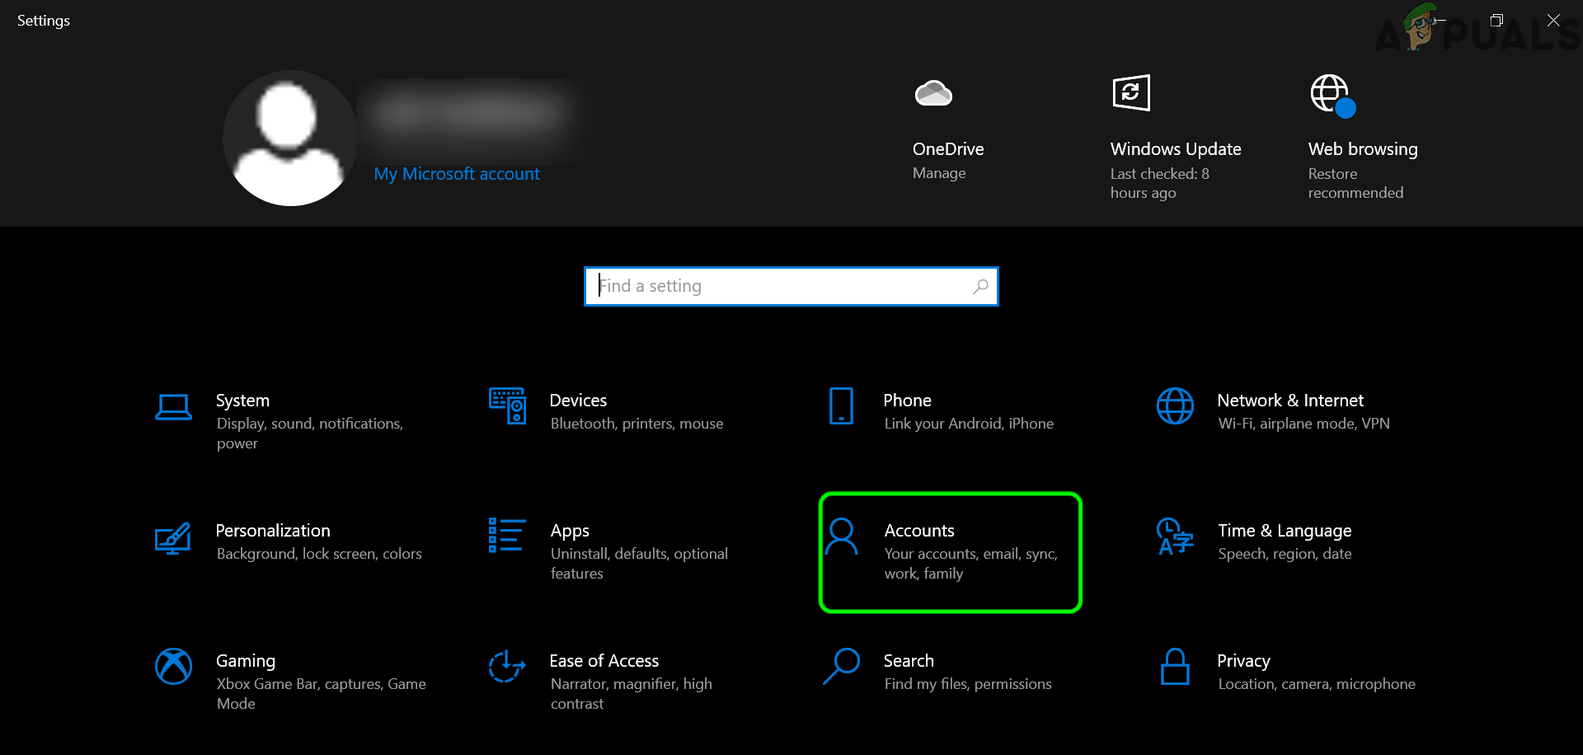
Open Accounts in the Windows Settings - Then, in the ‘Require Sign-in’ section, set the dropdown to ‘Never’. Keep in mind that if your system supports Modern Standby, this option may not be available.

Set Require Sign-in to Never in the Windows Settings - Now check if the password is disabled on waking from sleep.
If the dropdown in the Require Sign-in section is greyed out, check if changing the user password enables the dropdown.
Use the Windows 11 Settings Menu
The revised sentence can be: “To remove “authentication is required when my computer wakes from sleep” on a Windows 11 PC, you can try the steps below:
- Right-click Windows and open Settings.
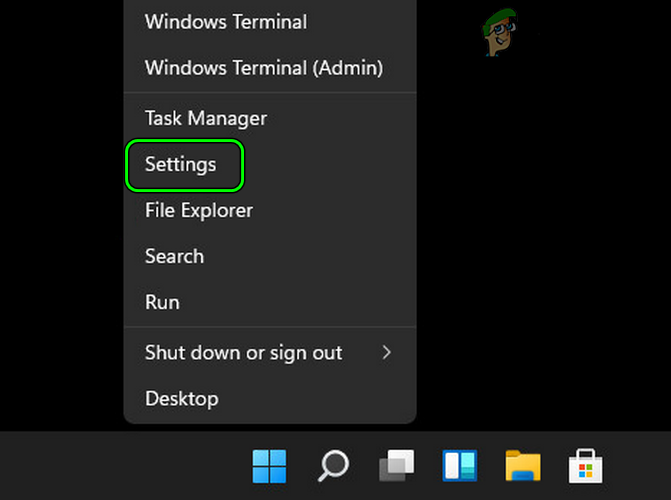
Open Windows 11 Settings from the Quick Access Menu - Now, in the left pane, head to the Accounts tab, and in the right pane, open Sign-in Options.
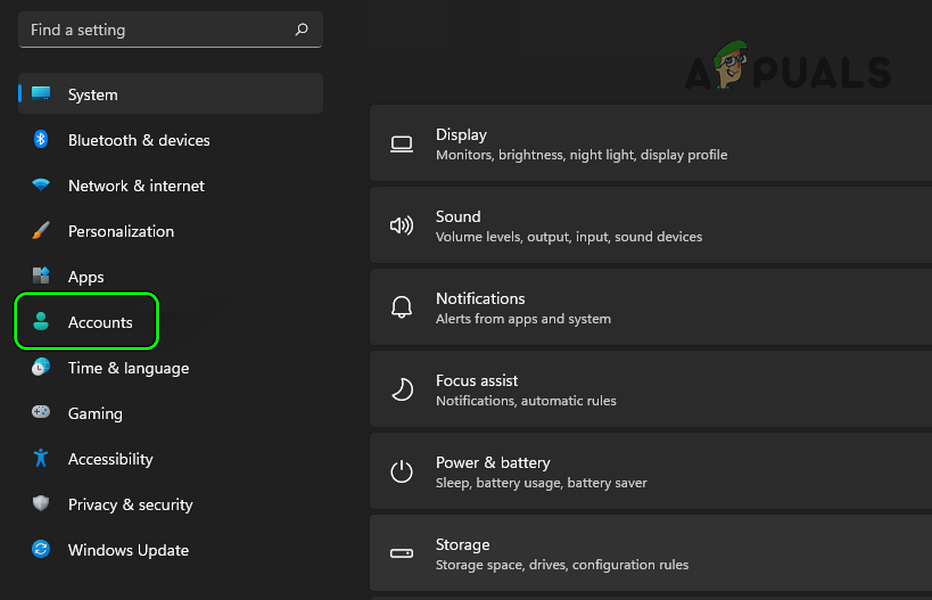
Open Accounts in the Windows 11 Settings - Then expand Additional Settings and set the dropdown of ‘If You’ve Been Away, When Should Windows Require You to Sign-in Again’ to ‘Never’. Users with Modern Standby may see different options.

Open Sign-in Options in Windows 11 - Now restart your PC and upon restart, check if the password on the system’s wake-up from sleep is disabled.
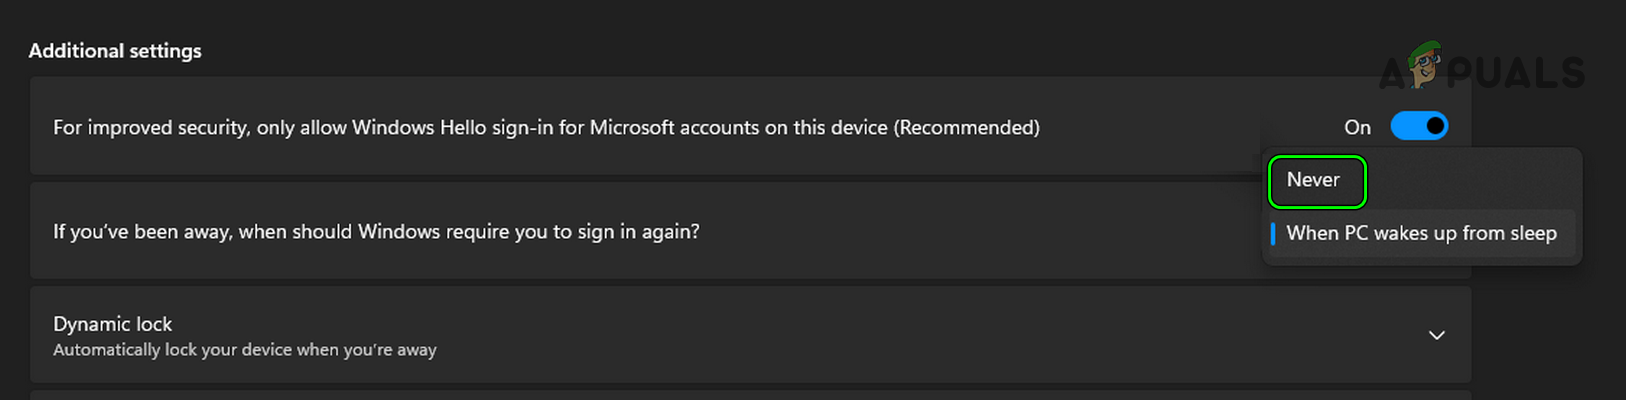
Set You’ve Been Away, When Should Windows Should Require You to Sign-in Again to Never in Windows 11
Use the Power Options in the Control Panel.
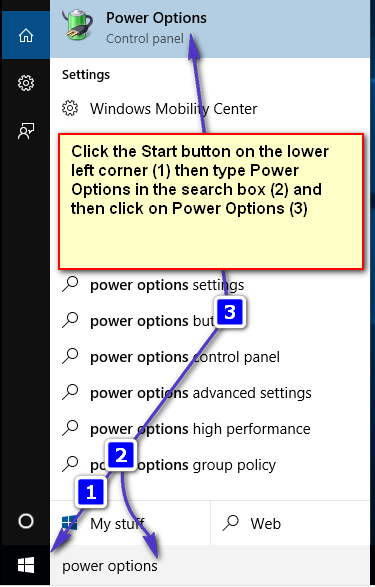
- Click the ‘Start’ button located in the lower left corner, type ‘Power Options’ in the search bar, and then select ‘Power Options’ from the displayed results. (This image was created on Windows 10, but the steps are the same for Windows 8/8.1 and 7 as well).
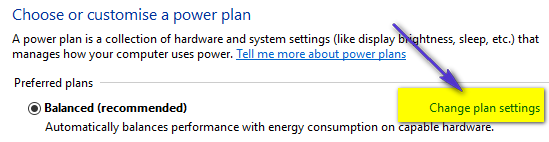
- Then, either tap or click on ‘Change Plan Settings’ for your selected Power Plan.
- Then, tap or click on ‘Change advanced power settings’ at the bottom.
- In the Power Options dialog that opens, tap on ‘Change settings that are currently unavailable’ to activate administrative privileges. Set the setting for ‘Require a password on wakeup’ to ‘No’.
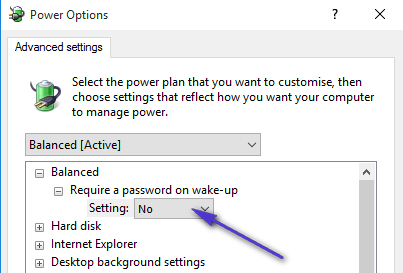
- Tap on ‘Apply’. Tap on ‘OK’. This should now disable the password requirement after the system wakes up from sleep or hibernation. However, if you change your power plan, you will need to redo this setting, as they are profile-based and each power plan is different. On my system, it is set to ‘Balanced’; if I change it to ‘High Performance’, I will need to perform these steps again to disable it.
Use the User Accounts in the Windows Control Panel.
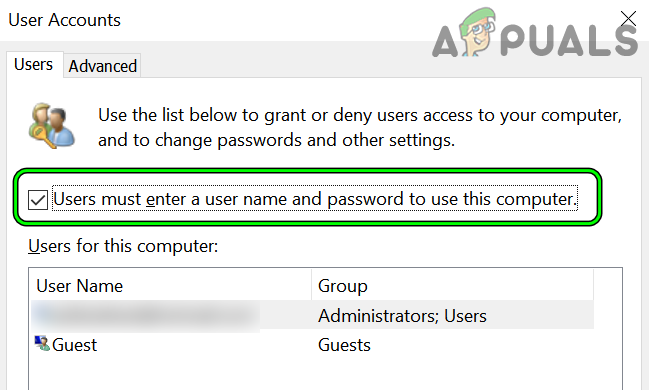
If a user account is set to enter a user name and password to use the computer, then that setting may override the above-mentioned settings and keep asking the user to enter the password when waking up from sleep.
- Right-click Windows and select Run.
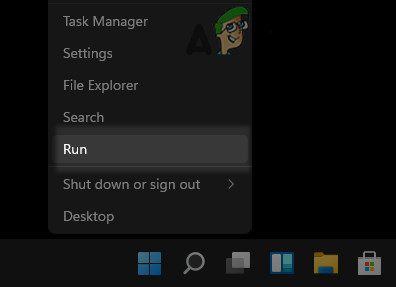
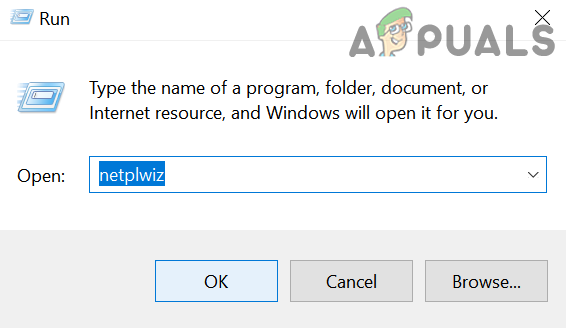
Open the Run Command Box from the Quick Access Menu - Now execute the following:
netplwiz
Open the Control Panel User’s Accounts Through the Run Command Box - Then uncheck the ‘User Must Enter a User Name and Password to Use This Computer’ option and click on ‘Apply/OK’.
Disable User Must Enter a User Name and Password to Use This Computer - Now restart your system and upon restart, check if the password requirement on the system wake-up is disabled.
Use the Command Prompt to Disable the Password on Waking from Sleep
If the Settings or Power Options method did not work or a CLI (Command Line Interface) happy geek wants to use a CLI-based method, then a user can turn off the wakeup password by using the Windows Command Prompt.
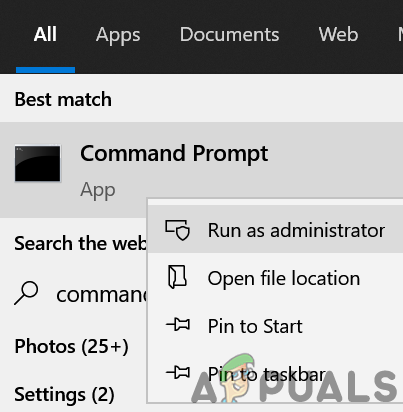
- Click Windows, search for Command Prompt, right-click on it, and select Run as Administrator. Windows 11 users may launch Windows Terminal as administrator.
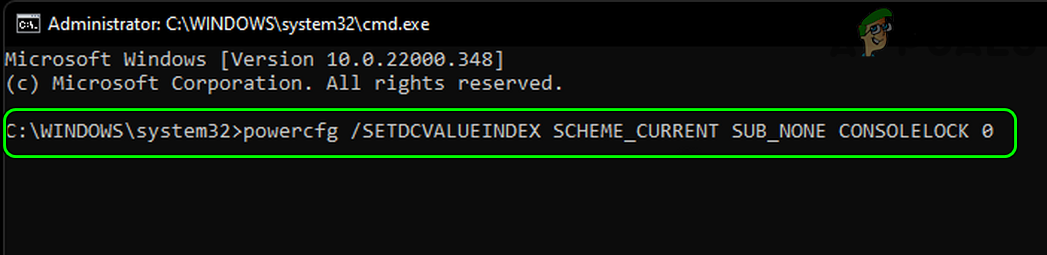
Open Command Prompt as Administrator - Now execute the following to disable the password requirement on the battery:
powercfg /SETDCVALUEINDEX SCHEME_CURRENT SUB_NONE CONSOLELOCK 0
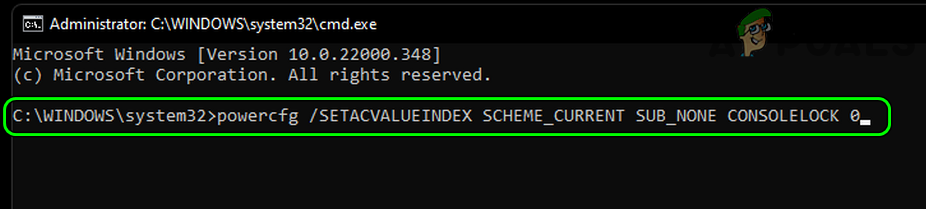
Disable the System’s Wakeup Password on Battery Through the Command Prompt - Then execute the following to disable the password requirement when plugged in:
powercfg /SETACVALUEINDEX SCHEME_CURRENT SUB_NONE CONSOLELOCK 0
Disable the System’s Wakeup Password When Plugged in Through the Command Prompt - Afterward, check if the password requirement on the system’s wakeup is disabled.
Keep in mind that if you want to disable the password when the system awakes from sleep on many systems, then creating a batch file with the above commands will make things quite easy.
In case you ever want to enable the password requirement, you may execute the following steps one by one:
For Battery:
powercfg /SETDCVALUEINDEX SCHEME_CURRENT SUB_NONE CONSOLELOCK 0
When it is plugged in
powercfg /SETACVALUEINDEX SCHEME_CURRENT SUB_NONE CONSOLELOCK 0
Edit the Relevant Registry Entries in Windows 10 and Windows 11
If a user fails to disable the password by using the above methods, then a registry entry may be causing the issue, and a user may turn off the lock screen on Windows 10 after sleep mode by editing the relevant registry entries.
Warning:
Proceed with the utmost care and at your own risk, as editing the system’s registry is a skillful task. If anything goes wrong, you may cause irreversible damage to your system/data.
- Click Windows, search for Registry Editor, right-click on its result, and select Run as Administrator.
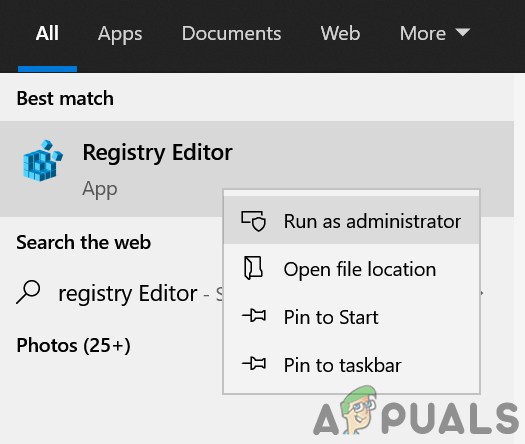
Open Registry Editor as Administrator - Now navigate to the following path:
Computer\HKEY_LOCAL_MACHINE\SOFTWARE\Policies\Microsoft\
- Then, within the right pane, simply right-click on ‘Microsoft’ and select ‘New>> Key’.
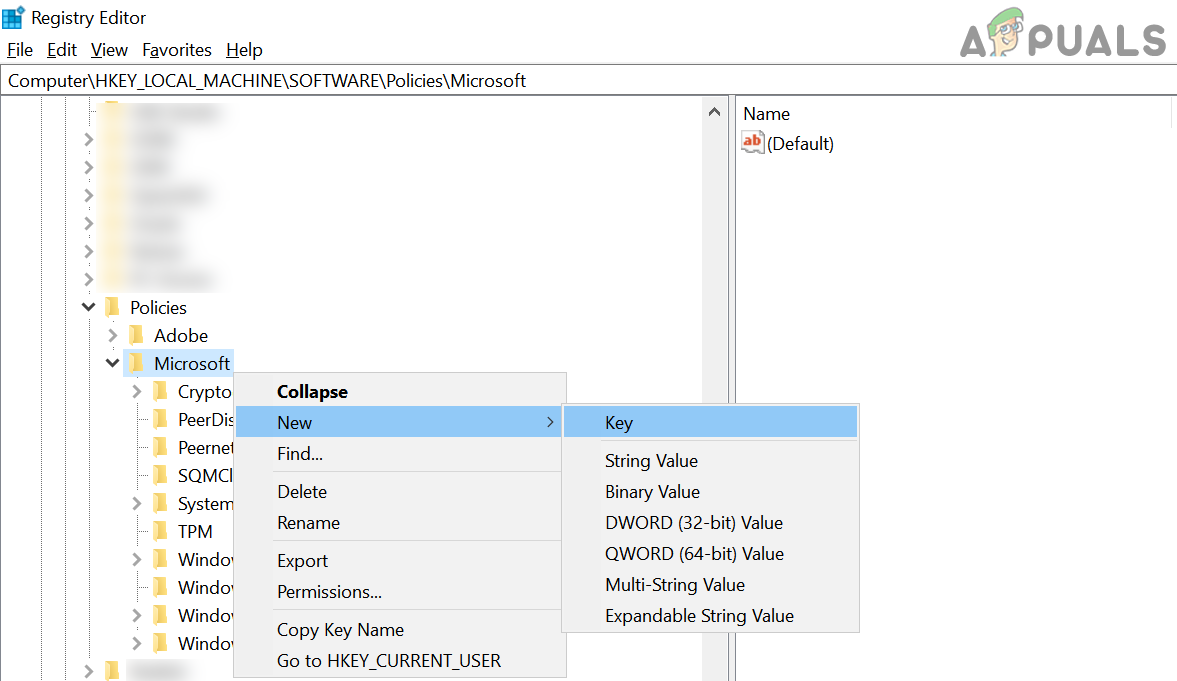
Create a New Key Under the Microsoft Key in the Registry Editor - Now enter the name of the new key as Power and right-click on Power.
- Then select New >> Key and enter the name of the new key as ‘PowerSettings’.
- Now, create another key under the PowerSettings key and name it as 0e796bdb-100d-47d6-a2d5-f7d2daa51f51.
- Afterward, right-click on the 0e796bdb-100d-47d6-a2d5-f7d2daa51f51 key and select New>> Dword (32-bit) Value.
- Then, enter the name of the value as ‘DCSettingIndex’ and double-click on it.
- Now set its value as 0 and click OK.
- Again, right-click on the PowerSettings key and select New DWORD (32-bit) Value.
- Then name the key as ACSettingIndex and set its value to 0.
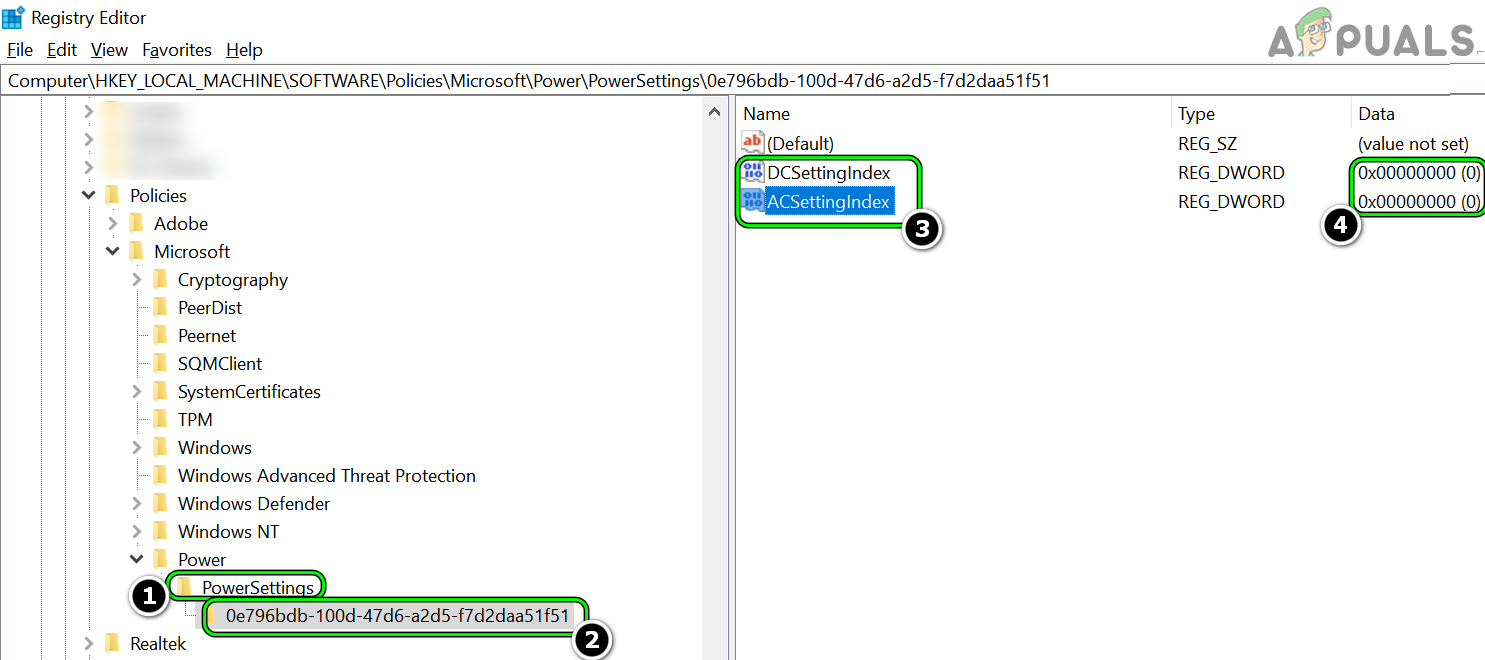
Set Value of DCSettingIndex and ACSettingIndex Value to 0 in the System’s Registry - Now close the editor and restart your PC.
- Upon restart, check if the password requirement is disabled when the PC wakes from sleep.
Use the Group Policy Editor to disable the password on the system’s wake-up.
If the above methods did not work, then a Group Policy (Group Policy settings override the system’s registry values) may be restricting a user from disabling the password requirement upon the system’s wake-up. Disabling this could solve the problem. Windows Home users may need to install the Group Policy Editor. Keep in mind that this will affect all users of the machine, not just the current user.
- Click Windows, search for Group Policy, right-click on Edit Group Policy, and select Run as Administrator.

Open Group Policy Editor - Now, in the left pane of the Group Policy Editor, navigate to the following path:
Computer Configuration>> Administrative Templates>> System>> Power Management>> Sleep Settings
- Then, in the right pane, double-click on Require a Password When a Computer Wakes (On Battery) and select Disabled.
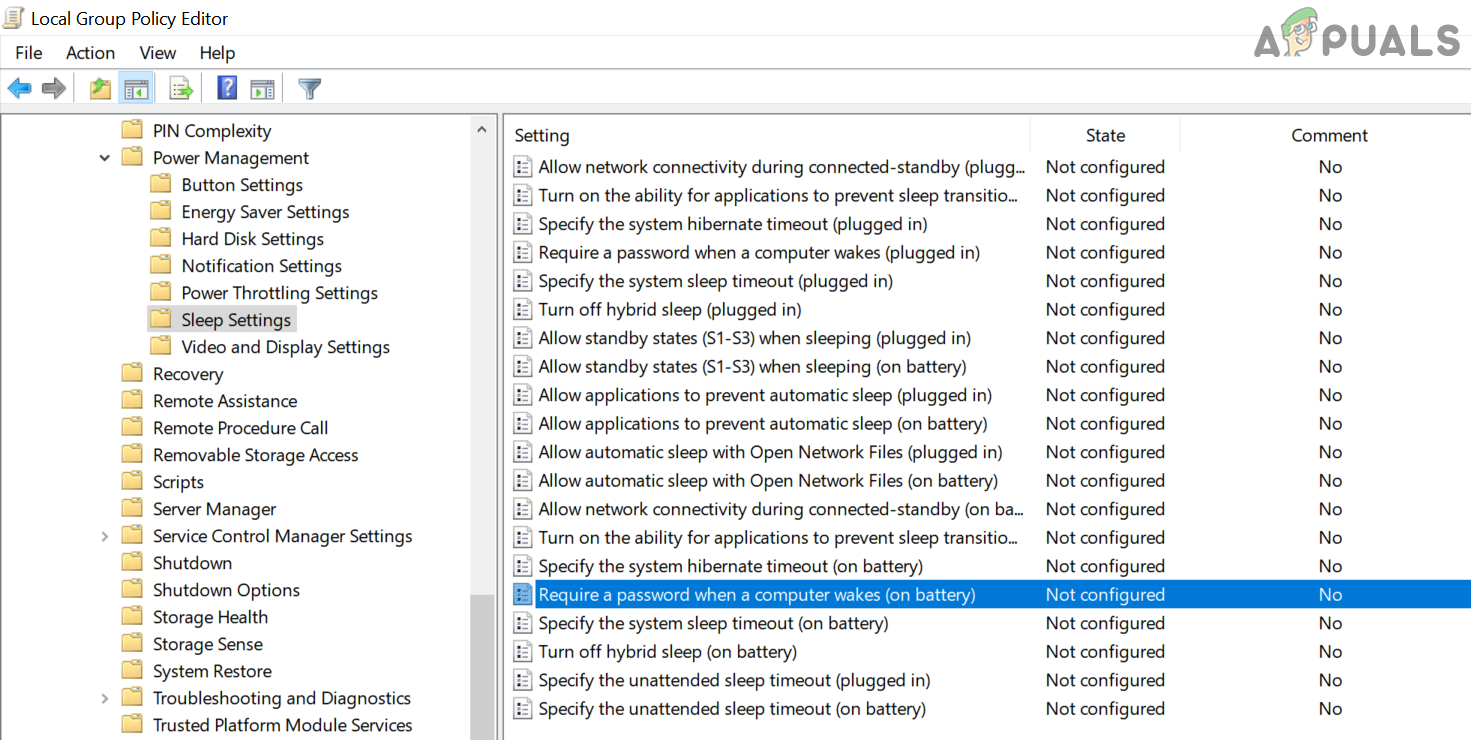
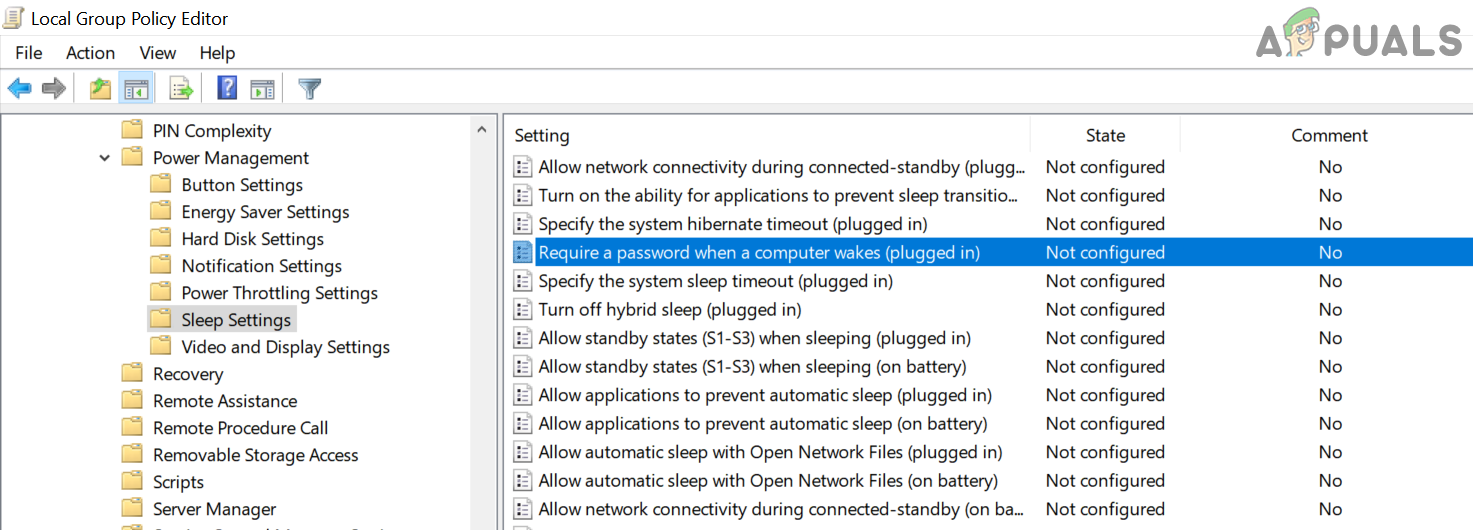
Open Require a Password When a Computer Wakes (On Battery) in the Group Policy Editor - Now apply the changes made and double-click on Require a Password When a Computer Wakes (Plugged in).

Disable Require a Password When a Computer Wakes (On Battery) - Then select Disabled and apply the changes made.
Open the Group Policy of Require a Password When a Computer Wakes (Plugged in) - Afterward, check if the password requirement issue is cleared.
Disable a password on a system that supports modern standby.
If a system supports modern standby, then a user may fail to disable the password on such a system with the above-mentioned methods. So, firstly, let us check if the system is modern standby supported or not. To do so, launch Command Prompt as Administrator and execute the following in it:
powercfg -a
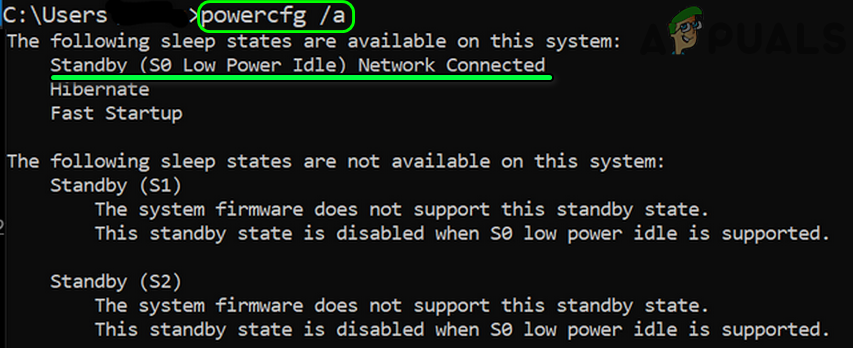
If the output shows any one of the following as available, then the system supports Modern Standby:
Standby (S0 Low Power Idle) Network Connected

Standby (S0 Low Power Idle) Network Disconnected
In this case, check if disabling the Modern Standby solves the problem.
If not, then you may edit the system registry to disable the system’s wakeup password. To do so, follow these steps…
- Open the Registry Editor as Administrator and navigate to the following path:
HKEY_CURRENT_USER\Control Panel\Desktop
- Now, in the left pane, right-click on Desktop and select New>> Dword (32-bit) Value.
- Next, name the key ‘DelayLockInterval’ and then double-click on it.
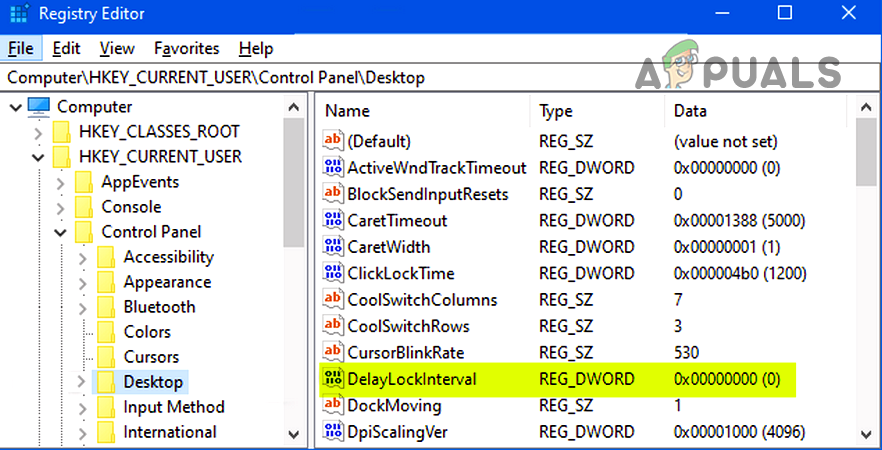
Set the Value of DelayLockInterval to ffffffff in the System’s Registry - Now set the value of the key as ffffffff and click OK.
- Then exit the editor and restart your system.
- Upon restart, check if the system’s wakeup password is disabled,
If none of the above worked, then you may either disable the lock screen (strictly not recommended) or check if a work or school policy is not causing the issue.
For Mac Users
- Launch Mac’s System Preferences and open Security & Privacy.

Open Security and Privacy in Mac’s System Preferences - Now in the General tab, uncheck Require Password [time] After Sleep or Screen Saver Begins.
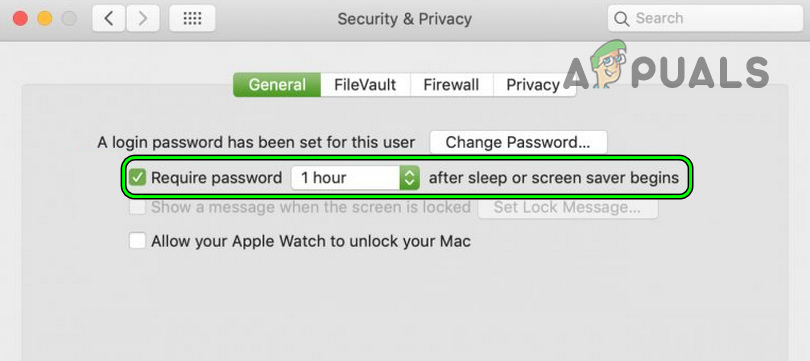
Uncheck Require Password [time] After Sleep or Screen Saver Begins in Mac’s Preferences - Then, on the pop-up that asks ‘Are You Sure You Want to Turn Off Screen Lock?’, click ‘Turn Off Screen Lock’. This will disable the password requirement after waking from sleep on a Mac.
For Ubuntu Users
- Launch Ubuntu’s Settings and, in the left pane, head to the Privacy tab.

Open Privacy in the Ubuntu’s Settings - Now head to the Screen Lock tab and in the right pane, disable Lock Screen on Suspend.
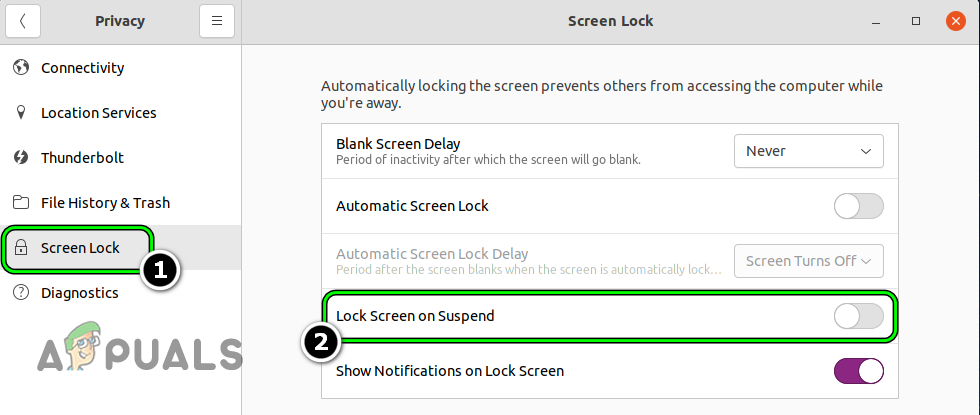
Disable Lock Screen on Suspend in the Ubuntu’s Settings - Then hopefully, the password requirement after sleep will be disabled on the Linux distro.
Geeks who favor the CLI (Command Line Interface) may use the following in Ubuntu’s BASH to disable the screen lock upon system suspension.
gsettings set org.gnome.desktop.screensaver ubuntu-lock-on-suspend false

This is a security concern,
Since a user has disabled the password for the system’s wakeup from sleep, it could make the system more vulnerable to security incidents. As a piece of advice, you might want to set up a smart lock on your system so that it locks automatically when you are away.