How to Fix ‘Denial Reason Code 20’ When Joining Party?
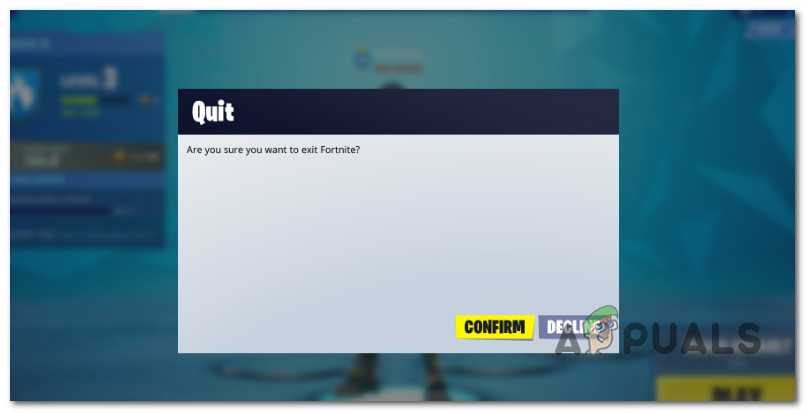
The Denial Reason Code 20 error appears when Fortnight players attempt to join an existing party. The error code is accompanied by the message “Unable to Join Party.” This problem is confirmed to occur on both consoles and PC.

This error generally occurs if the party is set to private. However, you can also expect to deal with this error due to a game/network inconsistency.
In other circumstances, you might see the reason for error code 20 because the party owner is not a friend on Epic, due to a firewall, proxy, or VPN interference, due to a parental control setting or because you are attempting to play with someone on a different platform while2 cross-network play is disabled.
Start troubleshooting the Fortnite reason code 20 with the methods below:
1. Restart the PC or Console
If you’re starting to troubleshoot the issue, try to close the game and open it again after restarting your PC.
This will resolve the majority of issues created by a temporary game file. This is confirmed effective on PC and consoles (Playstation or Xbox).
If you get the Fortnite Reason Code 20 while attempting to join an existing party, close the game and reboot your PC or console.
At the next startup, relaunch Fortnite and join the same party directly from a fresh invitation you just received.
If the same problem is still occurring, move to the next method below.
2. Set the Party to Public
One of the most popular reasons you might experience the Reason Code 20 error when attempting to connect to an existing party is that the party is set to private by the party owner.
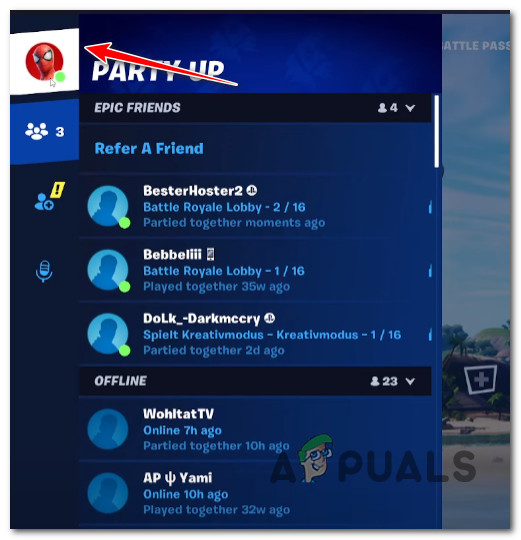
In this case, the only way to resolve the error is to ask the party owner to change its status to Public. This can be done from the Party Up menu. You need to ensure that the Party Privacy is set to Public so that any of your friends can join.
Here’s a quick guide that will show you the specific steps for changing the privacy status of an existing party to Public:
Note: The steps below need to be followed by the party owner. Ask your friend to follow these steps if you are not the party owner.
- Make sure you are on the main game menu of Fortnite.
- Press the options menu (or click on the top-left icon) to bring up the side menu.
- From the side menu, access your avatar icon to bring up the Advanced Party Settings.
Access the Advanced Party Up Menu - From the next menu, ensure that Privacy Party is set to public before saving the changes.
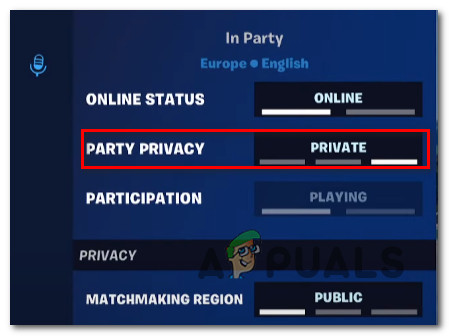
Access the Party Privacy Menu - Once the party privacy has been changed, attempt to join again and see if you still see the same error code, reason 20.
If the problem is still not fixed, move to the next method below.
3. Befriend party owner on Epic (PC Only)
If the two methods above didn’t work in your case, the next thing you should do is make sure the owner of the party you are attempting to join is also in your friend list on Epic Games.
Note: This is a requirement if the party owner configures the party with the Privacy Party set to Private or if you attempt to squad up with friends using the cross-platform functionality.
First, you must ensure that an active Epic Games account is validated and the Epic Game launcher is installed on your PC.
Here’s a quick step-by-step guide that will allow you to befriend the party owner on Epic and circumvent the Error Code Reason 20 on Fortnite:
- If the Epic Games launcher is not installed on your PC, head to the official download website and follow the on-screen instructions to download the latest version.

Downloading the Epic Games Launcher Note: Make sure you sign in with your Epic account before initiating the download.
- Once the Epic Games launcher is installed, please open it and ensure you are signed in with your account.
- From the main menu of Epic Games Launcher, click on the Friends icon from the top-right corner of the screen.
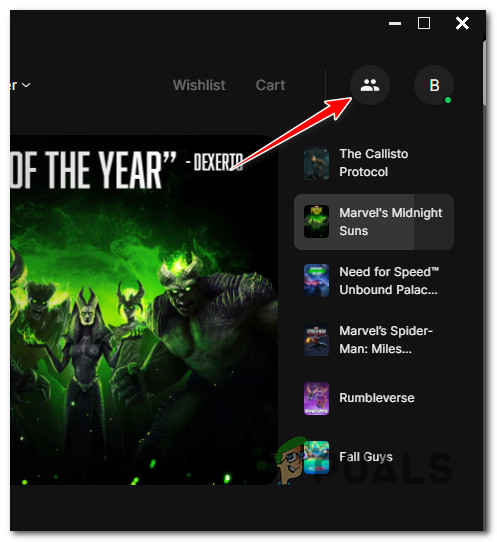
Access the Friends tab in Epic Games - Next, please search for your friend who’s the party owner using his Fornite id and add it to your friend list on Epic Games Launcher.
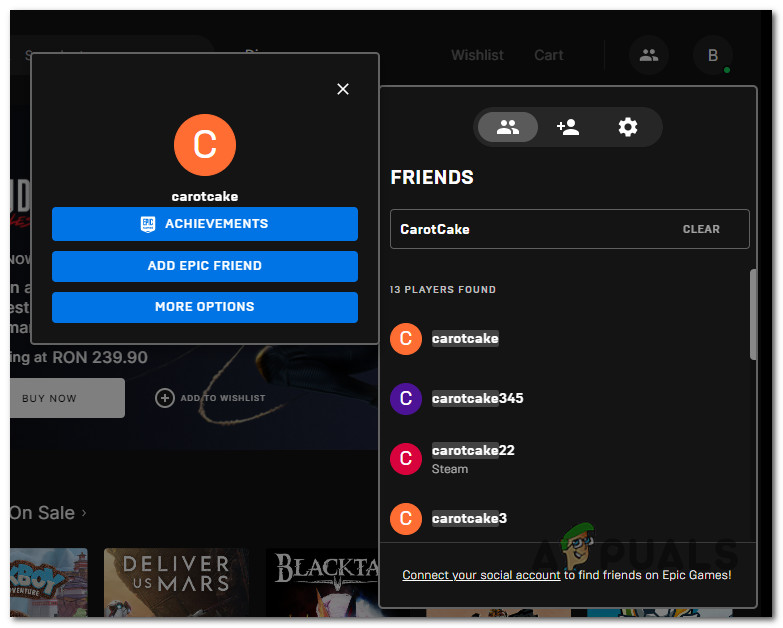
Adding a new friend inside Epic Games - Once you add the party owner as a friend on Epic, restart your PC and open Fortnite again to see if the problem is now fixed.
If you still get the same Denial Reason Code 20 error when attempting to join an existing party, move down to the next potential fix below.
4. Disable Proxy or VPN
Another scenario that might cause the 20 reason code when attempting to join Fortnite parties is a proxy or VPN client inhibiting the connection with the game server.
Note: This is usually an issue on a PC, but it might also occur if you enforce a proxy or VPN tunnel at a router level.
Fortnite and other multiplayer games hosted on the Epic Games architecture are known to malfunction when the connection is funneled through a VPN client or a Proxy server.
If this scenario is applicable, try disabling the VPN or Proxy server and see if the reason code 20 error stops occurring.
We’ve created two separate guides to accommodate both scenarios (using a VPN or proxy server). Follow the one applicable to your current scenario.
4.1. Disable Proxy server
If you’ve already set up a local proxy server, you may quickly disable it by selecting the Proxy tab from the Settings menu.
Note: This is only applicable if you use the built-in Proxy functionality on Windows or Windows 11.
Here’s a quick guide that will show you how to disable a currently active Proxy server:
- Open the Run box and press the Windows key + R keys simultaneously.
- To open the Proxy tab in the Settings app, enter “ms-settings:network-proxy” in the following menu and hit Enter.

Open the Proxy tab - Click Manual Proxy Setup under the Proxy tab in the Settings menu.
- Uncheck the box next to “Use a proxy server” on the right side of the screen.
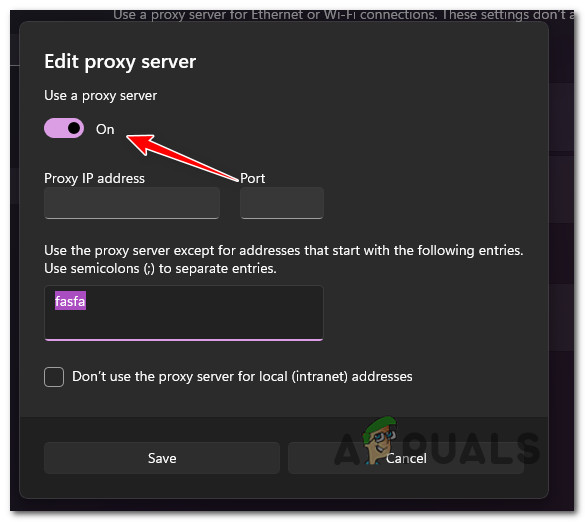
Disable the Proxy server - After turning off the proxy server, restart your computer and launch Fortnite again to see if the problem is now fixed.
If you’re using a VPN client, use the next sub-guide below.
4.2. Disable VPN Client
Disabling a VPN service on a Windows machine depends on whether Windows or another 3rd party program is in charge.
If you use a standalone app, the connection must be terminated at the VPN interface.
However, if you configured your VPN using the built-in feature, you can disable it by carrying out the following actions:
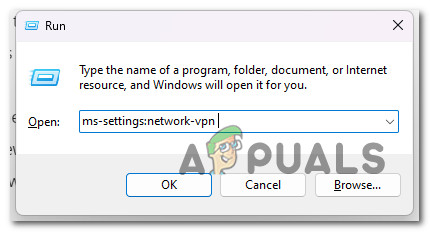
- To open the Run box, use the Windows key + R.
- To open the VPN tab in the Windows Settings app, type “ms-settings:network-vpn” and hit Enter.
Open the VPN menu - On the right side, click the VPN connection you are using.
- Select Remove from the new context menu to prevent VPNs from inhibiting connections to outside servers.
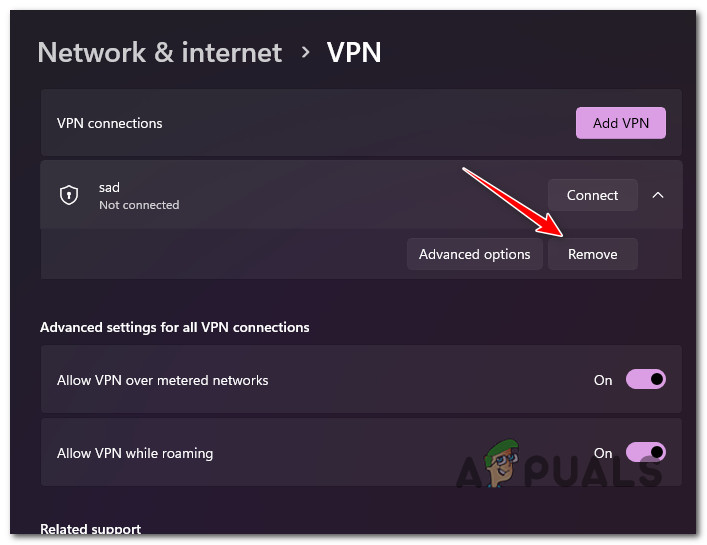
Remove the VPN connection. - Reopen Fortnite and attempt to join the same party that was previously triggering the reason error code 20 to see if the problem is now fixed.
If disabling your Proxy or VPN client didn’t make a difference or you weren’t using any of these anonymity solutions in the first place, move down to the next method below.
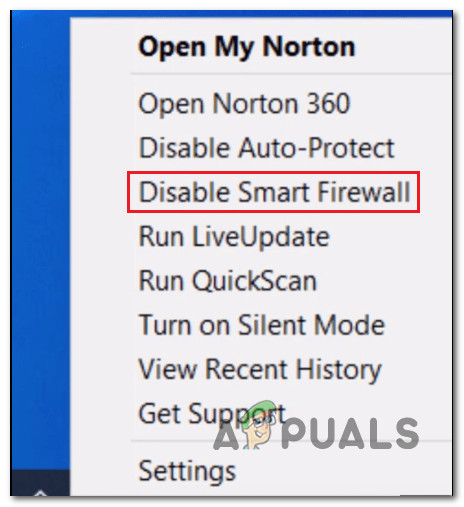
5. Disable or uninstall the firewall
An overprotective firewall can also interfere with the matchmaking feature on Fortnite and contribute to the reason code 20 when attempting to join existing parties.
Several overprotective firewalls confirm this problem on the free tier of AVs like Norton, Avira, and Comodo.
You can test this theory by temporarily disabling the firewall component and launching the game again to see if the error resolves itself.
You can accomplish this directly from the tray bar icon in third-party security packages.
Important: Network-specific rules will remain in place even if real-time protection is off on some firewalls. Therefore, if you previously configured your firewall to block particular types of communication with external servers, this function is likely to continue even after you disable firewall protection.
If this is the case, uninstall the third-party firewall by following the instructions below and check to see if the issue disappears:
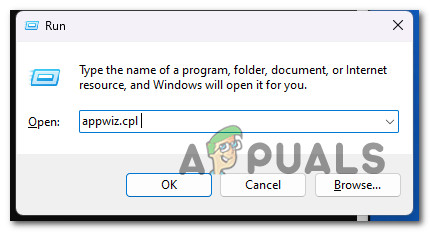
- To open the Run box, press the Windows key + R.
- Type “appwiz.cpl” into the box and hit Enter. This will open the Programs and Files menu.
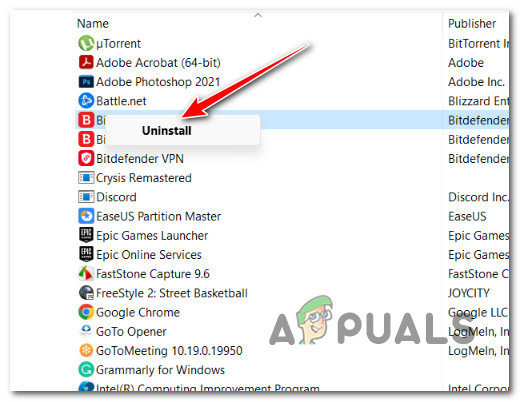
Open up the Programs and Features menu - Look through the list of installed programs using the Programs and Files menu until you locate the third-party firewall tool you wish to uninstall.
- Right-click the third-party antivirus program you located and select “Uninstall” from the new menu that appears to complete the uninstall.
Uninstall antivirus - To see if the issue is still present, finish following the instructions for uninstalling the firewall program and restarting your computer.
- At the next startup, launch Fortnite again and see if you still get the reason code 20 when you attempt to join an existing party.
If the problem is still unresolved, move to the next method below.
6. Disable Parental controls on the Epic account
As it turns out, this issue can also surface due to previously enforced parental controls preventing you from joining the party due to ambiguous settings.
If parental control settings are the main cause of why you see the error code 20, accessing the Parental Controls menu of your Epic account and reconfiguring the Parental Controls settings should allow you to fix this issue.
You’ll need to ensure that a parental control pin is set, then make the following changes:
- Reconfigure the Rating system so that PIN is not requested for PEGI 12.
- Disable the ‘Require PIN to add Epic Friends‘ toggle (under Epic Friends Permission).
- Set the Epic Voice Chat permission to Everybody if the party consists of players, not on your friend list. You can set it to Friends & Teammates otherwise.
Note: On top of these parental controls settings available inside your Epic account, there’s also a set of specific parental controls that you need to adjust if you’re playing on Playstation or Xbox.
For complete instructions on making sure that the parental controls don’t end up inhibiting the joining of existing parties in Fortnite, follow the steps below:
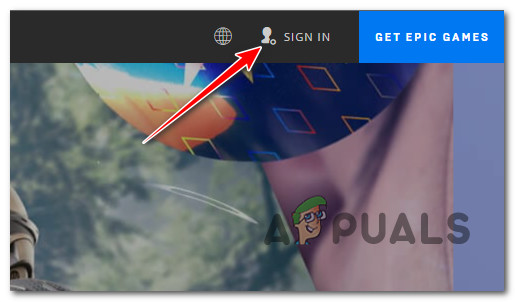
- Open any browser and visit the official Epic Games account page.
- Inside the page, click the Sign in button (top-right corner) and log in with the same account that holds ownership of Fortnite.
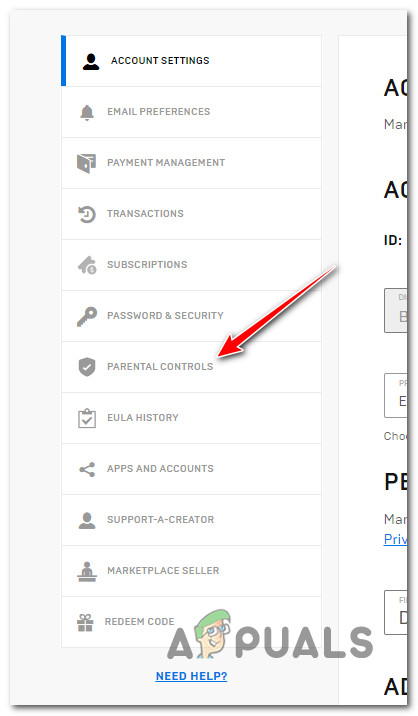
Sign in Button with Epic Games account - Once you are signed in with your account, click on your Account name, then click on Account.
- Inside the Settings menu, click on Parental Controls from the side menu on the left.
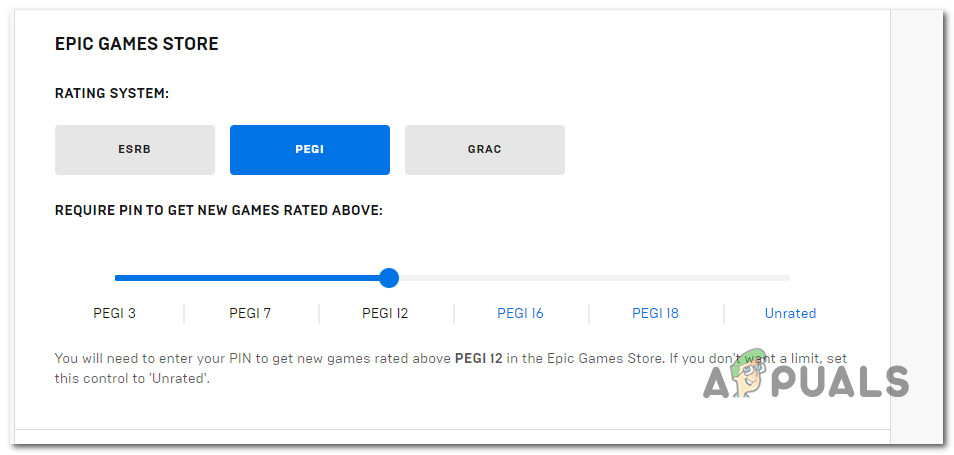
Access the Parental Control menu - Next, from the Parental Controls menu, start by ensuring that the Rating System for PEGI is set to PEGI 12 or above.
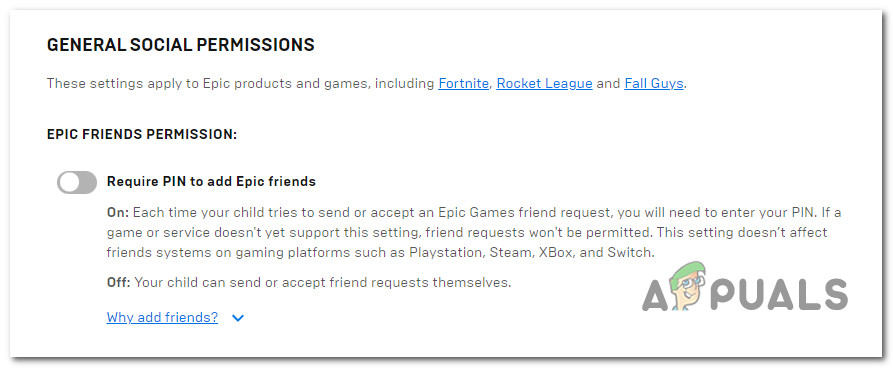
Set the PEGI rating to Pegi 12 or above - Next, scroll down to Epic Friends Permission (under General Social Permissions) and ensure that the Require PIN to add Epic friends toggle is disabled.
Disable custom permissions - Next, set the Epic Voice Chat permission to Everybody and the Epic Text Chat Permission to Everybody.
- Save the changes, then launch Fortnite once again and see if the reason code 20 is now fixed.
If the problem is still not fixed, move to the next method below.
7. Enable Cross-Network Play
Another way you’ll see the reason code 20 when attempting to join an existing Fortnite party is when you’re attempting to play with users on a different platform than yours, but cross-network play is disabled in your game’s settings.
If this scenario is applicable, you should be able to fix the issue by accessing your Account and Privacy settings and enabling Cross Platform Play (under Gameplay Privacy).
Note: If you’re experiencing this issue on an Xbox console, you’ll also need to ensure that crossplay is enabled at a system level.
For specific instructions on how to do this, follow the steps below:
- Open Fortnite on the platform triggering the error and go to the main game menu.
- Access the Settings menu by pressing the Options button (on your console’s controller) or clicking on the top-right icon (on PC).
- Then, click on Settings from the side menu that just appeared.
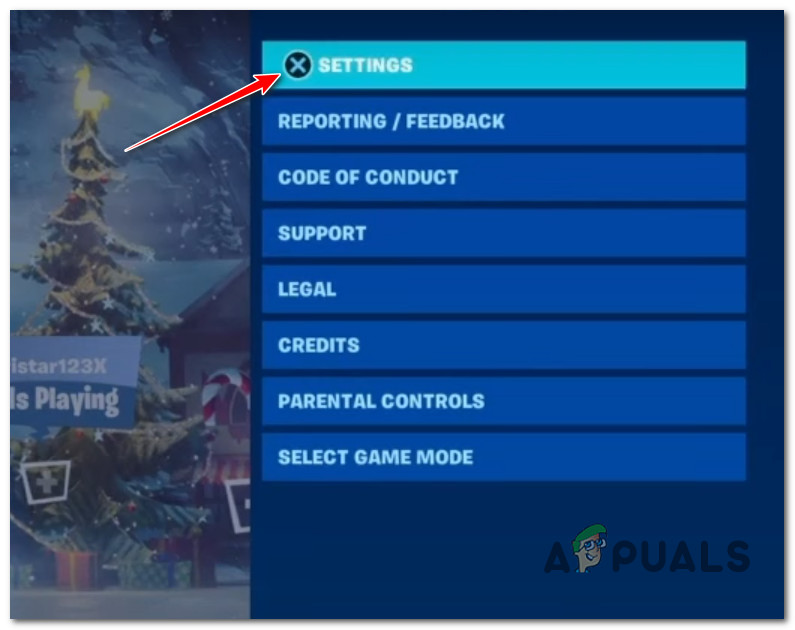
Access the Settings screen in Fortnite - Next, swipe through the different Settings options until you reach the Account tab.
- Cycle down to the Gameplay Privacy menu and make sure the toggle associated with Allow Cross-Platform Play is set to Yes.
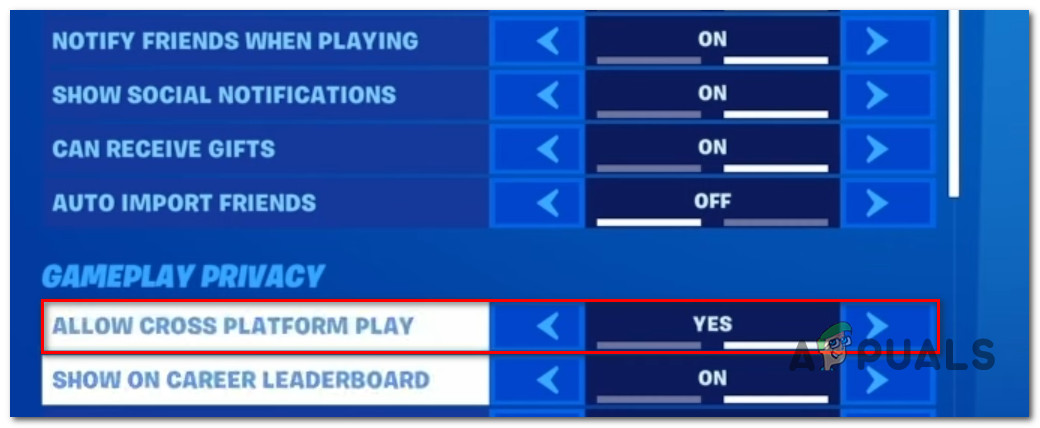
Enable Cross Play on Fortnite - Save the changes, restart the game and see if the problem is now fixed.
Note: If you are experiencing this issue on an Xbox console, continue with the steps below to ensure that cross-play is not disabled at a system level. If you’re on PC or Playstation, move directly to the next method below. - To open the context menu, press the Xbox button on the controller and choose Settings from the System (gear symbol).
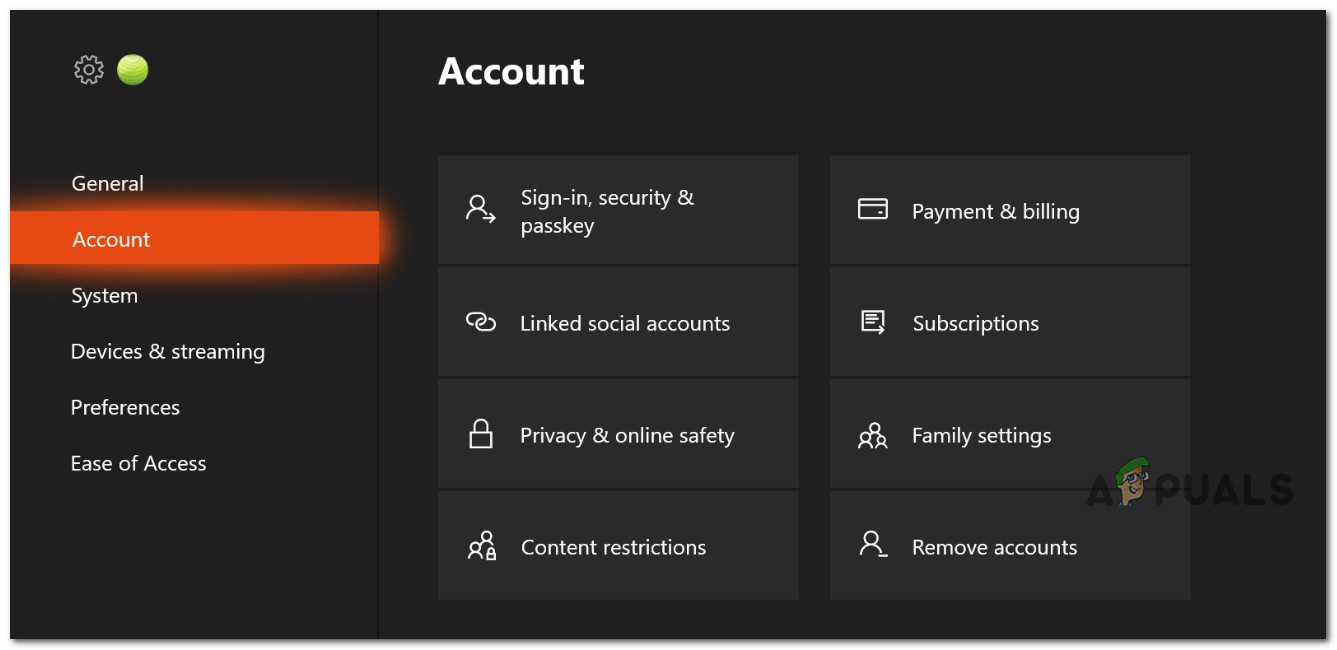
- Click Account Privacy and Online Safety from the menu that just appeared.
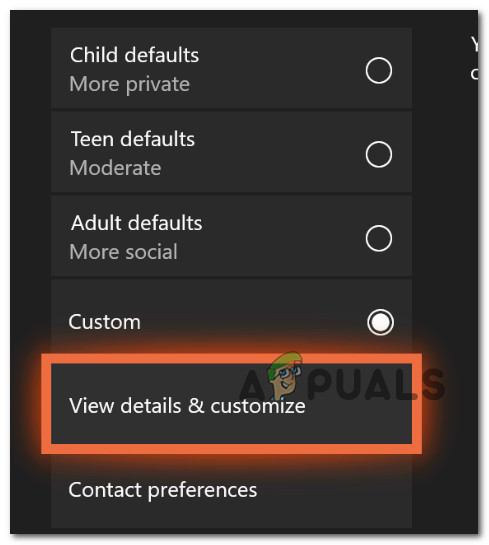
Access the Account menu on Xbox - After seeing the list of privacy presets, choose Custom from the following menu.

Establishing a custom preset - Select Communication & Multiplayer, then View Details and Customize after selecting a custom preset.
View details and customize - Once you’ve reached the Account Communication & Multiplayer pane, double-check that You Can Communicate Outside of Xbox Live is set to Everybody before saving your adjustments.
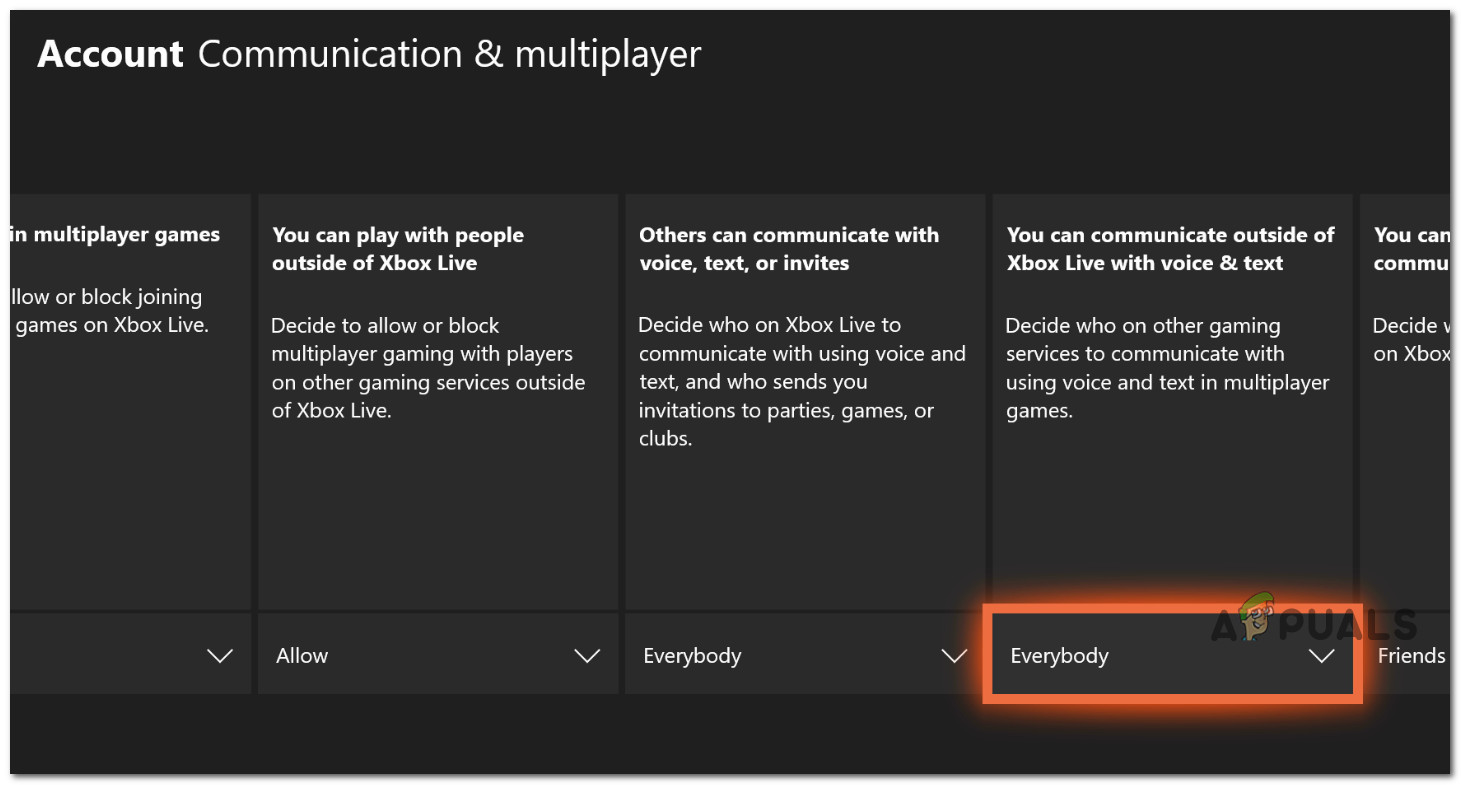
Setting communications to Everybody. - After making this adjustment, restart your console, relaunch Fortnite and see if the problem is now fixed.
If the problem is not fixed, move to the next method below.
8. Hard Reboot console (Power-Cycling)
If you’ve come this far without a viable fix, consider performing a hard reboot (AKA power cycling procedure).
We’ve identified several user reports of Fortnite players experiencing the 20 reason code error that managed to fix this problem by triggering a power-cycling procedure on their console. This is confirmed to work on both-old gen and current-gen consoles.
Here are the instructions for every accessible console in case you don’t know how to perform this on your particular console:
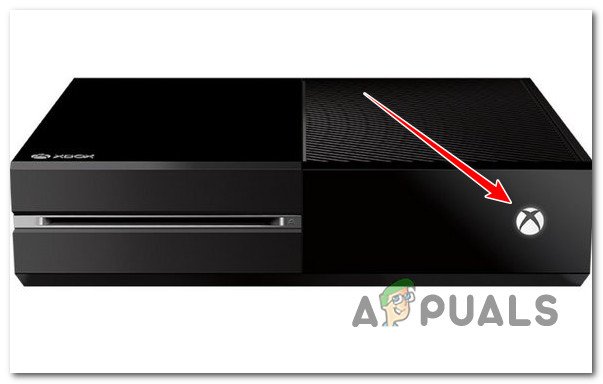
8.1. Hard Reboot Xbox One and Xbox Series X/S
The procedure is the same for Xbox One and Xbox Series X/S owners. Here’s how to power cycle your current-gen or last-gen Xbox console:
- Hold down the power button on your console for ten to fifteen seconds.
- Wait until the console shuts off after that.
Disable the Xbox button - Confirm that the power capacitors are completely discharged once the console has been turned off.
- Unplug the console from the outlet and wait a moment to drain the energy more quickly.
- Replug the console into the outlet and turn it on when a minute has passed.
- Open Fortnite once more to check whether you can join an existing party without getting the reason error code 20.
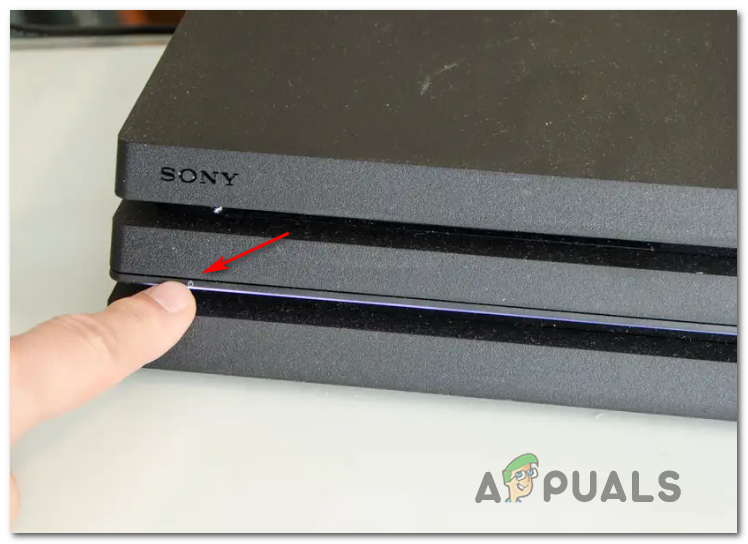
8.2. Hard Reboot PlayStation 4 system
Make sure to give the power capacitors ample time to finish cleaning themselves before hard rebooting your PlayStation 4 system.
Here’s how to do this:
- Hold the power button to switch off your console for a few seconds until the fan stops.
Turn off the Playstation console - Disconnect the power cord from the outlet and wait a minute to ensure the power capacitors are discharged.
- Plug the console back into the outlet and switch it on after the allotted time has passed.
- Launch Fortnite after the PlayStation 4 console has rebooted, and see if you can join existing parties.
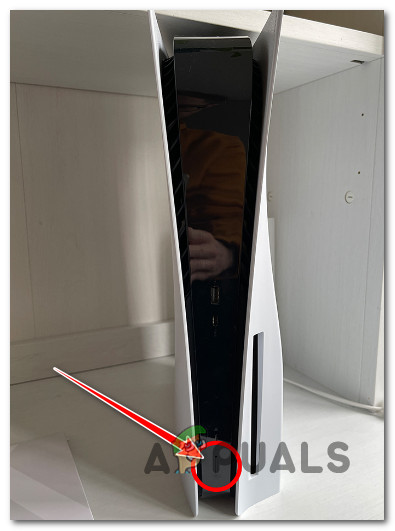
8.3. Hard Reboot PlayStation 5 system
The steps of a hard reboot you a PS5 system are similar to PS4, with one key difference.
Here’s what you need to do:
- Press and hold the power button on your PlayStation 5 console when it is fully turned on.
- Keep pressing the button until you are certain the console has shut off.
Press the Power button - Next, please turn off the console and remove the power wire from the outlet, leaving it unplugged for roughly a minute.
- Reconnect the power cord to the socket when the minute has gone, then wait until the console restarts.
- To check if the error still occurs, launch Fortnite and join an existing party.
If the same problem is still occurring, move to the next method below.
9. Reset or Restart the router
The last thing you should look into if you’ve got this far without finding a workable solution is a potential router problem.
This issue frequently occurs when your router is slowed down by collected cache data, which makes it more difficult to facilitate VoIP connections needed while joining Fortnite parties.
Your home Internet connection can be reset using one of two methods.
Most Fortnite connectivity issues should be resolved with a short router restart. To switch off the power, locate the On/Off button on the back of your router and press it.\
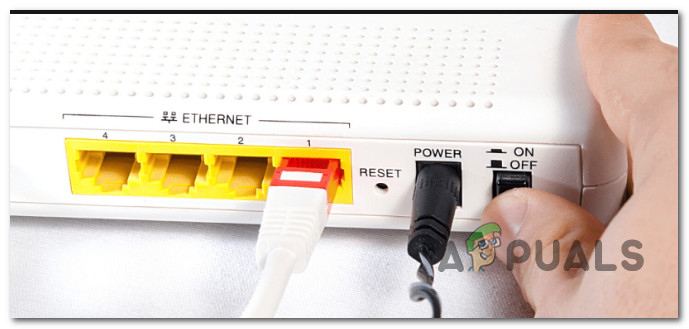
IMPORTANT: Unplug the power cord from the wall and wait a full minute after pressing the power button until all LED lights are off. Doing so will discharge the power capacitors and erase any temporary information your router may retain.
Next, turn on your router by pressing the power button, then wait for Internet access to resume.
The next obvious option is to do a router reset.
Note: Any modifications made to your router’s settings will be lost if you go for this procedure. Ports that have been opened and connections that have been disallowed will also be reverted.
Look for the reset button on the router’s rear and hold the reset button for 10 seconds (or until all of the LEDs flicker at once).
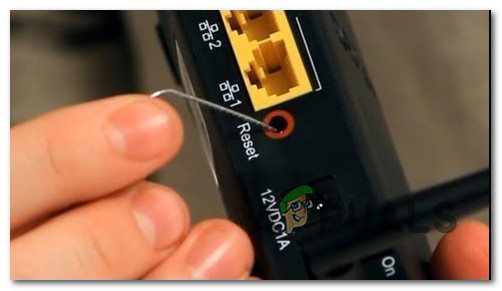
Note: Most of the time, it is integrated into the case to prevent accidental pushing. You’ll need something like a little screwdriver to access it.
After you complete this procedure, you must reenter your ISP’s credentials to connect if your ISP uses PPPoE (Point-to-Point-Protocol over the Internet). Before beginning the reset operation, make sure they are prepared.
Launch Fortnite once more when your internet access has been restored, and check to see whether you encounter the same reason 20 error code while attempting to join an existing party.


