How to Decompile and Theme Android APKs
Have you ever opened an Android app and didn’t like the color theme it used? What if you wanted to change a white background in an app to black, for example? Today I’m going to show you how to decompile an .APK file so you can edit the files inside, then recompile and install it on your Android phone.
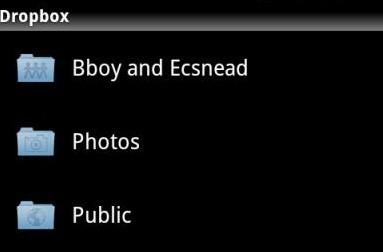
Note: Some apps are more difficult to theme than others. Facebook Messenger for example is notoriously difficult to theme. I’ll be walking you through this guide using the Dropbox app as an example, since it is among the easiest to edit.
Requirements
- Notepad++
- APKTool + latest AAPT
- APKMulti Tool Script
- A photo editor like Photoshop / GIMP
- [Optional] Dropbox .apk (for following this guide)
Download all of the required tools and install them on your PC, including the test.apk provided above. Dropbox is one of the easier apps to theme, so we’ll use it for this tutorial.
You should also transfer framework-res.apk from your phone to your PC, it is located in /system/framework/ on your internal storage.
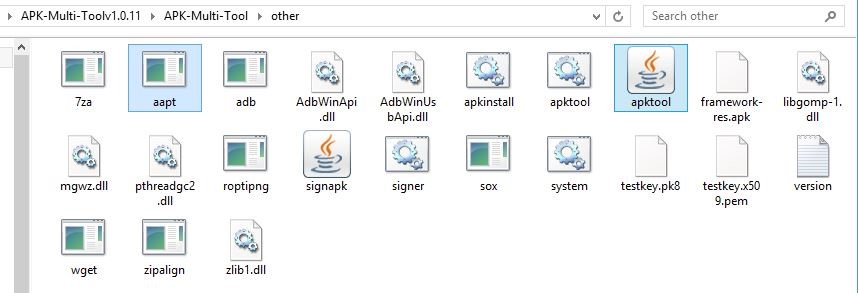
Drop the APKTool and the AAPT inside the “Other” folder inside the main directory of the APK Multi Tool.
Drag the test.apk into the “Place-apk-here-for-modding” folder inside APK Multi Tool directory, and you’ll be greeted with a command terminal.

Hit any key to proceed, and you’ll see a terminal menu with a bunch of options. Choose option 24.
You’ll go back to the main terminal screen, but “test.app” will be your project. So press 9 to decompile the apk, and then press 12 to run a test-build. This is a good practice for seeing if something was set up wrong. If the app builds correctly, press 2 and minimize the script that appears.
Since the test build checked out, let’s dive into editing the XML code of the apk. Please follow along carefully.
Inside the extracted .apk folder, go into the “res” folder and open “AndroidManifest.xml” with Notepad++. Now press CTRL+F to find the following string:
android:background
Use the “Find All” option, and there should be around 190 strings found. So now you need to go through each and every highlighted string, to make sure you don’t miss any when we change the background color of the app.
Scroll through until you find “Camera_upload_grid.xml” which contains the string “android:background=”@*android:color/white”. Copy that entire string and press CTRL+H so the “Replace” dialogue pops up. Paste the string into the top and bottom lines, but we’ll need to change it.
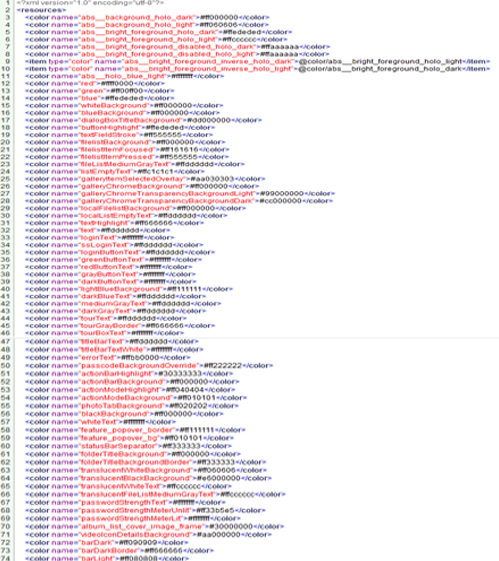
Inside the decompiled .apk folder, go into /res/values/colors.xml and open it in Notepad++. Look for the line “abs__background_holo_dark”, which is most definitely a background. So now copy that string, and go back to the first XML file we had opened, with the Replace box still open, and in the bottom line paste the string you just copied. So you should now have in the bottom line of the Replace dialogue:
android:background=”@color/abs__background_holo_dark
Now hit “Replace All”, and it’s going to change all of the @android:color/white’s to use the background_holo_dark instead. Now continue scrolling through the entire .xml, searching for any android:background strings that are using a hex value (#fffffff) or anything other than what we just replaced them with. For the ones you find, change the strings to use the new one (abs__background_holo_dark).
So we’ve changed the background, now we’re going to change the text color. So follow the same procedure we just did, but this time do a CTRL+F for “android:textColor”. You’ll get around 166 lines found.
You’ll see things like “android:textColor=”#ffbbbbbb”, etc. So look inside the Colors.xml again and we need to figure out which lines to replace for the text color.
You can see the android:textColor=”#ffbbbbbb”, “#ffffffff”, “#ff717171”, and “#ffcccccc” in the screenshot and in your search results in Note++. Open your Colors.xml again now to find which line we want to use for the text color.
So go back to the first .xml and do CTRL+H for the Replace dialogue again. Now copypaste the “android:textColor=”#ffbbbbbb” string into the top and bottom, and change the bottom line to “android:textColor=”@color/text”.
Now once again, search through all of the android:textColor lines and change anything that has a hex value in the string. Finally when you get to the styles.xml file, you want to remove the inverse from a few lines, starting at line 260 and continuing downwards for a few lines. So delete the “Inverse” from those strings.
Next you’ll see some hex values around on lines 527, 536, 573, 579, 585, 601, and a few others. Replace the from (<item name=”android:textColor”>#ffffffff</item>) to (<item name=”android:textColor”>@color/text</item>).
Press CTRL+F to search in Notepad++ for cacheColorHint, divider, @*android:color/, and Inverse.
The cacheColorHint is the scrolling background, so we need to make sure they’re using our background color. The dividers are self-explanatory, and we can change their hex values if you want. The only thing is that you must not touch anything that points to @drawable. Those are typically images stored as .png files elsewhere in the .apk folder.
When you search for “inverse”, it will display references to textAppearanceInverse. You need to double-click each one of these and delete the Inverse from those strings.
Finally, the search for @*android:color/ will just double-check if we missed any framework edits. If you find anything that says “android:popupBackground”>@*android:color/white”, you need to change it to “android:popupBackground”>@color/abs__background_holo_dark”. This includes line 911, which can be confusing because it already points to android:color/black.
Next we will open res/values/colors.xml and change it to look like this:
Next res/values/styles.xml, and scroll down to line 328. Change it like this:
(<style name=”Sherlock.__Theme.Light” parent=”@*android:style/Theme.Light.NoTitleBar”>) should be changed to (<style name=”Sherlock.__Theme.Light” parent=”@*android:style/Theme.Black.NoTitleBar”>)
Do the same for line 479, changing the “light” to “black”.
Now go into res/values-v11/styles.xml, and remove the “light” where it says “Holo.Light”.
Next you’ll open res/values-v14/styles now, which contains a lot of strings. So on the first 46 lines, you want to remove any “Light” and “Inverse” references, and then change the parents on lines 53 and 54 to “@*android:style/Theme.Holo “.
On line 69, on the right side parent, remove the Light from the @*android:style/Theme.Holo.Light.Dialog parent.
This is a lot of work, right? Maybe from now on you’ll be more appreciative of app themes and skins!
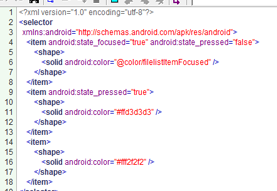
Next we’ll go into the res/color folder. There are some text files in there that are pointing to black. Open res/colors/action_mode_item_text_color_state_list.xml
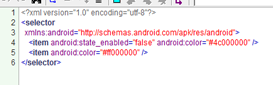
That’s how it looks on stock. Below is how you need to make it.

You need to make those sames changes to the following xml files inside the /res/colors folder: Bottom_button.xml, Button_update.xml, Filelist_text_name.xml, Filelist_text_small.xml, Link_button.xml, Local_filelist_text_name.xml, Local_filelist_text_small.xml, ss_bottom_bottom_text_color_dark.xml, ss_bottom_bottom_text_color_light.xml, tab_text_foreground.xml.
When you’re finished with those, open /res/drawable and there are xmls that control background color. So go through them and make them look like this:
Apply the same changes to all the other drawable.xml files.
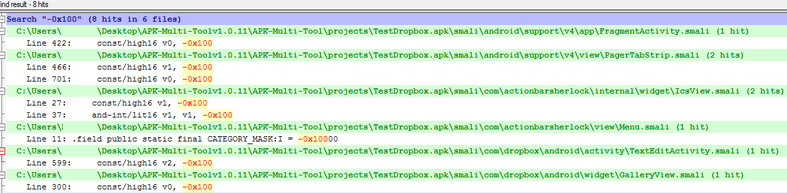
Now open the test.apk and press CTRL+left click to highlight smali and AndroidManifest, then right click and “Edit with Notepad++” again. Agree to all 1999 smali files. When it loads, do a CTRL+F search for -0x100 (black)
You’ll get about 8 hits, and the one you want is smali/com/dropbox/android/activity/TextEditActivity.smali, on line 599. Double click that line.
Line 599 contains -0x100 in it, and line 601 has “SetTextColor”. There is also a variable that matches line 599. So to briefly explain, -0x100, -0x1000000 and even 0x0 mean black, -0x1000000 is also black and even 0x0. Change line 599 by removing the two 0’s from the 100 and removing the /high16 like this:
Next we’ll search for @*android:style, but in smali. The xml will contain an extra “0” after the x, but in smali we don’t use it. It needs to be “0x103004f” instead of “0x0103004f.
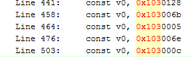
Do a search in Notepad++ for @*android:style/ which contains 0x103.
The second hit is “const v7, 0x1030073“. Search that in your public.xml from framework-res.apk again. You’ll see that it is the id for “Theme.Holo.Light.Dialog”. You’ll need to change it to the opposite theme style’s public id.
Since this one is Theme.Holo.Light.Dialog, you want to make it Theme.Holo.Dialog. Theme.Holo.Dialog has an id of “0x103006f”. That will change a pop up dialog alert box to use a darker Holo based theme instead of a lighter Holo.Light based theme.
The next one we need to change is “0x103006e” which is Theme.Holo.Light. So go ahead and make it the opposite theme style. In your public.xml from framework-res.apk, you’ll see the id for Theme.Holo is 0x0103006b. so let’s change that line to look like this:

There’s only 2 more of these to go through. The next one up is “0x103000c”, which is for Theme.Light in the public.xml. The opposite of that is Theme.Black, not ThemeHolo. So in the public.xml you’ll see the id for Theme.Black is “0x01030008” – change it to look like this:
In other apps, there’d be other things to edit and change, and with enough practice you’ll be able to re-theme nearly anything. But for now, we’re done with all the code bits (finally!).
So now you can open the script from the Apk Multi Tool, and hit 12 to compile the app. If any errors are displayed, you can try to look inside the error log for what went wrong, but its most likely you made a typo or other mistake during the code editing.
When the build is completed, press 2 and then 13 to re-sign the app.
The stock app contains a folder named “Templates” – you need to drag that into your unsigned apk using something like 7zip. Copy the unsigned.apk into the “place-apk-here-for-signing” folder inside Apk Multi Tool. Now press 18 in the terminal script to batch sign the apps in that folder. When it’s done, the script will automatically exit itself. You can now load the .apk onto your device!