How to Install & Use Cyberpunk 2077 Save Editor 2.0
 Reviewed by Huzaifa Haroon
Cyberpunk 2077 has come a long way. After facing multiple delays and a rocky launch in 2020, many thought it might spell the end for CD Projekt Red, the developers best known for The Witcher 3: The Wild Hunt. However, by listening to players and working closely with the modding community, they managed to turn things around and reveal Cyberpunk 2077’s true potential.

The game’s first and only major DLC, Phantom Liberty, was a massive update that fixed most of the game’s major issues and gave the story some serious polish. At first, modding mainly focused on fixing bugs and problems, but since Phantom Liberty’s release, the community has used mods to add all kinds of fun and creative changes. One of the most popular mods is the Save Editor. But what exactly is it, and how do you use it? Let’s find out!
Before we dive into what the Save Editor 2.0 is, let’s tackle a bigger question: why should you mod Cyberpunk 2077? Well, why not? Modding can massively improve your gaming experience and even give you a better understanding of how video games work under the hood.
Cyberpunk 2077 is already a visual feast, but even the best games can be improved. With mods, you can enhance graphics, add new outfits, your favorite cars, improve weapons, give V and other characters fresh looks, and so much more. The real question is: why wouldn’t you want to see how far you can push Night City?
What is the Save Editor 2.0?
The Save Editor was first developed by SirBitesalot. After the original project was discontinued for various reasons, Snapdragon2 and several other modders picked up where it left off, continuing its development under the new name Save Editor (Project CyberCAT-SimpleGUI). As its name suggests, this mod allows you to modify your save files entirely.
Depending on the version of the Save Editor you download, you can edit saves for a specific version of Cyberpunk 2077. The tool can even edit PS4 save files. With the Save Editor, you can:
- Unlock locked vehicles
- Unlock all upgrades
- Complete missions
- Add money
- Unlock weapons
This tool is perfect if you want to set up a save file just to have fun in Night City, try out different character builds, or unlock a particular upgrade, car, or weapon you missed. It’s also a lifesaver if something goes wrong with your saves while you’re modding. Best of all, it’s free to download from NexusMods and is open-source on GitHub.
How To Edit Saves Using The Save Editor 2.0
Editing saves with the new Save Editor is straightforward. The interface is user-friendly and designed to look and feel similar to Cyberpunk 2077’s own menus.
1. Locating your saves and creating a backup
First, you need to find where your game’s save files are stored. No matter where you bought Cyberpunk 2077, your save files will be in the same place:
C:\Users\(Your username)\Saved Games\CD Projekt Red\Cyberpunk 2077You’ll notice your saves are organized by date. Pick the one you want to edit—and don’t forget to make a backup copy before you start, just to be safe.

2. Download the Save Editor and run it
Download the Save Editor from NexusMods and open it. Make sure to get the latest version if you’re playing the newest release of the game. If you’re on an older version, you can scroll down in the Files section and pick a previous release. Choose the Manual Download option.

3. Load up your save in the Save Editor
Click on Load Save. By default, that same save file directory will open up in File Explorer. Just pick the save you backed up and want to edit.

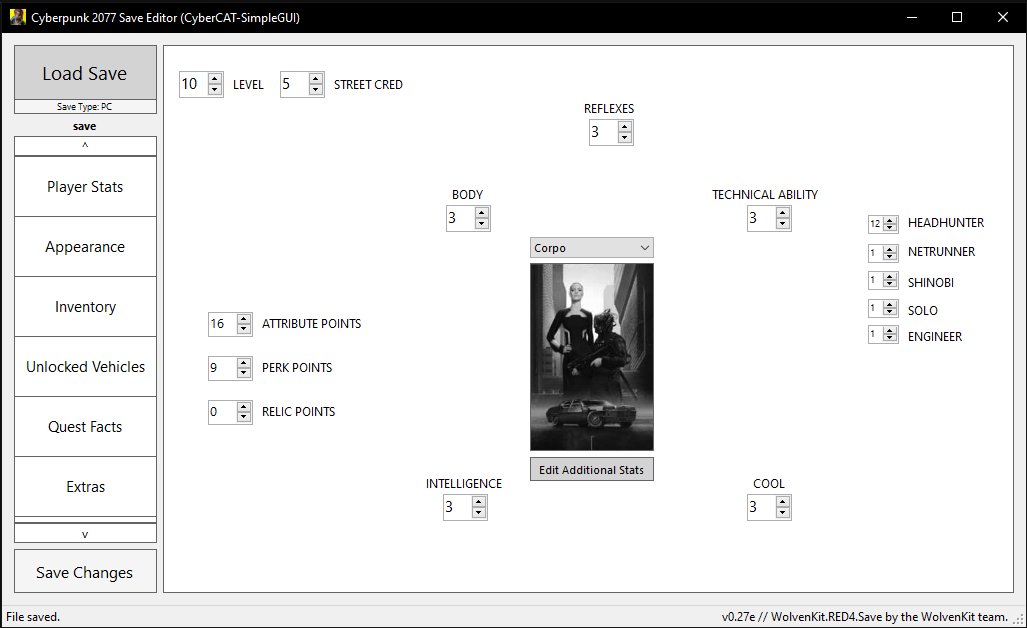
4. Tweak your heart out!
This is where you can get creative. The sidebar breaks everything down into categories, so just pick what you want to change: add money, unlock vehicles, pick up cool new weapons, and more. Just be careful when editing things like gender or mission progress—changing some things can cause unexpected issues in your save.

5. Saving your changes
Once you’re happy with your edits, click Save Changes. You’ll see a File Explorer window pop up at the save files location. Choose the save folder where the original file was loaded. The original file will be renamed to sav.old, and your edited save will be exported as sav.dat.
 Reviewed by Huzaifa Haroon