How to Create or Add an Offline Local User Account on Windows 11
Microsoft is getting increasingly more aggressive with pushing Windows users to use a Microsoft Account. This is even more evident in Windows 11. Fortunately, if you’re not comfortable with linking your Windows 11 account with your Microsoft account, you still have the option to set up a Local account.

Add a New Local Account on Windows 11If you share your Windows 11 PC, it makes a lot of sense to create different accounts in order to give everyone their own sign-in info, personalized access to their own files, and favorite settings – In this case, creating a Local account for all your Windows 11 users is the quickest way since it’s super fast and you won’t need to convince everyone to create a Microsoft account.
Why should I use a Microsoft account?
Before you let go of your Microsoft account in favor of a local equivalent, you need to be aware of the advantages that a Microsoft account brings:
- You can download apps from the Microsoft Store – On Windows 11, you will not be able to download and install any UWP (Universal Windows Platform) apps from the native Microsoft Store. You might also need a Microsoft account to run certain desktop programs that are reliant on a Microsoft account integration
- Sync all Online content in Microsoft apps Automatically – If you’re a fan of Microsoft automatically syncing your Word, Excel, Powerpoint, and other files that you create inside the Office Suite, keep in mind that you’ll lose this ability once you make the switch to a local account.
- System-wide settings syncing – Migrating from one PC to another with a Microsoft account is hassle-free considering that all your system settings along with your browser history will be migrated along with every other personalized setting. But once you go local, you’ll lose this ability completely.
What should I expect with a Local User account on Windows 11?
- If you’re using multiple PCs, you will need to create a local account for each PC that you use. Additionally, your settings and browsing data will not sync between your local accounts.
- Although it’s not safe from a security standpoint, using a local account on Windows 11 will allow you to remove the account password allowing your operating system to boot directly.
- Every time you need to download something from the Microsoft Store, you will need to sign in with a Microsoft account if you don’t find a desktop equivalent for that program.
Now that you understand the advantages and drawbacks of using a local account instead of a Microsoft account on Windows 11, we’ll show you how to create a new local account from scratch.
Note: Keep in mind that when you create a new account, the account will be a standard user by default. You can, however, elevate the permissions of that account to the administrator later on if necessary.
As of now, we have found four different ways of creating a new local account on Windows 11. Every method will ultimately help you achieve the same thing, so feel free to follow the steps that are closer to your preferred way of doing things on Windows:
- Creating a new Local account via the Settings menu
- Creating a new Local account via the User Accounts utility
- Creating a new Local account via the Local User and Groups utility
- Creating a new Local account via Command Prompt
Important: All of the methods featured below will require you to be signed as an administrator.
1. Add a new Local Account via Settings
- Press Windows key + I to open up the Settings app on Windows 11.
- Once you’re inside the Settings menu, access the side menu by clicking on the action button in the top-left corner of the screen.
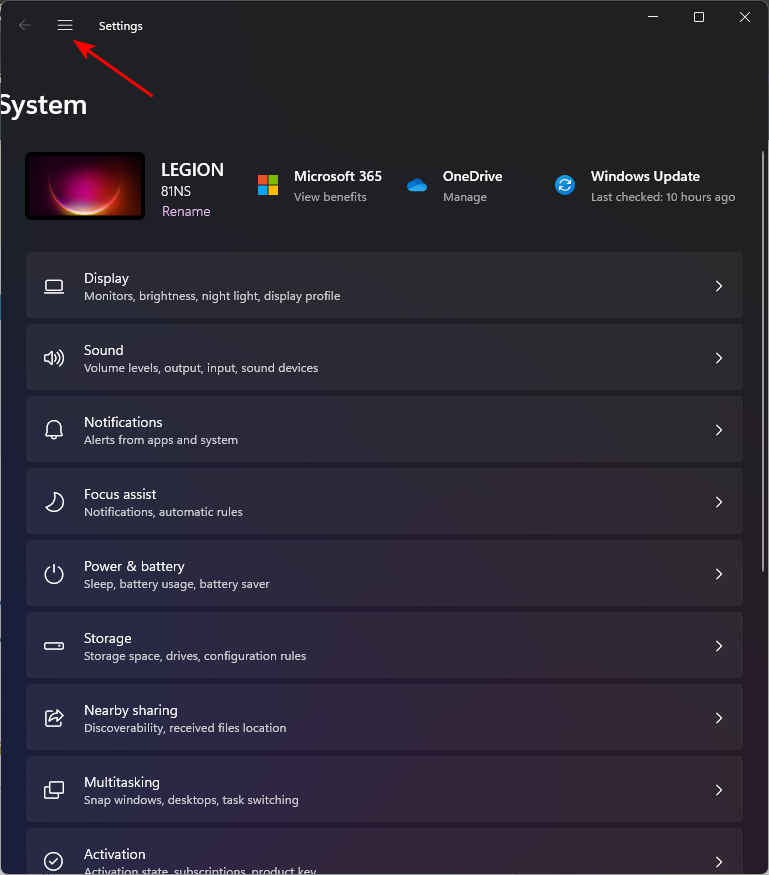
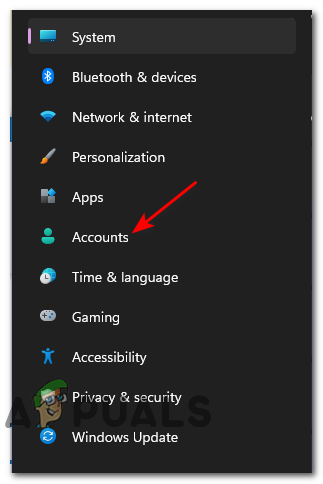
Accessing the Settings sideline menu - Next, from the sideline menu that just appeared, click on Accounts from the list of available options.
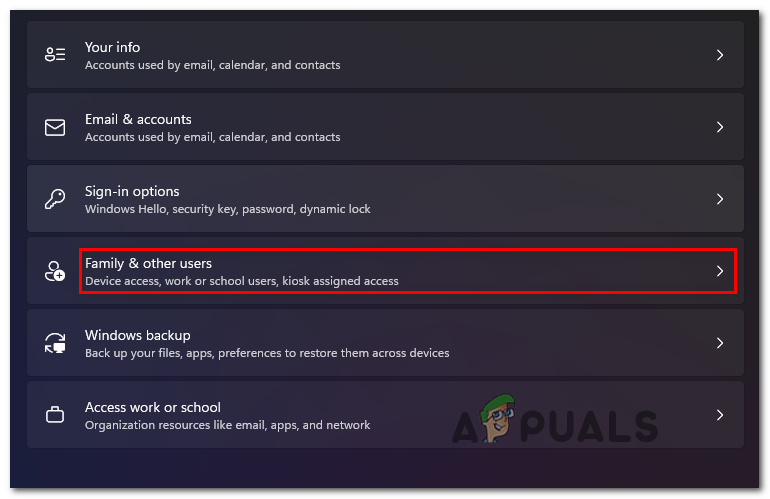
Accessing the Accounts menu - From the Accounts tab, move over to the right-hand side menu and click on Family & other users.
Accessing the Family & Other users tab - Once you’re inside the Family & other users tab, go under Other users (from the same right-hand side menu) and click on the Add account button.

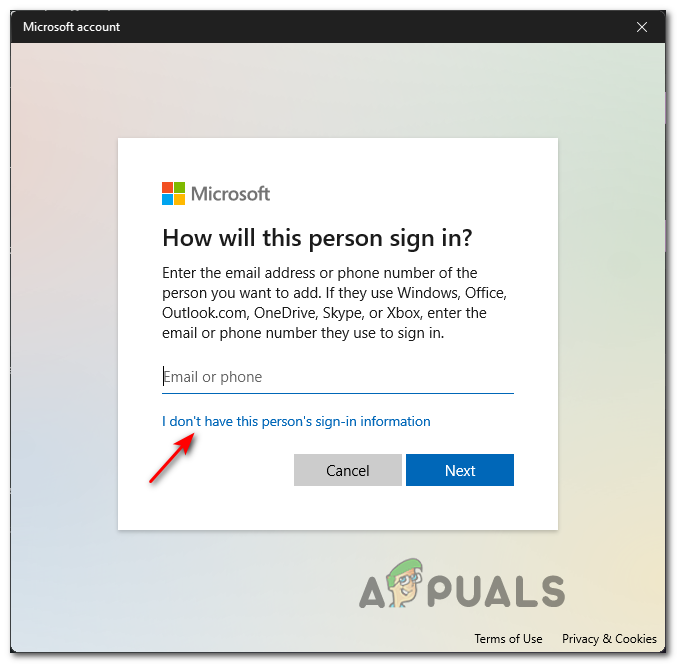
Adding a new account on Windows 11 - At the first prompt, go ahead and click on the I don’t have this person’s sign-in information hyperlink under the box where you can input the email.
Creating a new Local account - At the next prompt, go ahead and click on Add a user without a Microsoft account and wait for the next screen to load.
- Once you see the Create a user for this PC page, start by entering the Local account username and add a password if you want to add an extra security layer.
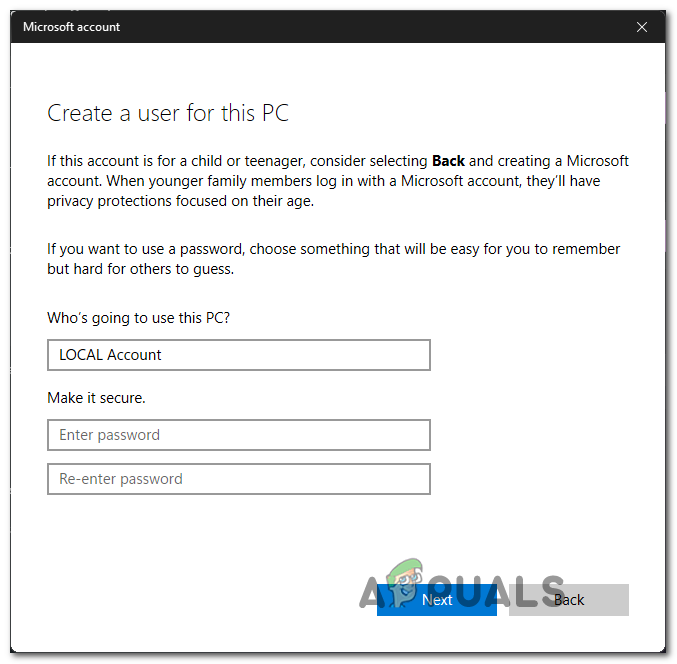
Creating a new Local account - Once the new local account is named and a password is added, hit the Next button and wait until the account is initialized.
Note: After you add the password, you will be asked to add a couple of Security questions so you’ll have a recovery option if you ever forget it. Add the security questions as instructed before moving forward. - Finally, click Next one more time to finish the creation of the local account. The newly created local account will become visible under Other users (inside the Family & Other users tab).
2. Add a New Local Account via User Accounts
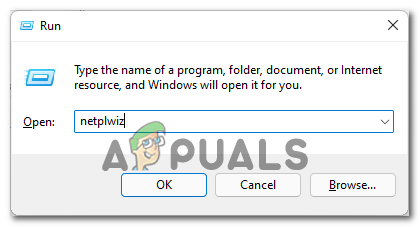
- Press Windows key + R to open up a Run dialog box. Next, type ‘netplwiz’ inside the text box and hit Enter to open up the User Accounts menu. If you are prompted by the User Account Control, click Yes to grant admin access.
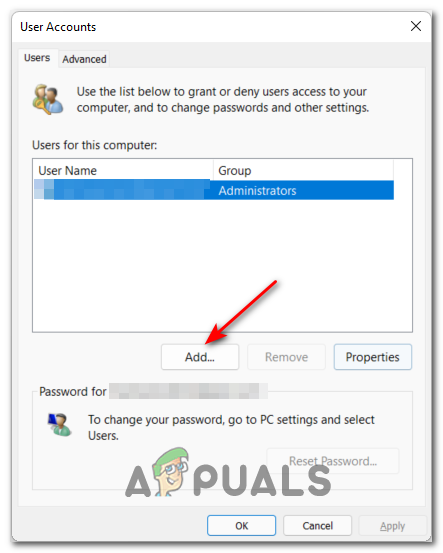
Accessing the User Account screen on Windows 11 - Once you’re inside the User Accounts window, access the Users tab at the top, then check the toggle associated with Users must enter a user name and password to use this computer if available.
Note: If you previously enabled Windows Hello during the initial setup or from Settings > accounts > Sign-in Options, this setting will not be available. - Next, go under Users for this computer and click on Add to initiate the process of creating a new local account.
Creating a new Local account - At the next screen, go ahead and click on Sign in without a Microsoft account.
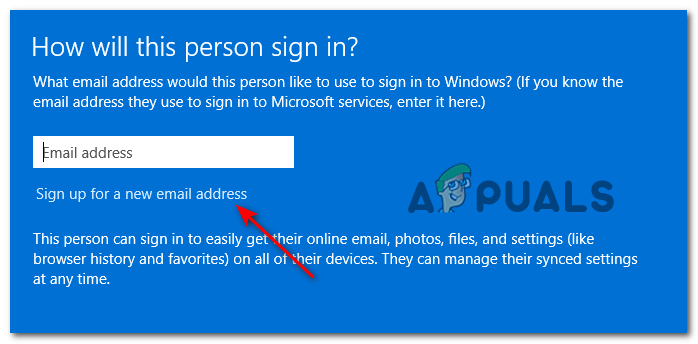
Sign in with a new email address - At the next window, go to the bottom of the screen and click on the Local account button.
- next, go ahead and insert the User Name, Password, and a password hint associated with the Local account that you wish to create. Once you are ready to go, click on Next to initiate the process.
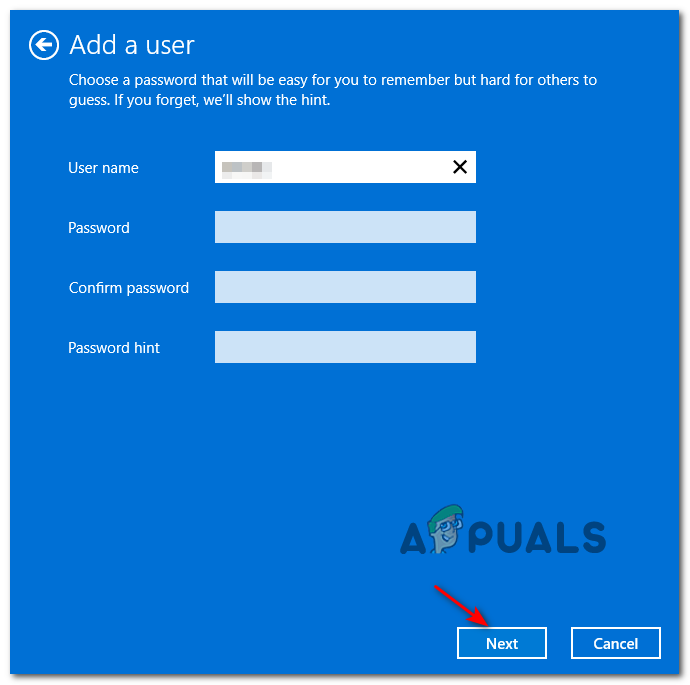
Creating a New Local account via User Accounts Note: If you don’t want to create a local account that is password-protected, simply leave the password and password hint fields completely empty while clicking on Next.
- Finally, click on Finish and wait until the local account that you’ve just configured is created.
Note: Once the process is finished, you’ll be able to find your newly created account under Users for this computer inside the Users Accounts window.
3. Add a New Local Account via Command Prompt
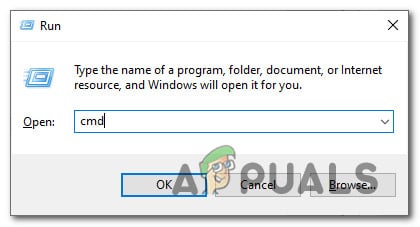
- Hit Windows key + R to open up a Run dialog prompt. Inside the Run text box, type ‘cmd’, then press Ctrl + Shift + Enter to open up an elevated Command Prompt. When you see the User Account Control, click Yes to grant admin access.
Open the elevated CMD prompt - Inside the elevated Command prompt, type the following command and press Enter to create a new local account with a password:
net user "UserName" "Password" /add
Note: Keep in mind that UserName and Password are simply placeholders. Replace them with the actual user name and password that you wish to set up for your local Windows 11 account.
Note 2: You can also create a new Windows 11 local account without a password by using the following command instead:net user "UserName" /add
- Wait until the command is processed, then you can safely close the elevated CMD prompt and restart your Windows 11 PC to make the changes permanent.
4. Add a New Local Account via LuSRMGr
Important: You will only be able to enforce this method as long as you are using Windows 11 Pro, Windows 11 Enterprise, or Windows 11 Education. The Home edition will not have the Local Users and Groups utility, so you will not be able to replicate the instructions below.
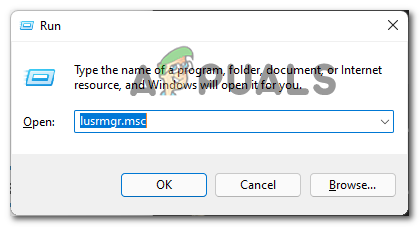
- Press Windows key + R to open up a Run dialog box. Once inside, type ‘lusrmgr.msc’ inside the text box and press Enter to open up the Local Users and Groups utility. When you are prompted by the User Account Control, click Yes to grant admin access.
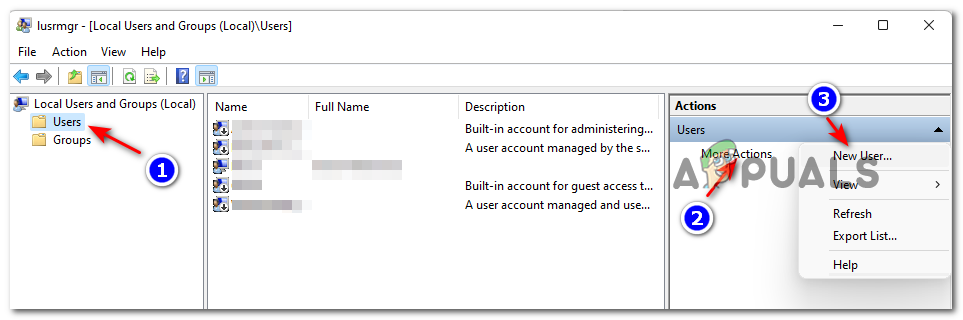
Opening the Local Users and Groups utility - Once you’re inside the Local Users and Groups utility, use the menu on the left to select the Users folder and open it on the right pane.
- Next, with the Users folder selected, move over to the far-right section of the screen and click on More Actions > New User.
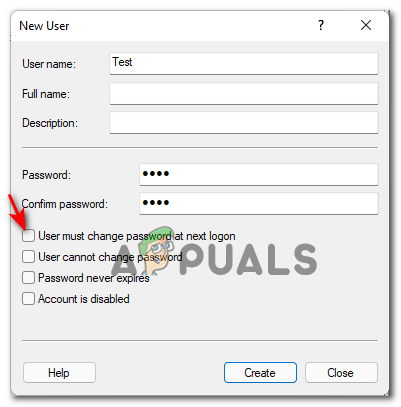
Creating a New user via the Local Users and Groups - Once you’re inside the New user prompt, enter the username, password as well as the password confirmation. There’s no need to add a description.
- If you want to make this password permanent, uncheck the box associated with User must change password at next logon and press Create to initialize a new local account with the user and password that you previously established.
Creating a new Local account via the Local Users and Groups utility - After a couple of seconds, the account should be automatically created and added to the list of users inside the Local Users and Groups utility. At this point, you can safely close the utility and restart your PC to log into the newly created local account.


This Page helped me very much so, was very helpful sorting what I had to accomplish at home on the PC which was at the time understanding why I wasn’t able to orand wasn’t enabled to have an offline administration privileged local account on my PC at home and while configuring settings later, I found this webpage while going through its options on Windows 11 OS [OS – Operating System].
-AND this webpage was very helpful.The problem wasn’t with Prev ledges or enabling or disabling. It had alot to do with my understand and now as per this webpage I understand the process reading through its instructions to save the days and nights, save family and friends, saving myself really! I became a saver and savier from here, Thank you all so very much,F.Y.