FIX: Corrupted CNBJ2530.DPB File in Windows 8/8.1
Back in late 2014, a lot of users running Windows 8/8.1 started suffering from a corruption of the CNBJ2530.DPB file located in a specific directory of their computers’ C drives. This corruption, most common in computers that have AMD GPUs, causes a horde of different problems, usually affecting the graphics display. A corrupt CNBJ2530.DPB file can be caused by any of a half a dozen issues – ranging from sudden computer shutdowns to malware – which is why pinpointing the exact cause of this issue in any given case is pretty hard.
In addition, a corrupt CNBJ2530.DPB file can also not be diagnosed with symptoms alone as you need concrete evidence that your computer’s CNBJ2530.DPB file is corrupt in order to be able to apply the right fix for the issue. Thankfully, though, if you do know that your computer has a corrupt CNBJ2530.DPB file, you can resolve the issue pretty easily.
How to determine whether or not you are affected by this issue
To determine whether or not your computer is affected by a corruption of the CNBJ2530.DPB file, you need to first:
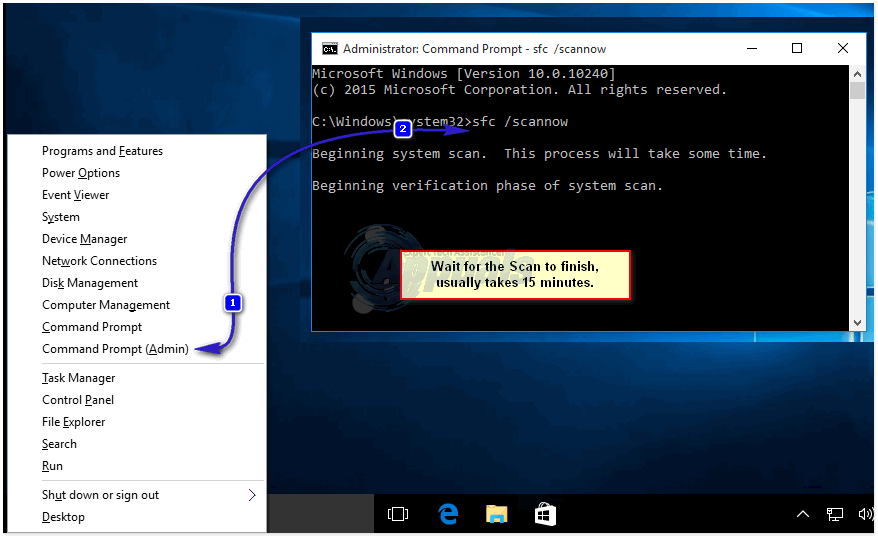
Press the Windows Key + X while on your Desktop to open the WinX Menu. Click on Command Prompt (Admin) to open an elevated Command Prompt. Once the elevated Command Prompt opens up, type the following into it and press Enter:
sfc /scannow
Allow the SFC scan to be completed successfully. This may take as long as 15-20 minutes.
The System File Checker (SFC) scan is a scan designed to detect and repair system files and components. . Once a SFC scan is completed, a log of the entire scan – a file that contains all of the corruptions that the scan found – is created. This log, however, is in machine language. To translate this log into plain English so that you can interpret it and determine whether or not your computer’s CNBJ2530.DPB file is corrupted, you need to:
Click here to download the executable file for a program known as SFCFix.
Move the downloaded executable file to your Desktop.
Close all open programs.
Launch SFCFix from your Desktop by double-clicking on its executable file or right-clicking on it and selecting Open. Be sure to do so within a few minutes of the SFC scan you ran previously being completed.
When SFCFix launches, follow all of the program’s onscreen instructions and when it is done working its magic, it will create a completely comprehendible log file named txt on your Desktop. This log file will open automatically as soon as it is created by the program.
As soon as the log file opens up, start sifting through it, looking for a line similar to the following in particular:
CORRUPT:
C:\WINDOWS\winsxs\amd64_prncacla.inf_31bf3856ad364e35_6.2.9200.16430_none_fdce12188b615b12\Amd64\CNBJ2530.DPB
The directory in the above mentioned line may be different depending on the version of Windows 8/8.1 you are running – and so may be the strings of numbers – but the name of the file will definitely be the same. If the above mentioned line, or one that is extremely similar to it, appears somewhere in the log file created by SFCFix, your computer is definitely a victim of this problem.
How to fix a corruption of the CNBJ2530.DPB file
Once you know for sure that your computer is indeed suffering from a corruption of the CNBJ2530.DPB file, you can move onto repairing the corruption and ultimately fix the issue. The following are the two most effective solutions that can be used to resolve this problem:
Solution 1: Have SFCFix repair the corrupt CNBJ2530.DPB file
Soon after this issue first came to light, the people behind the SFCFix program (sysnative) updated it, adding to it the ability to successfully repair a corrupted CNBJ2530.DPB file and resolve this issue for good. If you want to use SFCFix to repair your computer’s corrupt CNBJ2530.DPB file and get rid of this issue, you need to:
Run a SFC Scan – instructions for which can be found in the How to determine whether or not you are affected by this issue
Click here to download SFCFix, save it to your Desktop and launch it once it has been downloaded.
Follow the onscreen instructions and let SFCFix do its thing.
When SFCFix is done, it will create and automatically open a log file. Search this log file for something along the lines of the following:
AutoAnalysis:
FIXED: Performed DISM repair on file Amd64\CNBJ2530.DPB of version 6.3.9600.16384.
The version of the CNBJ2530.DPB file in the lines above may change depending on various factors such as the version of Windows 8/8.1 you are running, but if you see something similar to the abovementioned line in the log file, SFCFix was successful in resolving this issue for you.
Solution 2: Fix the issue by running the DISM Manually
The Deployment Image Servicing and Management (DISM) utility is a utility that comes built-in with all versions of the Windows Operating System and is designed to service and repair any given copy of the Windows OS. If you are one of those people who would rather deploy a fix to an issue yourself than have a program do all the legwork for you, you can use this solution to repair your computer’s CNBJ2530.DPB file and solve this problem. However, this solution only works on computers that are connected to the internet.
The DISM utility simply scans all of your computer’s system files for corruptions and then repairs any and all corrupt files using exact copies of them from Microsoft servers. To fix this issue using this solution, you need to:
Press the Windows Logo key + X while on your Desktop to open the WinX Menu.
Click on Command Prompt (Admin) to launch an elevated Command Prompt.
Type the following into the elevated Command Prompt and press Enter:
DISM.exe /Online /Cleanup-image /Restorehealth
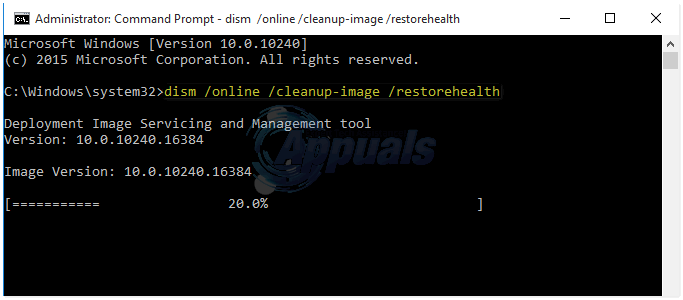
Once the DISM utility is done performing the repairs, which can take up to 20 minutes, type the following into the elevated Command Prompt and then press Enter:
sfc /scannow
Wait approximately another 20 minutes for the SFC scan to be completed, and if DISM was indeed successful at repairing the DPB file and resolving the problem, the scan will state that no integrity violations were found once it has been completed.
thank you bro