How to Carrier Switch and Firmware Flash the Galaxy S8 Snapdragon
If you’ve bought a carrier-locked Samsung Galaxy S8 Snapdragon edition in the United States, chances are you may want to switch to a new SIM carrier. This is not impossible, the process is just a bit tedious. This guide will walk you step-by-step on achieving exactly what you want to do, as well some additional steps for flashing either standard or unlocked firmware.
Warning:
Following anything in this guide will erase and reset your phone completely. It is highly recommended that you have backups of all your important data before proceeding, and that you also remove your Google account from your phone. This guide is only for the Snapdragon S8 Plus variants.
Flashing to stock firmware from unlocked firmware will require you to follow the Carrier Switching section of this guide, which also means you’ll need to follow the Flashing Standard Firmware section, unless the CSC code of your carrier is currently active. If you need to double check this, go into Recovery Mode by holding Power + Bixby + Volume Up, and once it transitions from a blue to black screen, you’ll see your active CSC code on the bottom. If your CSC code is already matching to your carrier’s, you only need to follow the How to Flash Standard Firmware section. But before doing anything from this guide, you must follow the Prerequisites section.
Required Downloads:
- Odin
- Prince Comsy’s Odin
- Samsung Drivers
- Canadian Firmware
- Factory Binary
- ADB Platform Tools
- Unlocked Firmware
Prerequisites:
- Begin by extracting the Galaxy S8 Plus factory binary, the Prince Comsy Odin, the ADB tools, and the Canadian firmware to your PC.
- Now turn off your Galaxy S8 Plus, and then boot it into Download Mode. You do this by holding Power + Volume Down + Bixby, until it launches into a blue screen. Then you press Volume Up to enter Download Mode.
- Now go into the extracted regular Odin folder, not the Prince Comsy Odin. Launch the Odin3 .exe file inside.
- Connect your Galaxy S8 Plus to your PC via USB cable, and Odin should display a successful connection.
- Now click on the AP box in Odin, and navigate to the extracted Factory Binary folder. Choose the file that starts with “COMBINATION”.
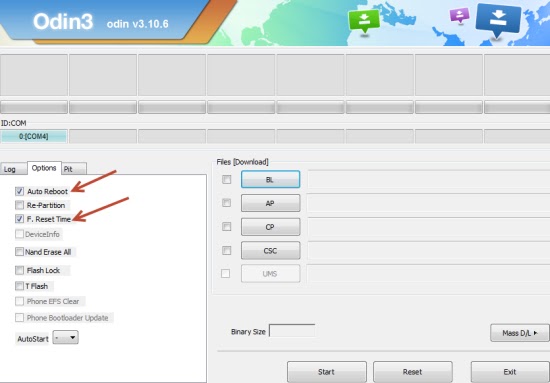
- Make sure under Odin’s options, only “Auto Reboot” and “F. Reset Time” are enabled via checkbox.
- Now go into the Log tab, and press the START button. Odin will start flashing the binary, and automatically reboot your phone once it is finished. It will reboot into a “factory binary homescreen”, which is basically the home screen of a normal S8 Plus.
- Now go into the extracted “platform-tools-latest-windows” folder, hold Shift + Right click, and choose “Open command window here”.
- It will launch an ADB terminal, which is basically a command prompt. So in this command prompt, type: ‘adb reboot bootloader’. Do not close the ADB terminal.
- Now launch the Prince Comsy version of Odin, and once its launched, it should also confirm a successful connection with your device.
- Click on the CSC box and choose the extracted Canadian firmware, and choose the file that starts with “HOME_CSC”.
- Just like before, make sure the only options ticked in Prince Comsy Odin are “Auto Reboot” and “F. Reset Time”, then go into the Log tab and click the START button to begin flashing the Canadian firmware.
- When your Galaxy S8 Plus reboots, you will see an “IME” button on the home screen, so tap on it.
- A number pad will appear. Enter: *#243203855#
- This will launch a new menu. Scroll down this menu until you find an option for “XAC”, then tap on it and choose “Install”.
- Your Galaxy S8 Plus will reboot again, and once it reaches the home screen, go back to the ADB terminal on your PC, and type: adb shell
- Now, choose one of the 3 letter CSC codes from the list below:
BST = Boost
VZW = Verizon
ATT = ATT
USC = US Cellular
ACG = C Spire
TMK = MetroPCS
VMU = Virgin Mobile
TFN = Tracfone
XAS = Sprint
TMB = T-Mobile
XAA = Unlocked US
SPR = Sprint
CCT = Xfinity Mobile
AIO = Cricket
Type in the ADB terminal: echo “XXX” > /efs/imei/mps_code.dat
REPLACE XXX with your preferred CSC code, but leave the “quotations” around XXX.
Now type exit in the ADB shell, but the command prompt will remain open, so type adb reboot bootloader.
You can now flash your desired firmware by following the How to Flash Standard Firmware section of this guide, or proceed to “How to Flash Unlocked Firmware”.
How to Flash Standard Firmware:
- First you need to uninstall Samsung Switch and/or Samsung Kies, if they are presently installed on your computer.
- Now extract the Samsung drivers .zip and the Odin .zip to somewhere on your PC.
- Navigate to the Samsung drivers folder, and run the “Samsung USB Driver for Mobile Phones” executable.
- Now go to into the extracted Odin folder, and open the Odin3.ini with a text editor, like Notepad++.
- Now look for a setting in there called “UMS/PATCH”, and change the value from 0 to 1, so it becomes “UMS/PATCH=1”. Save and exit.
- Download an official firmware you want to flash from http://fw.updato.com
- Extract the firmware you’ve downloaded to somewhere on your PC.
- Shut off your Galaxy S8 Plus, and boot it into Download Mode. You do this with Power + Bixby + Volume Down, then when you see a blue screen, press the Volume Up key to enter Download Mode.
- Now launch Odin on your computer, and connect your Galaxy S8 Plus to your PC via USB cable.
- Odin should verify a successful connection. Now we’re ready to add the firmware to Odin we want to flash.
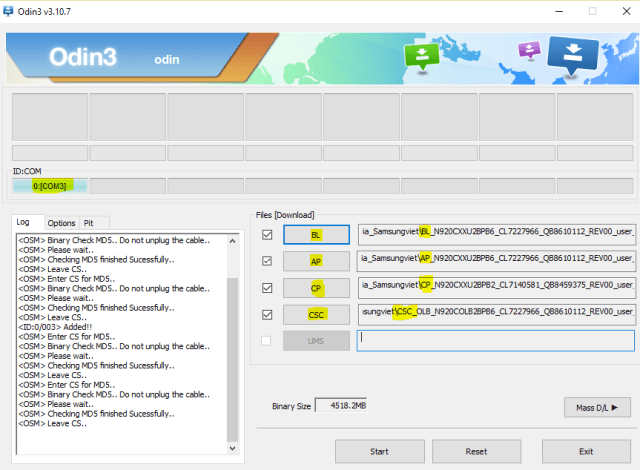
- In Odin, you’ll see separate boxes for the kind of firmware file. There are boxes for BL, AP, CP, CSC, UMS, AP, and USERDATA. You’ll want to add the appropriate firmware files to these boxes, depending on what was included in your firmware download – but do not use “HOME_CSC” file for the CSC box.
- Make sure that the only settings checked in Odin are “Auto Reboot” and “F. Reset Time”, these should be the only boxes ticked for flashing options.
- Now go into the “Log” tab, and click the START button in Odin. It will begin the firmware flashing process, so just leave it alone until it’s done.
- Once Odin has successfully flashed the firmware, disconnect your Galaxy S8 Plus from your PC. Your phone will begin to perform a data erase procedure, do not interfere. Just wait until your phone reaches the setup screen.
How to Flash Unlocked Firmware
Please be aware that the unlocked firmware does not unlock your phone for use with other carriers. It simply removes carrier bloatware – this may have the drawback of certain carrier features, like Wi-Fi Calling or VoLTE not working with the unlocked firmware.
- You’ll need to begin by extracting the Prince Comsy Odin and the unlocked firmware to somewhere on your PC.
- Now shut off your Galaxy S8 Plus, and boot into Download Mode. As mentioned earlier in this guide, this is done by holding Power + Volume Down + Bixby, until it launches into a blue screen. Then you press Volume Up to enter Download Mode.
- Now launch the Prince Comsy Odin .exe on your computer, and connect your phone to your PC via USB cable.
- Prince Comsy Odin should display a successful connection. So individually add each appropriate file to its respective box – BL box requires a file that starts with “BL”, AP box requires a file that starts with “AP”, and so on.
- Make sure the only options ticked in Prince Comsy Odin are “Auto Reboot” and “F. Reset Time”, then go into the Log tab and press START.
- After the unlocked firmware has been successfully flashed, you can disconnect your Galaxy S8 Plus from your computer. Your phone will automatically begin to perform a factory erase, do not interfere, just wait until it reaches the Android setup menu.
Got a Verizon s8+ (g955U) from a family member. I’m with TMobile. Never rooted a phone before and certainly never used odin, modded or not. I researched carrier switching for a couple days. Ended up seeing this process on XDA developers but, without much personal experience on the matter, it was a bit tough to follow.
Your tutorial was absolutely fantastic. Also, providing the links for downloads was huge. I was able to execute the Verizon —> TMobile switch perfectly.
I have VoLTE and WI-FI calling now. Can convert phone call to video (something Verizon was trying to get me to activate….). And, finally, no more Verizon meddling/bloatware.
Much appreciated. You should make a video on this. It’d get hit hard.