Canon MG5220 Not Printing Black Ink
The Canon MG5220 might not print black ink, causing documents to have missing or faded black text. This problem usually happens because the print head nozzles are clogged, blocking the black ink. It often occurs when the printer isn’t used often, leading to ink drying and clogging, or when using non-original cartridges that might not match Canon’s standards.
To begin the cleaning process, follow the steps below:
- Turn on the printer.
- Ensure that there are 5 or more A4-sized papers in the tray.
- Open the paper output tray (B) and the output tray extension (A).

- Start the cleaning process by selecting Setup on the printer’s panel. To select setup, press the tools/wrench icon
 .
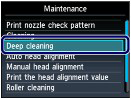
. - Use the arrow keys to locate and select the Maintenance Menu
 and then press OK to enter.
 - Select ‘Deep Cleaning‘ and press the OK button.
- Confirm your selection by choosing YES and then pressing the OK button. This will initiate the cleaning process; please wait until it finishes before performing any other operations. It usually takes about 3 minutes.
- After you see the pattern print confirmation on the screen, press OK.
Most helpful advice for deep cleaning the printer heads. Easy to understand and initiate.
Worked perfectly. Thanks.