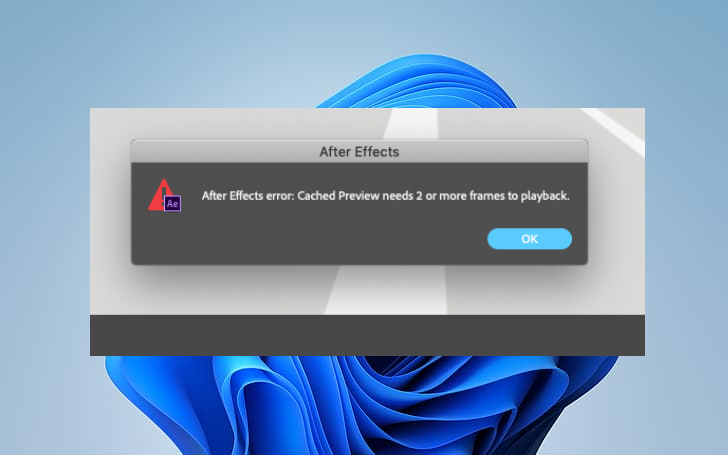
Fix: “Cached Preview Needs 2 or More Frames to Playback” Error in After Effects
The error message “Cached Preview needs 2 or more frames to playback” appears when trying to preview a composition in After Effects. This error indicates that your project requires at least two frames within the work area to generate a cached preview. The most common cause is forgetting to mark the beginning and end of the work area.
Other possible causes include insufficient RAM allocation, complex compositions, a small disk cache size, or running multiple applications simultaneously. Fortunately, we’ve put together a list of solutions to help you fix this error and get back to work smoothly.
1. Expand the Work Area
If the work area is set to a single frame or a very short duration, After Effects won’t have enough frames to generate a preview. Expanding the work area ensures that After Effects has enough frames to cache and render for proper playback.
- In the Timeline Panel, check if the work area (the highlighted section of the timeline) is too short or limited to just a single frame. If so, expand it to cover your desired preview range.
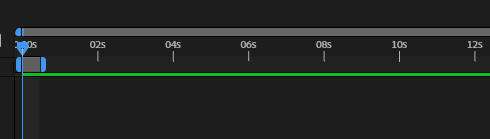
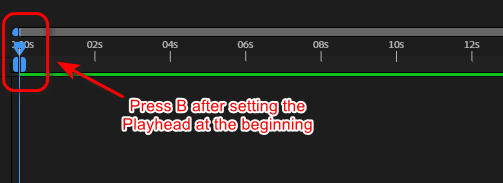
- Drag the Playhead (the vertical timeline marker) to the point where you want your preview to begin.
- Press B on your keyboard to set this as the start point of your work area, defining where playback will begin during previews.
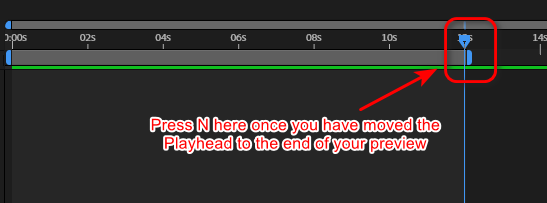
- Now, move the Playhead further along the timeline to where you want the preview to end.
- Press N to mark this as the end point of your work area, creating a defined playback range for testing.
- After setting these in and out points, initiate your preview to verify if this resolves the playback issue.
2. Reset After Effects Preferences
When After Effects’ settings are changed or conflict with other system elements, it can cause unexpected behavior. Resetting the preferences restores After Effects to its default state, potentially resolving issues related to corrupted configurations or misbehaving settings.
- Close After Effects completely – Ensure no AE processes are running in Task Manager (Windows) or Activity Monitor (Mac).
- Windows reset: Hold Ctrl+Alt+Shift while launching After Effects. Keep holding until the splash screen appears.
- Mac reset: Hold Cmd+Option+Shift while launching. Continue holding until you see the splash screen.
- When the Reset Preferences dialog appears, click OK to confirm. This will restore default settings.
- After the reset completes, launch After Effects normally and test if your issue is resolved.
3. Remove Puppet Tool (if applicable)
The Puppet Tool is a powerful feature for animating characters and objects, but it can be very resource-intensive, especially when applied to high-resolution or vector layers. If you’re encountering issues while using the Puppet Tool in your project, it could be the source of the problem. Removing the Puppet Tool can reduce the strain on your system, which may help resolve the cached preview error.
- Select the layer containing the Puppet Tool animation in your composition.
- Open the Effects Controls panel by clicking its tab in the bottom-left menu (or go to Window > Effects Controls if not visible).
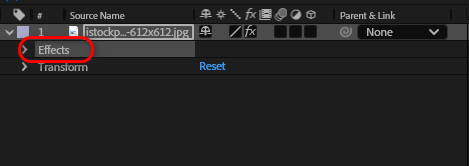
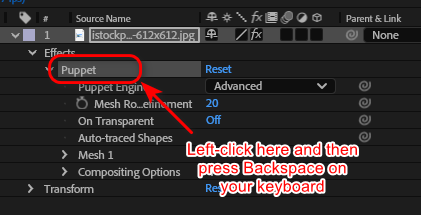
- In the layer properties, find the Puppet effect that was applied (it may be labeled as “Puppet” or “Puppet Pin Tool”).
- Click to select the effect, then press Delete (or Backspace) to remove it completely from your layer.
- Play your composition to verify if removing the Puppet Tool resolved your issue.
4. Clear the Cache of After Effects
After Effects stores cached data to improve loading times and performance. However, if this cached data is left for too long, it can become corrupted or outdated, leading to errors. Clearing the cache frees up memory and ensures that After Effects can process frames properly.
- Launch After Effects and ensure your project is loaded.
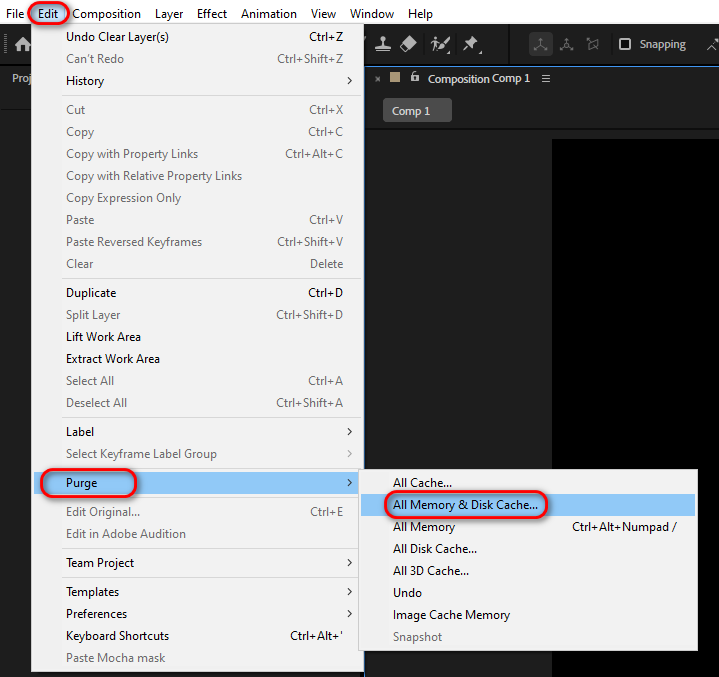
- Navigate to the top menu bar and select Edit.
- Hover over Purge in the dropdown menu, then select All Memory & Disk Cache to clear temporary files that may be causing issues.
- When the confirmation dialog appears, click OK to proceed with clearing the cache.
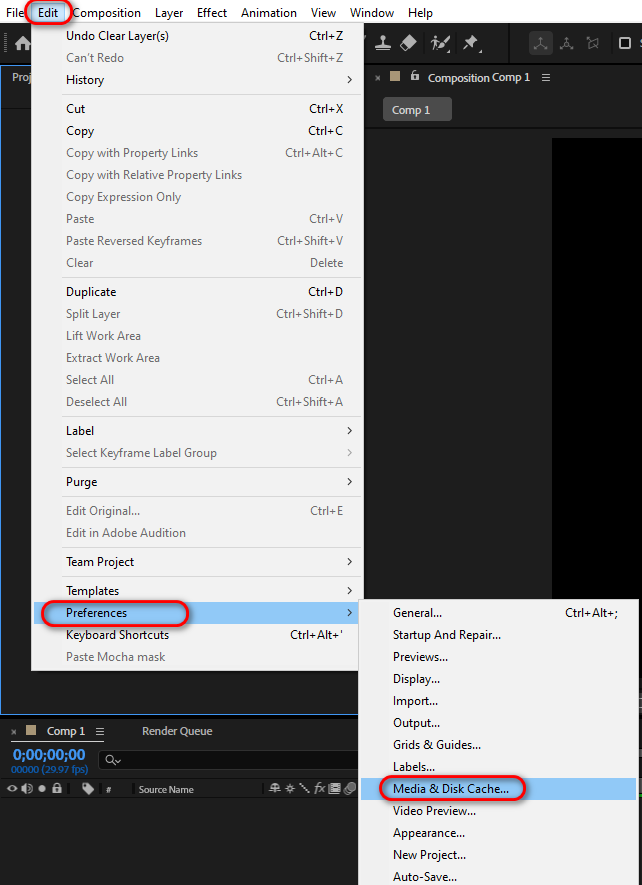
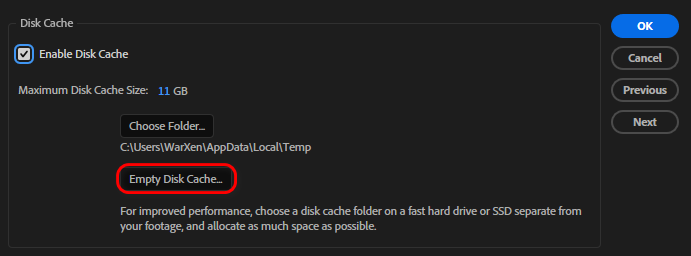
- For a more thorough cleanup, go back to Edit in the menu bar and select Preferences.
- Choose Media & Disk Cache from the preferences options.
- Click the Empty Disk Cache button to remove all cached media files, then confirm the action when prompted.
- Close After Effects completely to ensure all changes take effect.
- Restart the application and check if the problem persists.


