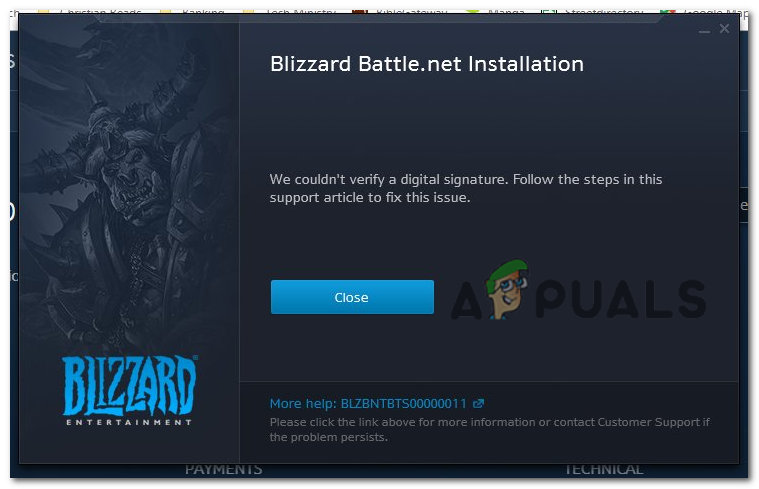
How to Fix “Error Code: BLZBNTBTS00000011” On Battle.net?
Recently, several users have reported that they have been encountering the error code BLZBNTBTS00000011, which states ‘We couldn’t verify the digital signature of your Battle.net Agent. Follow the steps in this support article to fix this issue’.
This error occurs in the desktop launcher, in the area where game information and updates are typically displayed. We had a look into the issue and discovered that it is caused by a number of reasons including:
- Corrupted Battle.net cache – The most common cause of this error (unless the error is server-related) is an issue with temporary files. You can fix the majority of these problems by clearing the cached files.
- Unreliable / Insufficient Connection – Whenever you use a wireless connection from a limited ISP plan, you are likely to run out of bandwidth while playing Battle.net while using VoIP. If this is the case, switching to a wired connection should alleviate the problem.
- 3rd party security program interference – In some cases, the active antivirus or firewall that you are using may also cause this issue to occur. This can occur when a false positive is detected in the firewall or antivirus software. Depending on your situation, you may want to disable or remove the overprotective security suite.
- Outdated GPU drivers – If you encounter this error when attempting to open up a game you installed through Battle.net, you probably have outdated GPU drivers that Battle.net no longer accepts. Install the latest GPU drivers as well as physics drivers for your graphics cards if this applies to your issue.
Now that we know about the potential causes, let’s have a look at some effective troubleshooting methods that can help you fix the problem.
Clear the Battle.net Cache
You might get the BLZBNTBTS00000011 error if the Battle.net launcher’s cache is corrupted. In this case, clearing the cache may help.
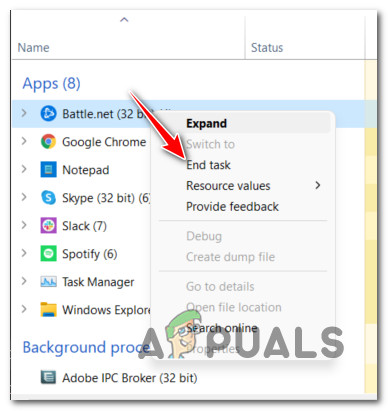
- Launch Task Manager and right-click on the Battle.net program.
- Select End task from the context menu.
End Task with Battle.Net - Then, right-click on the Windows icon and select Run from the list of options available.
- Now navigate to the following path:
%programdata%
- Delete the folders related to Battle.net and Blizzard (like Blizzard Entertainment).
- Do the same for the paths below.
%appdata%

%localappdata%
- Once done, check if this resolves the issue.
Launch the Battle.net Client as Administrator
Battle.net might also not be able to load on your operating system if it does not have the necessary permissions. When this scenario applies, running the program as an administrator should solve the problem.
- Run Battle.net as an administrator and perform the action that was causing the issue previously. Check if the issue is resolved.
- If that did not work, navigate to Battle.net client’s installation directly and launch bootloader.exe as an administrator.
- If you are still facing the issue, then run bootstrapper.exe in the same directory and check if that does the trick for you.
Disable or Uninstall the System’s Antivirus or Firewall
In some cases, antivirus programs mistakenly identify legitimate files or processes as malware (typically after a major software update). Most often, this occurs when it is hard to recognize the differences between ‘good’ and ‘bad’ codes.
If you are using a third-party antivirus or Windows Defender on your computer, try disabling it and check if that fixes the issue. Several users were able to skip the error this way, which is why we encourage you to give it a shot.
Here is what you need to do:
- Locate the security application’s icon in the system tray and right-click on it. Check the hidden items on the system tray if you cannot locate it.
- A context menu should appear on your screen. Select Pause protection from it.
- Afterward, right-click on the security software’s system tray icon and select Pause Firewall.
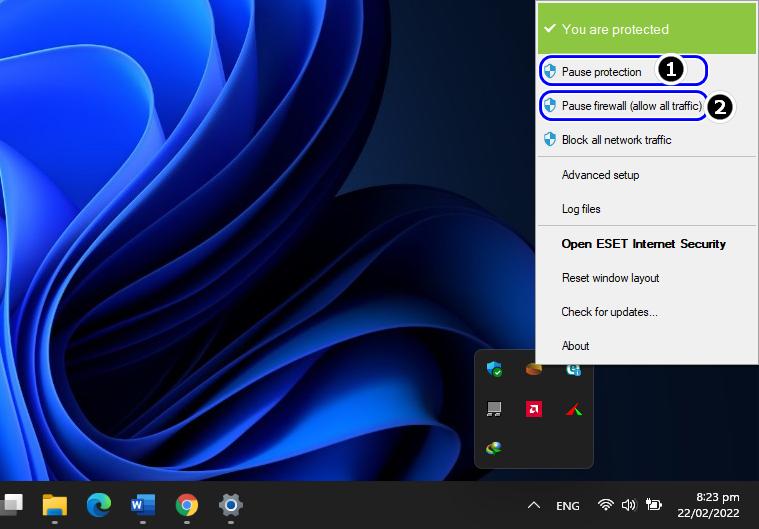
Pause ESET Protection and Firewall - Confirm your action and see if doing so fixes the issue for you.
- If not, type Apps & Features in the search area of the taskbar and hit Open.
- Now locate the security application click to expand.
- Then, click on the Uninstall button.
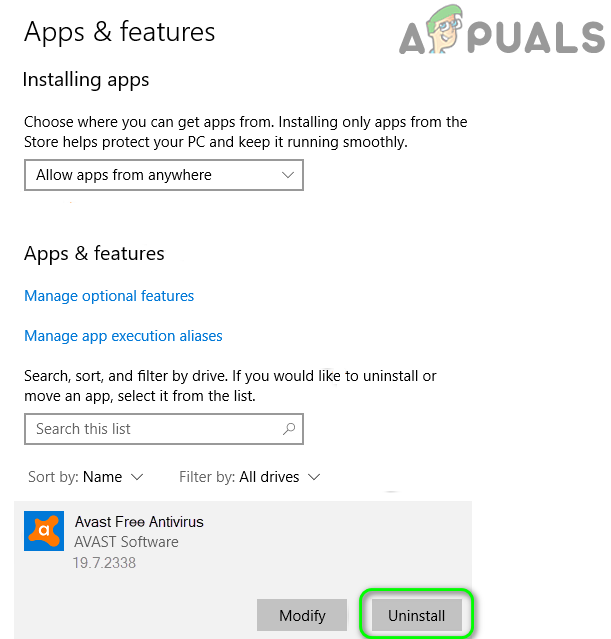
Uninstall Avast Antivirus - Confirm your action and restart your system. Check if the BLZBNTBTS00000011 issue is fixed.
Update Your Drivers
Updates not only provide you with new features but also ensure that your programs run smoothly. This is why it is important to check for out-of-date drivers when a game is having trouble loading or is not working.
Here is how you can update your drivers to fix the issue at hand:
- Press Windows + R keys simultaneously to open a Run dialog box.
- Inside the text field of the dialog box, type DxDiag and hit Enter.
Run dialog: dxdiag - Once the DirectX Diagnostic Tool loads, head over to the Display tab.
- The name and manufacturer of the video card can be found in the Device section. The current driver version can be found in the Driver section.
- For the most recent driver, visit the manufacturer’s website. You might need assistance updating the driver from the manufacturer. To update the driver, contact the manufacturer and then check if the error code BLZBNTBTS00000011 shows up again.
Reinstall the Battle.net Client
In case you have come this far without a solution, then we recommend you go ahead and uninstall Battle.net Client from your PC. After uninstalling, remove all of the app’s data from your operating system to remove all the traces of the old installation. Once you are done with that, you can install the new, latest version of the Battle.net Client. Hopefully, it will fix the issue once and for all.
Here are detailed instructions on how you can do it:
- Type Battle.net in the search area of your taskbar and right-click on the search result.
- Click on Uninstall from the context menu and confirm your operation.
- Once done, restart your system, and upon reboot, press Windows + R keys together. This will open a Run dialog box.
- Type the following commands in the text field of the dialog box one by one and press Enter. Then, delete the folders related to Battle.net and Blizzard there.
%programdata%

%temp%

%appdata%

%localappdata%
- Once done, install the latest launcher of Battle.net and launch it as an administrator.
- Log into your account and check if the BLZBNTBTS00000011 issue is resolved.


