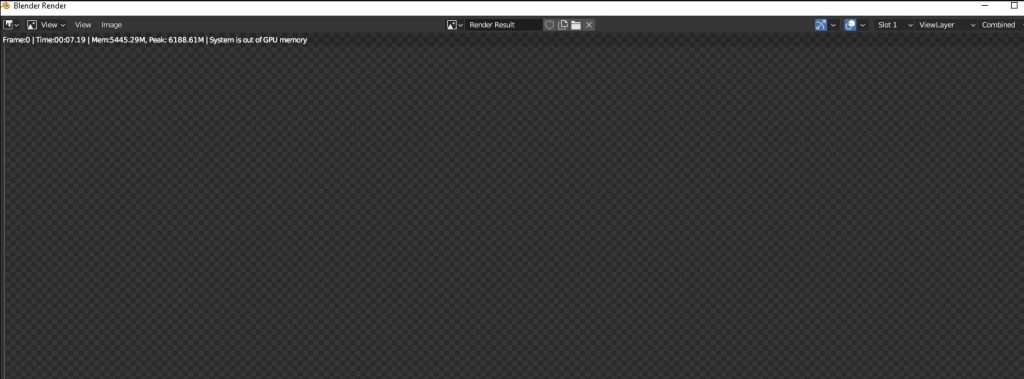
How to Fix “Out of GPU Memory” in Blender
Blender may display an error during rendering that reads, “System is out of GPU memory,” indicating that your graphics card has exceeded its available VRAM (Video RAM). This typically occurs in scenes with high-resolution textures, dense geometry, heavy subdivision modifiers, or complex shader nodes.
This issue can arise during both final renders and live previews—especially when using GPU compute rendering with the Cycles engine, known for its higher memory demands compared to Eevee, Blender’s real-time engine. Users working on animations, 4K renders, or complex lighting setups may encounter this problem more frequently.
It’s also worth noting that consumer-grade GPUs (with 4–6GB of VRAM) are more prone to hitting memory limits than high-end workstation cards. Blender does not currently support full “out-of-core” rendering for most setups, so once the GPU runs out of VRAM, rendering fails without fallback.
Fortunately, there are several ways to fix this error. Start with the simpler methods listed below—most users won’t need to go beyond the first few.
1. Use Wireframe or Solid Viewport While Editing
If Blender starts to lag or freeze while working on a complex scene, it could be due to the real-time rendering load in the 3D Viewport, especially when many objects, high-resolution textures, or heavy modifiers are involved.
While this won’t reduce GPU memory usage during the final render, switching to a lighter viewport mode can help avoid crashes or performance issues while editing.
Blender offers multiple viewport shading modes, each with different levels of GPU demand:
- Wireframe Mode: Displays only edges and vertices. Uses the least GPU resources.
- Solid Mode (sometimes casually referred to as “shaded”): Displays basic surfaces without materials or lighting effects.
- Material Preview and Rendered View: Show materials, lighting, and shadows—these use significantly more GPU memory.
To change the viewport shading, click the shading icons at the top-right corner of the 3D Viewport, as shown below:
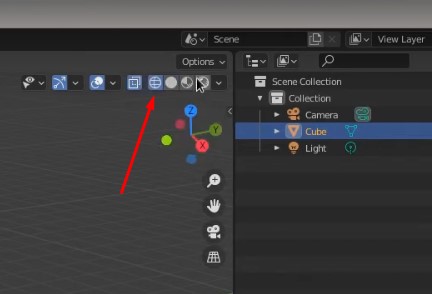
Switching to Wireframe or Solid mode while editing large or complex scenes can free up memory for Blender’s interface and help prevent preview-related crashes—especially on systems with lower VRAM.
2. Change GPU Rendering to CUDA
Blender supports multiple GPU rendering backends—OptiX, CUDA, and HIP/Metal depending on your graphics card. By default, newer NVIDIA GPUs use OptiX, which is typically faster for ray tracing. However, in some cases—especially with older drivers or complex scenes—OptiX may crash or consume more memory.
Switching to CUDA can improve stability or reduce memory-related errors, particularly on older NVIDIA GPUs (e.g., GTX 10-series or early RTX cards). While CUDA isn’t necessarily faster, it can be more reliable in certain configurations.
- Go to Edit > Preferences in the Blender menu bar.

- In the Preferences window, navigate to Systems > Cycles Render Devices.
- Select CUDA from the available options.
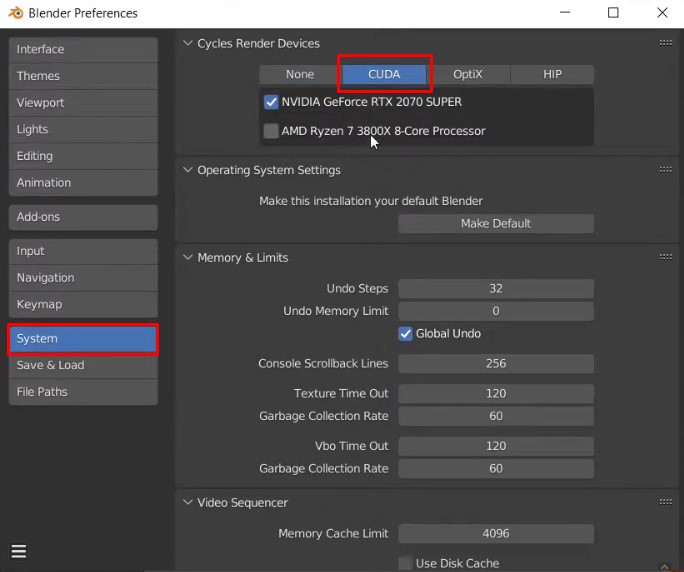
- Save your preferences (if required) and close the window.
- Now, try rendering your animation again—the error should no longer appear.
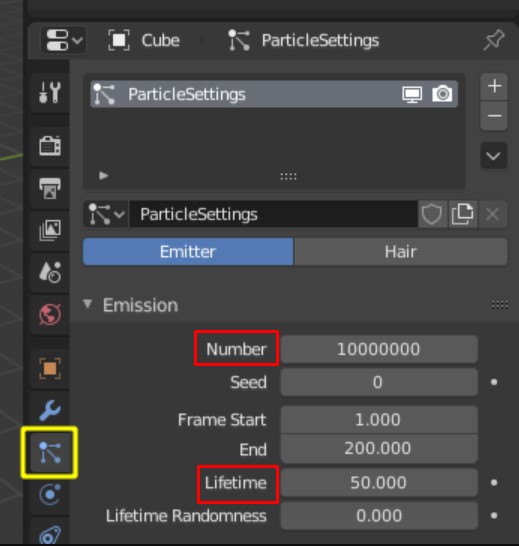
3. Turn Off Unused Particle Systems to Reduce GPU Load
Particle systems in Blender are used to simulate thousands of small objects—like smoke, fire, sparks, or hair—and can significantly increase GPU usage during rendering, especially if they’re instancing complex geometry or using volumetrics. If you’re not using these effects in your final output, disabling unused particle systems can help reduce memory usage and prevent “Out of GPU memory” errors during rendering with Cycles.
- Go to the Particles tab in the Properties panel (the icon looks like a spark symbol).
- Under the Emission section, set both Number and Lifetime to 0 to stop particles from emitting.
- Optionally, go to the Modifiers tab and disable the particle system modifier, or hide it from rendering in the Outliner by clicking the camera icon.
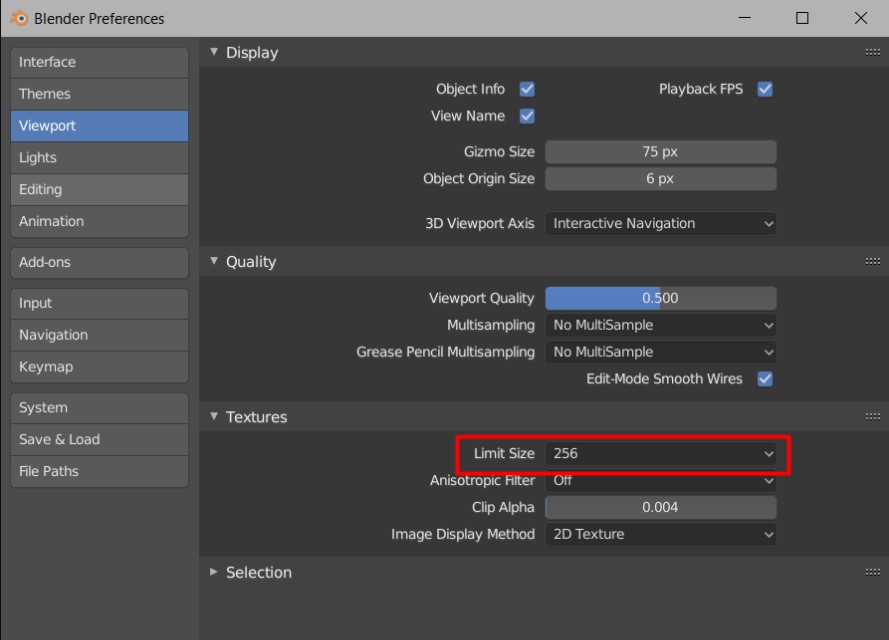
4. Reduce Texture Resolution to Lower GPU Memory Usage
High-resolution textures (such as 4K or 8K) consume a significant amount of GPU memory during rendering, especially when multiple large image files are used in materials. If you’re getting the “System is out of GPU memory” error, consider reducing the resolution of your textures to 2K, 1K, or even 512 pixels—depending on how close they appear to the camera.
- Go to Edit > Preferences.
- Select the Viewport tab.
- Under the Textures section, use the Limit Size dropdown to choose a lower preview resolution (e.g., 1024 or 512).
If you want to reduce memory usage for final renders, you will need to:
- Open the original texture images in an image editor (e.g., GIMP, Photoshop) and downscale them manually.
- Replace the high-resolution versions in Blender with the resized versions using the Shader Editor or Image Editor.
- Use compressed formats like JPEG or optimized PNGs to save memory without drastically reducing visual quality.
Reducing texture sizes this way can significantly lower GPU load during Cycles rendering, especially in scenes with multiple large image maps.
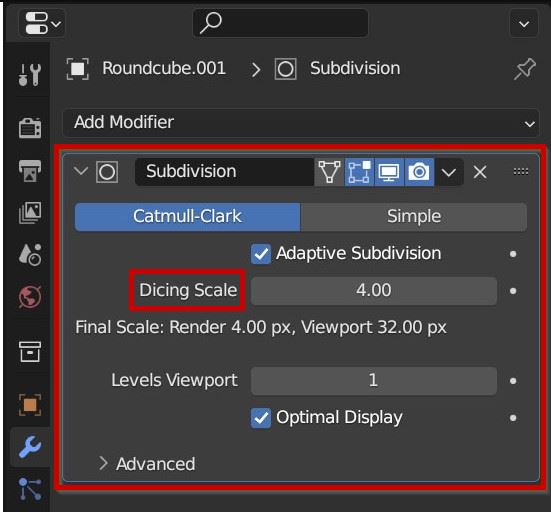
5. Increase the Dicing Scale to Reduce Displacement Geometry Load
If your scene uses displacement maps with adaptive subdivision in Cycles, Blender creates dense mesh geometry at render time using a setting called the Dicing Scale. A lower dicing scale generates more detail but can quickly exhaust your GPU memory—especially with high-resolution displacement textures.
To reduce GPU load, you can increase the Dicing Scale value. This reduces the mesh resolution created for displacement, freeing up memory.
Enable Adaptive Subdivision (if not already enabled):
- Go to Render Properties > Feature Set and select Experimental.
- Then, add a Subdivision Surface Modifier to your object.
- Enable Adaptive Subdivision in the modifier settings.
Now increase the Dicing Scale:
- Under the Subdivision section in the modifier, raise the Dicing Scale value to 4, 8, or 16 depending on your scene’s needs.
- Render your scene again to see if the GPU memory error is resolved.
If you’re still experiencing issues, consider reaching out to the Blender support community for more scene-specific guidance.


