[FIX] Bex64 Error with File Explorer and 3 Party Applications
File Explorer or other apps may suddenly close and disappear from the screen. In the Event Viewer, this is often recorded as a BEX64 error. BEX64 means there was a “buffer overflow” (too much data put in a memory space) in a 64-bit program. This gets stopped by a Windows safety feature called Data Execution Prevention (DEP), which stops programs from running unsafe code from protected areas of memory.

The most common cause is a problem with a third-party shell extension or icon add-on. These are often added by programs like TeamViewer, Razer Synapse, amBX, or some antivirus software, and can cause conflicts with File Explorer.
In this article, we will discuss different ways to solve this error.
1. Disable the amBX Service (if applicable)
If you notice this crash whenever you try to launch GTA V, there may be a conflict between the game and amBX (a lighting system) or a similar service.
Several users with the same issue confirmed that disabling the amBX service from the Services screen allowed them to launch the game normally. Restarting the computer after disabling this service usually resolves the issue.
- Press Windows key + R to open a Run dialog box. Type ‘services.msc’ in the box and press Enter to open the Services menu. If prompted by User Account Control (UAC), click Yes.

Running Services.msc - Once in the Services window, scroll through the list to find the amBX service. Right-click on it and select Properties from the context menu.
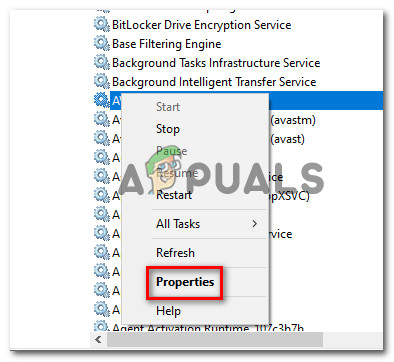
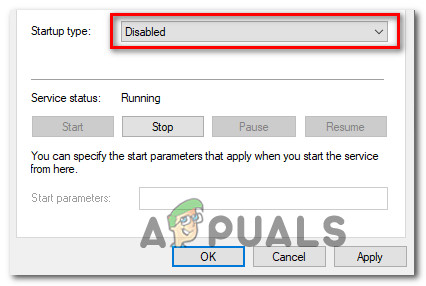
Accessing the Properties menu - In the Properties window, go to the General tab, set the Startup type to Disabled, and click Apply to save the changes.
Disabling the amBX service - Restart your computer, then try launching GTA V (or the previously crashing application) to check if the problem is resolved.
2. Eliminating Third-Party Interference
If you are seeing the BEX64 crash when using File Explorer or launching an application, a third-party software may be interfering with the application’s memory or launch process.
Many users found that the problem was due to antivirus programs, firewalls, or tools like MacType (custom font rendering), DEDgear, amBX, Razer Synapse, or TeamViewer.
To check if a third-party program is causing the issue, it’s best to start with a clean boot. If you can repeat the same action without encountering the BEX64 error in clean boot mode, then the problem is likely caused by a third-party process.
Follow this guide to perform a clean boot, which ensures only essential Windows services and startup programs are running.
If the crash disappears with a clean boot, try re-enabling the disabled services and programs one at a time (restarting each time) until you find which one is causing the issue.
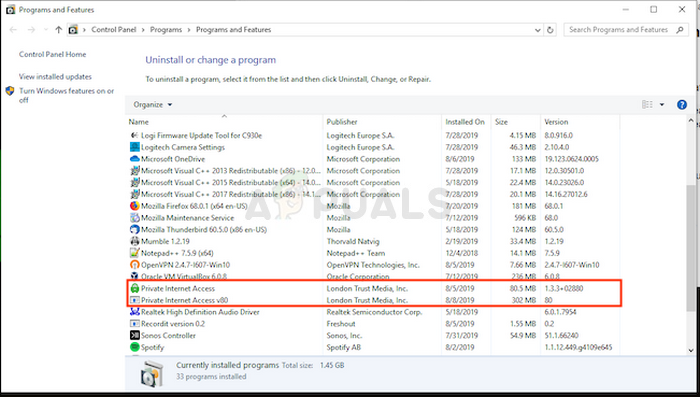
- Press Windows key + R to open a Run dialog box. Type ‘appwiz.cpl’ and press Enter to open the Programs and Features list.

Type appwiz.cpl and Press Enter to Open Installed Programs List - Scroll through the list of installed programs and locate the software you want to remove.
- Right-click on it and select Uninstall.
Uninstalling the problematic software - Follow the on-screen instructions to complete the uninstallation, then restart your computer.
3. Disable Data Execution Prevention (DEP)
The Data Execution Prevention (DEP) filter is a security feature that checks computer memory to help prevent harmful code from running. However, in certain cases, this security feature can prevent trusted applications or games from running properly.
Users have often reported this issue when trying to run games that are not fully compatible with DEP.
- Press Windows key + R to open a Run dialog box. Type ‘cmd’ and then press Ctrl + Shift + Enter to launch Command Prompt as administrator. If prompted by UAC (User Account Control), click Yes.

Running the Command Prompt - In the Command Prompt window, type or paste the following command and press Enter:
bcdedit.exe /set {current} nx AlwaysOff - Once you get a confirmation, you have disabled the data execution prevention filter.
- Restart your PC, then try the task that was previously causing the error to see if the problem has been resolved.


