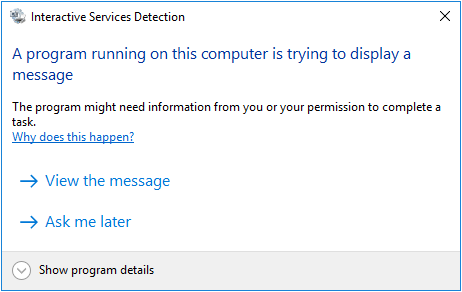
How to Stop Interactive Services Detection Popups
In a Windows environment, applications are designed to use dialog boxes and popups for interacting with users. However, when a background service tries to show one of these prompts, Windows displays an Interactive Services Detection dialog box instead. This message can appear as often as every five minutes and sometimes disappears before you can even read it. When this happens repeatedly, it can interrupt your work and cause frustration.
You can either turn off this service or fix the problem by finding and resolving the cause.
1. Disable Interactive Services Detection
If the popup keeps appearing and vanishing too quickly for you to interact with it, disabling the service might be your only solution. This method works for Windows Vista, 7, 8, and 10.
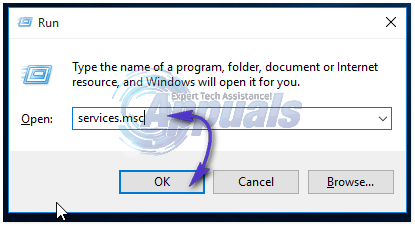
- Press the Windows key + R on your keyboard. In the Run window that appears, type “services.msc” and press Enter. If prompted by a UAC (User Account Control) warning, click Yes.
- A window listing all available services will appear. Scroll down and find ‘Interactive Services Detection’ under the ‘Name’ column. Double-click it to open its properties window. Next to ‘Startup type:’, choose ‘Disabled’ from the menu, then click ‘OK’.

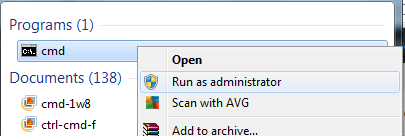
- If you prefer to use the Command Prompt, press the Windows Key and type ‘cmd’. Right-click on ‘cmd’ in the search results and select ‘Run as Administrator’. When you see the UAC warning, click ‘Yes’.
- In the Command Prompt window, type the following command and press Enter:
REG add "HKLM\SYSTEM\CurrentControlSet\services\UI0Detect" /v Start /t REG_DWORD /d 4 /f

- Restart your computer and check if the issue is resolved.
2. Uninstall the Program Causing Interactive Services Detection
If you started seeing the Interactive Services Detection messages after installing a new program, it’s likely that the new program is causing a conflict.
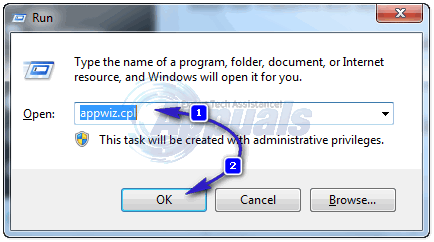
- Press and hold the Windows key, then press R. Type “appwiz.cpl” into the Run window and press Enter.
From the list of installed programs, right-click on the recently installed application and select Uninstall. Follow the prompts to complete the removal. Restart your computer. If the problem goes away, the removed program was likely causing the issue. If you need to use the program, try reinstalling it or look for an updated version from the official website.
To help identify the software causing the issue, click “Show Program Details” when the Interactive Services Detection dialog appears. If the file path matches a program you have installed, consider uninstalling that program. If the path is C:\Windows\System32\spoolsv.exe, then the printer spooler service is at fault—try removing and reinstalling any recently added printers.
If you find that another program is causing the problem, feel free to share it in the comments section. We’ll be happy to suggest a more specific solution once you’ve tried the options below.
3. Restore Your System to an Earlier Date
If the problem started after a Windows update or a change in your system settings, you might be able to fix it by restoring your computer to a previous point in time, before the issue started. Note, this requires that you have created a System Restore point before.
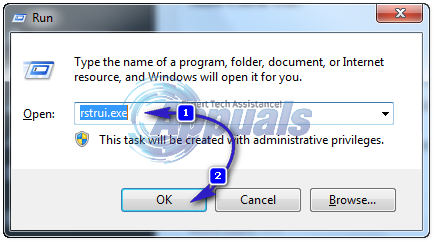
Make sure you close and save all open files before starting. Press and hold the Windows Key, then press R. Type ‘rstrui.exe’ into the Run dialog and click ‘OK’.
Look at the list of available Restore Points. Choose one that was created before the issue began. Select it and click ‘Next’ or ‘Finish’. To see more options, check the box for ‘Show More Restore Points’. The goal is to go back to a moment when your system was working correctly. This process won’t delete or affect your personal files, but any programs or updates installed after the restore point will be removed.
4. Run a System File Checker (SFC) Scan
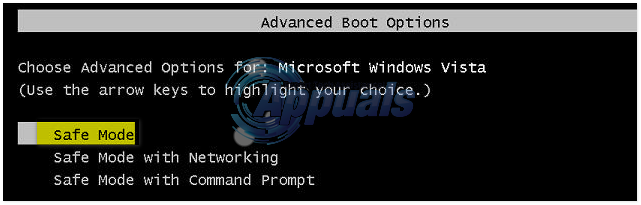
The System File Checker tool checks if important Windows system files are missing or damaged, and tries to repair them. To run it, turn on your computer and repeatedly tap the F8 key (for Windows Vista/7) until you see the Advanced Boot Options screen.
- Choose Safe Mode and press Enter.
- If you’re using Windows 8, follow the steps here. For Windows 10, instructions are here.
- After logging into Safe Mode, press Windows Key + R, then type:
%WinDir%\WinSxS\Temp
- If you see folders named ‘PendingDeletes’ or ‘PendingRenames’, delete them. Next, click the Start button, type ‘cmd’ in the search box, right-click on it, and select ‘Run as administrator’. If a UAC prompt appears, click ‘Yes’.
- Now, type the following command and press Enter:
sfc /scannow
- Wait for the scan to finish. It will look for any corrupted or missing system files and try to fix them.
- After the scan, you’ll see a message such as “Windows Resource Protection did not find any integrity violations” or “Windows Resource Protection found corrupt files and successfully repaired them“. If it says that it couldn’t fix some files, then enter this command:
Dism /Online /Cleanup-Image /RestoreHealth
- Restart your PC and see if the problem is resolved.
Thank you, very helpful!!!