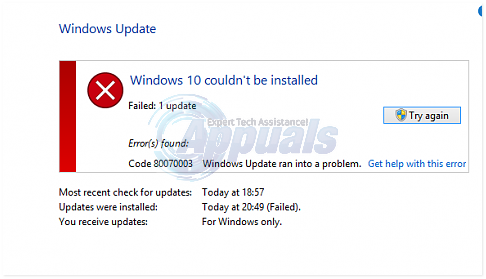
SOLVED: Windows 10 couldn’t be installed Error (80070003)
The installation process may suddenly stop halfway, often during the “Installing features and drivers” step, with error code 0x80070003 and a message saying that a required file does not exist. This error usually means the installer can’t find a file or folder it needs. The most common reasons include a missing or damaged driver file, corrupted installation media like a USB drive, incorrect partition settings, or using a custom version of Windows.
Sometimes, other programs—such as antivirus software or backup tools—can also cause this issue by interfering with the installation files, especially if there are leftover files or old recovery partitions from previous installations.
1. Check the WIMMount Path
A missing or incorrect path can block the upgrade process. To check the path, open the Registry Editor and navigate to:
HKEY_LOCAL_MACHINE\SYSTEM\CurrentControlSet\Services\WIMMount
Double-click on it and make sure it points to the correct location for wimmount.sys. This file should be located in C:\Windows\System32\Drivers — before you make any changes, ensure the file really exists in that folder.
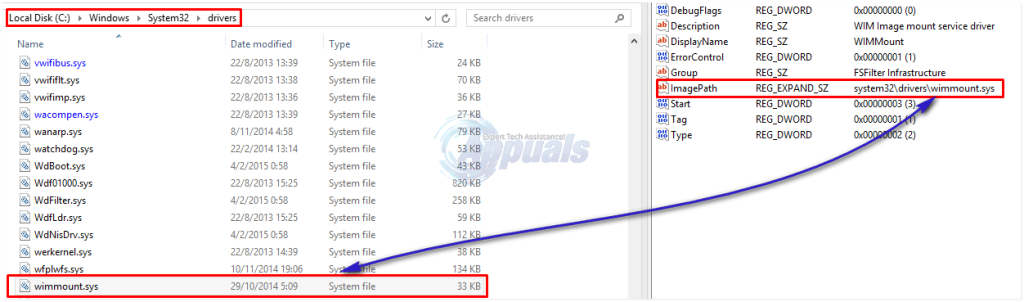
Once you’ve corrected the path, restart your PC and try the upgrade again.
2. If You’ve Used EaseUS Partition Master 10.5
This method is for people upgrading from Windows 8.1 and who have used EaseUS Partition Master 10.5. EaseUS may change your partition types, which causes issues with the upgrade. Here’s how your drive’s partitions should look:
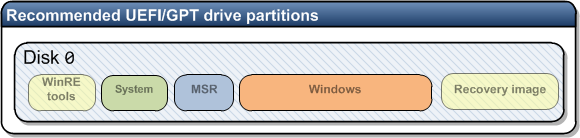
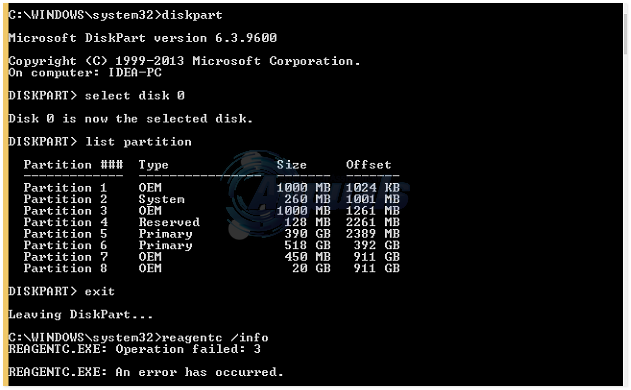
Before using EaseUS for partitioning, the correct structure on a Windows 8.1 system should look like this:
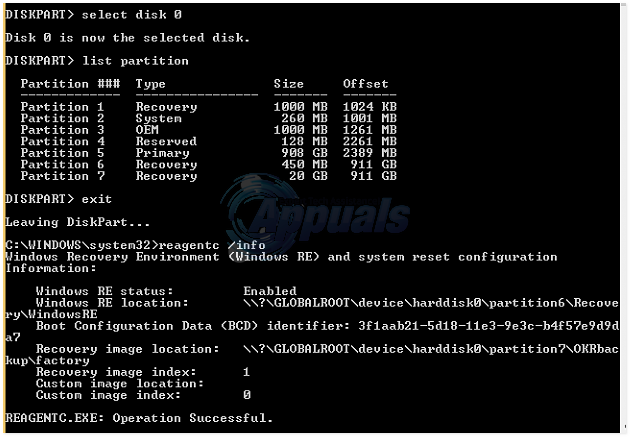
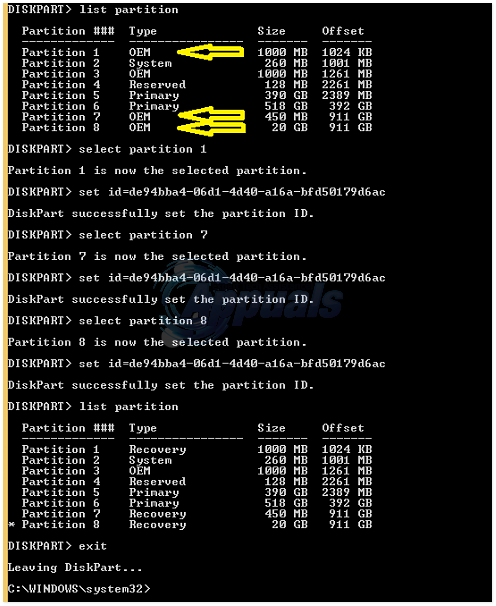
After running EaseUS, the structure may change as shown below, and recagentc might fail to verify Windows RE.
In short, EaseUS changes your partition types. Here’s what you need to do to fix them, following the above diagram. Open Command Prompt as an administrator and enter these commands after confirming your partitions have changed:
diskpart
select disk 0
list partition
select partition # Note: Select the Windows RE tools partition.
set id=de94bba4-06d1-4d40-a16a-bfd50179d6ac
select partition # Note: Select the 350 MB or 450 MB Windows RE tools partition (if you have this partition).
set id=de94bba4-06d1-4d40-a16a-bfd50179d6ac
select partition # Note: Select the Recovery image partition.
set id=de94bba4-06d1-4d40-a16a-bfd50179d6ac
list partition
exit
Next, run reagentc /info to check if things are fixed. If successful, it means your partitions are now set up correctly. You can now continue with your Windows 10 installation.