Best Emulators for Chromebook
One of the biggest downsides of having a Chromebook is the inability to get some proper gaming done. The low-end hardware that most Chromebooks come with is nowhere close to enough for most modern games. However, we are not completely doomed. Even with their low-end hardware, Chromebooks can still run old Nintendo favorites like Super Mario and Contra using emulators. These games have extremely minimal hardware requirements, but it can be argued that they are as entertaining as some of the best modern titles. In this tutorial, we are going to teach you how to load up some emulators on your Chromebook and play the loved Nintendo games.
SNES games do not yet have a proper Chrome OS emulator, but there does exist an Android app called SNESDroid which can emulate the SNES platform. What we are going to have to do is port this Android application onto a Chromebook and run our games from the application. Note that the procedure used in the tutorial does not require your Chromebook to run Android apps natively. This method should work on all kinds of Chromebooks, old and new. So let’s get started.
Download Android Runtime for Chrome (ARC)
The first thing that we will need to do is download the Android Runtime for Chrome (ARC). To do that, download ARC Welder from the Chrome Web Store. The ARC file is pretty big, so this step might take 10-20 minutes depending on your internet speed.
Get the SNESDroid APK
To run the SNESDroid Android app on a Chromebook, we will need its APK file. To procure it, head over to https://apps.evozi.com/apk-downloader/ and paste this link – https://play.google.com/store/apps/details?id=ca.halsafar.snesdroid
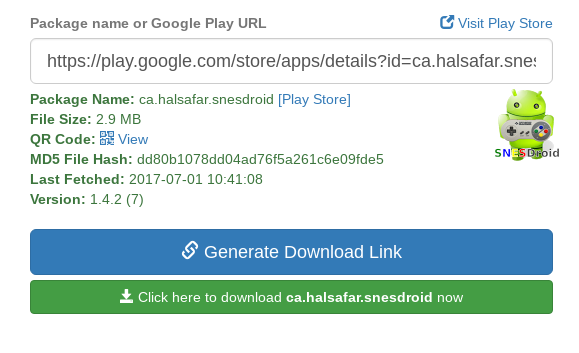
Click on the green ‘Click here to download…’ button to download the APK for SNESDroid.
Set Up SNESDroid with Twerk
The next step is to install the Twerk app from the Chrome Web Store. This should not take much time. Once twerk is installed, open it from the app drawer. The first time you open Twerk, you will be asked to install ARC
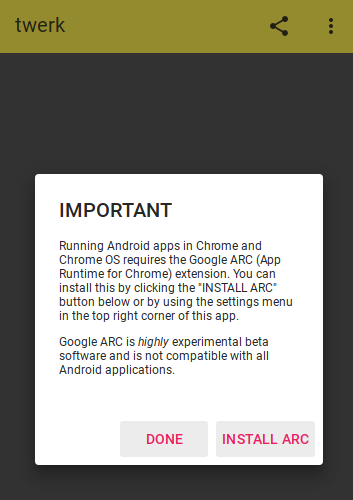
Since you have already installed ARC Welder, click on ‘Done’ and not on ‘Install Arc’. Then, you will see the link button on the screen.

When you click on the link button, your File directory will open up, and it will ask you to select an APK to add to Twerk. Select the APK file that you downloaded in Step 2, and click ‘Open’. (The filename of the downloaded APK should be ‘ca.halsafar.snesdroid.apk’)
Once you click open, you should see this list of settings on the screen.

We need to make some changes to these settings.
- Change ’Application Name’ to SNESDroid
- Switch ‘ON’ Disable External Directory
- Switch ‘ON’ Internet Required
Once you toggle these settings, your settings screen should look like this.
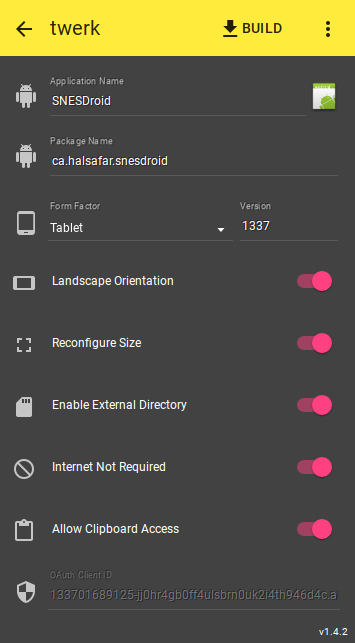
Please make sure that each field matches the screenshot below. Any variations might lead to SNESDroid not working on your Chromebook.
Once you have made the required changes, click on ‘Build’ on the top right of the Twerk application. The Files app will open up asking you to select a directory to store SNESDroid files. Select the default Downloads folder on your Chromebook itself, and click ‘Open’. The SNESDroid folder will then be created in your selected directory. It should be a folder titled ‘ca.halsafar.snesdroid_twerk’. Check that this folder is in your Downloads folder before moving on to the next step.
Install SNESDroid
Once you verify that the folder ‘ca.halsafar.snesdroid_twerk’ exists in your Downloads folder, head over to chrome://extensions using your browser address bar.
On the top right corner of the site, check ‘Developer Mode’.

Click on ‘Load unpacked extension’, which will be right under the ‘Extensions’ heading. It will prompt you to ‘Select a Folder to Open’.
Now, you have to select the ‘ca.halsafar.snesdroid_twerk’ folder that you created using the Twerk app. It should be right under your Downloads folder. Just select the folder (rather than opening it), and click on ‘OPEN’ on the files app popup to load the extension to Chrome. Instantly, you should see the SNESDroid application under your extensions.

Do not worry about the red warning that shows up. It should not be a problem while running SNESDroid. Now that we have SNESDroid up and running, let’s set up some ROMs (i.e. files for games) on the emulator.
Set Up the Roms folder
After having installed SNESDroid, create a new folder in your Downloads directory and name it ‘SNESDroid’. Open the folder, and inside the folder, create a folder called ‘ROMs’. Now, place all your games (in ZIP or sfc format) in the ROMs folder. (If you don’t know what I’m talking about – ROM files are sfc files for games that you can download from the internet. The SNESDroid emulator will open the zip/sfc file to run whichever game you have downloaded. )
Load Roms into SNESDroid and Start Playing!
It’s now time to get started on the action. You can now open SNESDroid, and start playing all the SNES games that you have ROMs for.
First, open SNESDroid from the App drawer. When you do so, you will immediately be asked to select a folder to open. Select the downloads directory, which has the SNESDroid folder. You must do this step properly. Select the default Chromebook Downloads folder only, not any subfolder inside of it.
Once you select a directory, this is the screen that will show up on your first run.
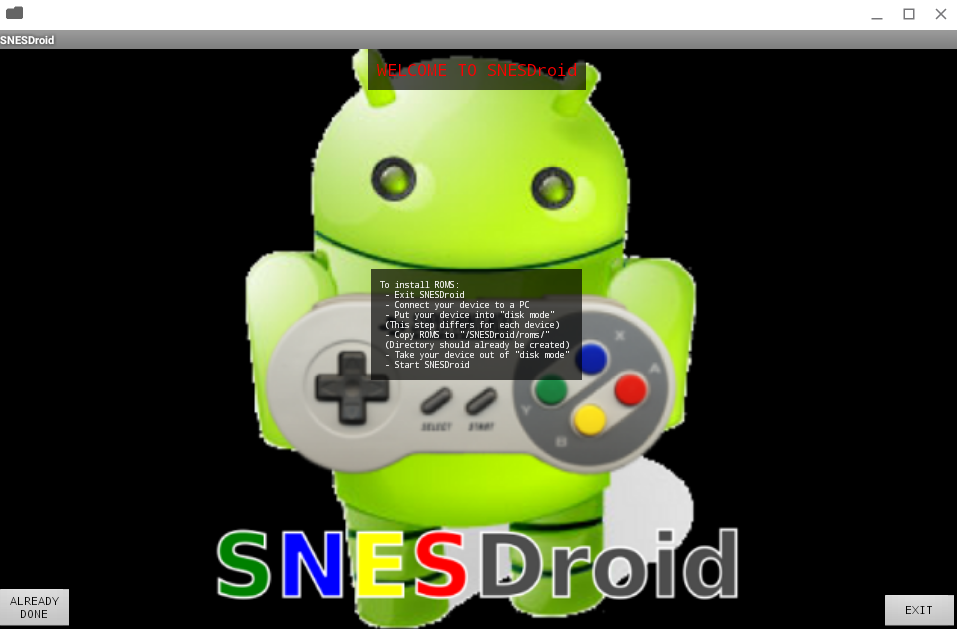
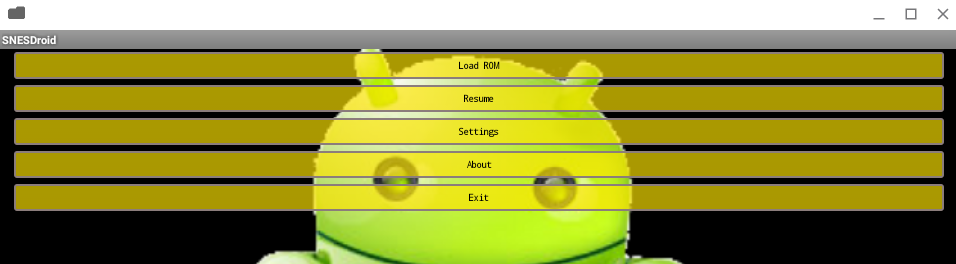
Since you already have your ROMs in the SNESDroid folder, you do not have to worry about the instructions on this screen. Click on ‘ALREADY DONE’ on the bottom left corner of the screen. On the next page, you will see the option to Load ROMS, but we don’t want to do that just yet. Click on the ‘Settings’ option instead.

When you go into settings, scroll down a little and you will see the ‘Configure Key/Gamepad Input’ option. Click on that setting to set the controls of your keyboard or controller.
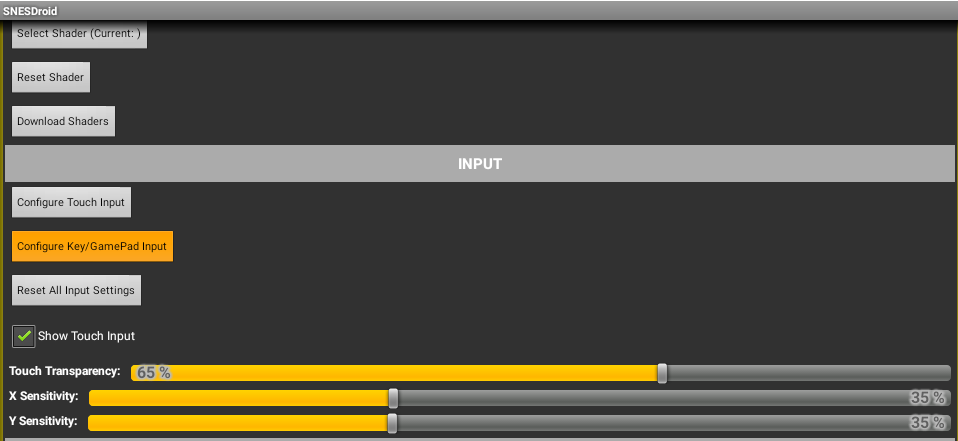
You will see a list of different controls and the keys mapped for them. What we want to do now is change these mappings to our preferred keys.
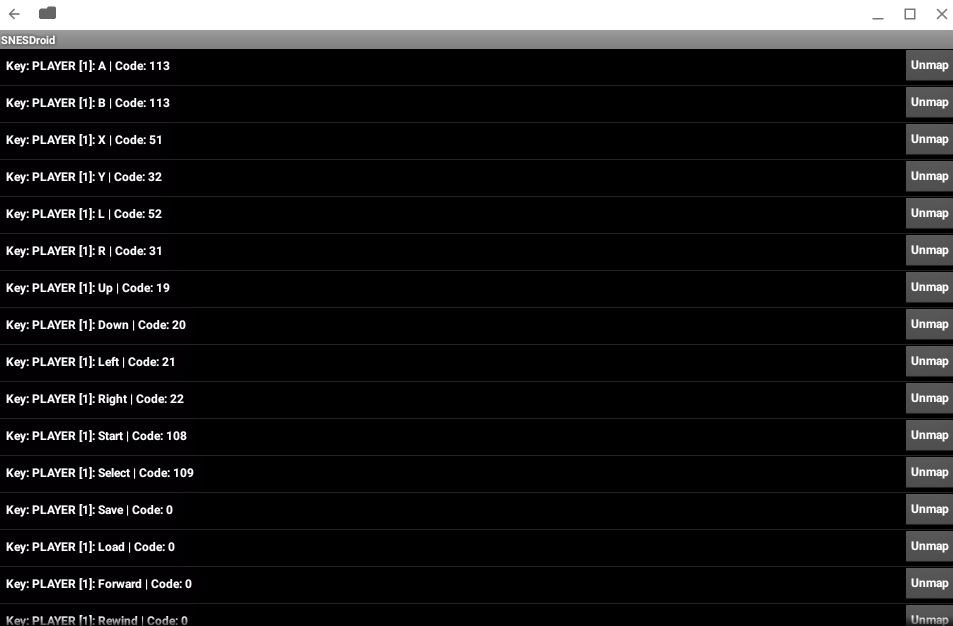
To change a key mapping, just click on that specific key once, and it will ask you to press the key that you want to map the control to. The keys for up, down, left and right are already set to the arrow keys, so you don’t have to bother about those. However, you might want to change the keys for A, B, X, Y, L and R to comfortable positions on the keyboard. You can change these anytime, so try some mappings and see what works best for you.
Once the keys have been mapped, it is finally time for us to get playing. Click on ‘Load ROMS’ in the menu, and SNESDroid should automatically navigate to the ROMs folder we created earlier, and list all your downloaded ROMs.
In my case, I only had Aladdin installed, so that shows up. When you click on your desired ROM, the game starts and you can play using your mapped keys.
Have fun playing your old beloved SNES games on your Chromebook. The games are surprisingly very entertaining and can help you do something for fun (and offline too) on your Chromebook.
The Apk downloader will not let me download the Snesdroid apk.