[FIX] Arma 3 Referenced Memory Error on Windows
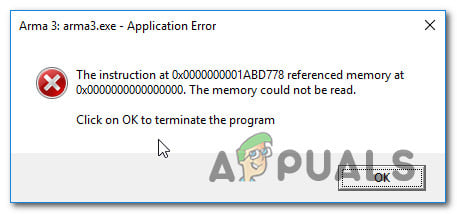
Crashes usually happen during loading screens, busy combat scenes, or special multiplayer missions in Arma 3. When this happens, you might see a message saying: “The instruction at 0xXXXXXXXX referenced memory at 0xYYYYYYYY. The memory could not be read.” This error means the game tried to use a part of your computer’s memory (RAM) that it wasn’t allowed to use, or that wasn’t available at the time.
Most of the time, this problem is caused by a bad mission script or a mod that’s doing something it shouldn’t. However, unstable RAM, memory leaks, or problems with memory settings can also cause this error.
Now that you know what might be causing the issue, here are several methods that have helped other users fix the ‘Referenced Memory‘ error in Arma 3:
1. Reinstall Arma 3 & Remove Leftover Files
Let’s start by making sure there’s no file corruption in your Arma 3 installation.
Many users have reported that their crashes stopped completely after reinstalling the game and deleting any leftover files from earlier installations. This suggests that the Referenced Memory error may come from corrupted data in the game folder.
Note: Mods that were used with a previous version of Arma 3 can also cause this problem. Make sure to carefully follow this method, especially if you played with mods before.
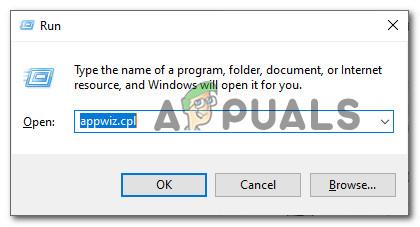
- Press Windows key + R to open a Run dialog box. In the textbox, type ‘appwiz.cpl’ and press Enter to open the Programs and Features menu.
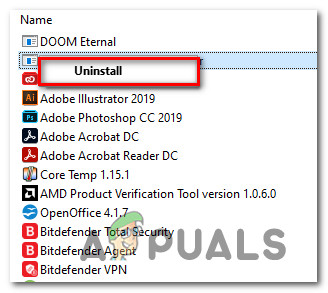
Opening the Programs and Features menu - In the Programs and Features menu, find your Arma 3 installation. Right-click on it and select Uninstall.
Uninstalling Arma 3 - Follow the on-screen instructions to finish uninstalling the game.
- Open File Explorer and go to the My Documents folder for Arma 3. By default, this is located at:
\Users\*YOUR USERNAME*\Documents\Arma 3
Note: Replace *YOUR USERNAME* with your actual Windows username.
- Once there, delete the Arma 3 folder (you may want to back it up first just in case).
- If you play Arma 3 through Steam, navigate to this folder and delete the Arma 3 directory as well:
\Program Files (x86)\Steam\SteamApps\common\Arma 3
Note: If you don’t use Steam to launch Arma 3, you can skip this step.
- Restart your computer. After it boots up, reinstall Arma 3. If you use Steam or another installer, right-click and select Run as Administrator to avoid permission issues.
- Launch Arma 3 and check to see if the problem is resolved.
If the ‘Referenced Memory‘ error still appears, move on to the next method below.
2. Check Your RAM
Since this error can sometimes be linked to RAM issues, it’s a good idea to check your memory using MemTest86. The free version of this tool lets you test your computer’s memory and see if it’s starting to fail.
Several users who encountered the ‘Referenced Memory‘ error in Arma 3 found that their RAM was defective after running MemTest86. If that’s the case for you, the only real solution is to replace the faulty RAM.
- Open your web browser and go to the MemTest86 download page.
- Click the Download button to get the free version of MemTest86.

Downloading MemTest86 - After downloading, use a program like 7-Zip, WinZip, or WinRar to extract the contents of the memtest86-usb file.
- Follow the instructions provided on the official website to create a bootable USB drive for testing your RAM.
- Boot from the USB drive and run the memory test. Review the results to see if your RAM is the source of the problem.
If MemTest86 shows that your RAM is failing, you’ll need to replace it.
3. Increase the Virtual Memory File (Paging File)
Some users have found that the crash happens because Windows 10 does not have enough paging file (virtual memory) available to handle large files generated by Arma 3. Increasing the size of your paging file can help the game run more smoothly and avoid memory-related crashes.
Many affected players have confirmed that enlarging the paging file solved the ‘Referenced Memory‘ error.
- Press Windows key + R to open a Run dialog box. Type ‘sysdm.cpl’ (correcting the typo here) and press Enter to launch the System Properties window.
- Go to the Advanced tab and click on Settings under the Performance section.
- In the Performance Options window, go to the Advanced tab again, and then click on Change under Virtual Memory.
- Uncheck Automatically manage paging file size for all drives.
- Select your system drive (usually C:), then choose Custom size.
- Set the Initial size to at least 3500 MB and the Maximum size to 7000 MB. Click Set to apply the changes.
- Click OK to save the settings and restart your computer to make the changes take effect.
If you still experience the same problem after this, move on to the next possible solution.