Fix: Apps Getting Resetted to TWINUI
There is a problem in Windows where when opening a file, the computer sets the default application for opening any file to type to the type “TWINUI”. Most of the time you can open the file by right-clicking it and select the open with option. However, you would not be able to set any default program for opening any file type.
“TWINUI” is a bug in Windows 10 that shows that users cannot change their default program in the Setting application and all their default applications reset to “TWINUI”.

It means that user cannot set default programs. It may due to numerous reasons including system registry corruption or maybe some other reason.
Solution 1: Remove TWINUI through Windows power shell
We can try to remove TWINUI through windows power shell on Windows 10. We will enter the commands to set each program type to its default. Your file opening preferences will be reset and you would have to set them again.
- Press Windows + S to launch your computer’s start menu and type “windows power shell” in the dialogue box Right click on the first result and select “Run as administrator”.
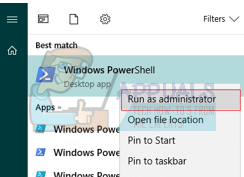
- Once the application has been opened, copy paste this line into it and press Enter. Now Windows will set each file type to the default opening program. This process might take a while as all of your file types are being scanned and their settings changed.
Get-AppXPackage | Foreach {Add-AppxPackage -DisableDevelopmentMode - Register "$($_.InstallLocation)\AppXManifest.xml"}

- Once it’s completed close the window and then try opening the desired file type in default application launcher.
- Restart your computer to make sure all changes take place and check if the problem at hand got fixed
Solution 2: TWINUI problem with Photos application
We can try deleting contents of Photos configuration to reset it. Refer to this method if the first one didn’t work for you. Also, don’t delete the entire folder. We only need to delete the contents of the folder and restart your computer in order for the changes to take place.
- Press Windows + R button to launch the Run
- Type:
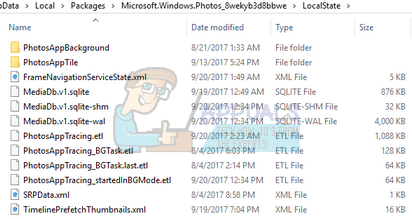
%appdata%\..\Local\Packages\Microsoft.Windows.Photos_8wekyb3d8bbwe\LocalState
- You might want to copy all the contents of the folder elsewhere so you can always restore them if anything goes wrong. Once you have safely copied the files, delete all the contents of the folder.
- Restart your computer and check if the issue at hand still persists.
Solution 3: Running System File Checker
It may be possible that your system configuration files are corrupt. Because of this, the computer sets the preference for all file type to TWINUI. We can try running the windows utility and make sure that no files are missing or corrupt. If they are, Windows will fix them.
- Press Windows + R to launch the Run Type” cmd” in the dialogue box and press Enter. This will launch the command prompt. Sometimes, you might need to open the prompt as administrator to carry out this solution.
- Type “sfc /scannow” and press Enter. Now Windows will start checking all the system files and look for any irregularities. This process might take a while.

- If any errors are found and fixed, restart your computer so all changes can take place and check if the problem got solved.
Solution 4: Install the latest Windows updates
Windows roll out important updates targeting the bug fixes in the operating system. One of the bugs is our case; the problem with files not opening properly with the default program. If you are holding back and not installing the Windows update, we strongly recommend that you do. Windows 10 is the latest Windows operating system and new operating systems take a lot of time to get perfect in every regard.
There are a lot of issues still pending with the OS and Microsoft rolls out frequent updates to target these issues.
- Press Windows + S button to launch your start menu’s search bar. In the dialogue box type “Windows update”. Click the first search result which comes forward.

- Once in the update settings, click on the button which says “Check for updates”. Now Windows will automatically check for updates available and install them. It may even prompt you for a restart.

- After updating, check if your issue got fixed.
Solution 5: Restoring your system
If all the above methods don’t work, we can try restoring your system to the last system restore point. Save all your work correctly and backup any important data. Do note that all the changes to your system configurations after the last restore point will be removed.
- Press Windows + S to launch the start menu’s search bar. Type “restore” in the dialogue box and select the first program which comes in the result.

- One in the restore settings, press System Restore present at the beginning of the window under the tab of System Protection.
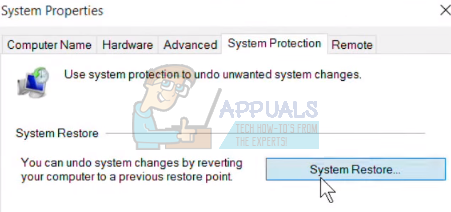
- Now a wizard will open navigating you through all the steps to restore your system. Press Next and proceed with all the further instructions.
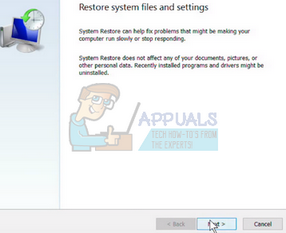
- Now select the restore point from the list of options available. If you have more than one system restore points, they will be listed here.

- Now windows will confirm your actions for the last time before it starts the system restore process. Save all your work and backup important files just in case and proceed with the process.
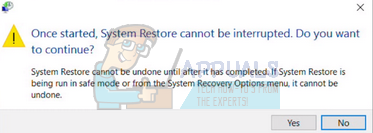
You can learn more about system restore to gain more knowledge about what it does and what are the processes involved.