FIX: Apps are Greyed Out and Underlined on Windows 10
Apps in the Windows 10 Start menu may sometimes look greyed out and underlined. When this happens, the apps might not open or may close right away. This issue usually means that the files for those apps are not set up correctly or are missing, so Windows can’t use them as it should.

The most common reason for this is a problem with the app’s registration, which can happen after a Windows update, an incomplete installation, or problems with the Microsoft Store cache. Sometimes, problems with user permissions or damaged user profiles can also cause this issue.
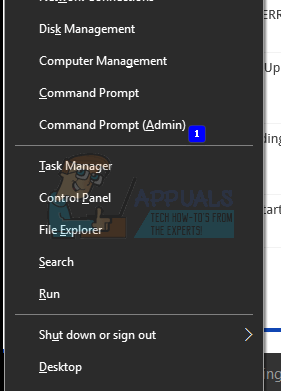
1. Press the Windows key + X to open the menu above the Start button. Select Command Prompt (Admin) from the list.

2. When the command prompt opens, type the following command and press ENTER. This command will attempt to repair any issues with your Microsoft Store app:
PowerShell -ExecutionPolicy Unrestricted -Command "& {$manifest = (Get-AppxPackage Microsoft.WindowsStore).InstallLocation + '\AppxManifest.xml' ; Add-AppxPackage -DisableDevelopmentMode -Register $manifest}"
3. After the command has finished running, restart your computer. Once your PC restarts, open Command Prompt again (as you did before), type wsreset.exe and press Enter. This will reset the Microsoft Store.

4. Now, launch the Microsoft Store app. At this point, the Store should begin updating all the apps that were previously greyed out or stuck.
If some applications still haven’t updated, try updating them manually by following these steps:
5. First, you will need to uninstall the problematic apps. Open Command Prompt as an administrator again and enter the following command:
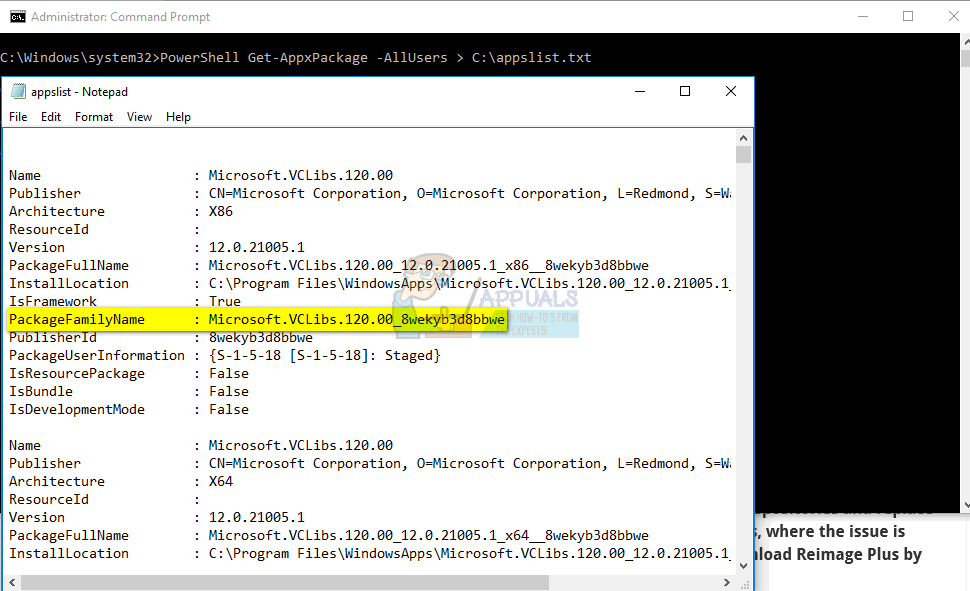
PowerShell Get-AppxPackage -AllUsers > C:\appslist.txt
This will create a file called appslist.txt in your C:\ drive.
6. Open the appslist.txt file. If you want to uninstall a specific app (for example, the Camera app), press Ctrl + F to open the search bar and type “camera”. Press Enter.
7. Find the entry named WindowsCamera. A few lines beneath, look for the field called PackageFamilyName.

8. Copy the value next to PackageFamilyName and paste it into the command below, replacing [here]:
PowerShell Remove-AppxPackage [here]
For example, the command might look like this:
PowerShell Remove-AppxPackage Microsoft.WindowsCamera_2016.816.20.0_x64__8wekyb3d8bbwe
Paste that command into Command Prompt and press Enter.
Repeat this process for any other apps you want to uninstall.
9. To reinstall the app (let’s use Camera as an example again), use the following command. Replace [here] with the app’s name (not the package name this time):
PowerShell -ExecutionPolicy Unrestricted -Command "& {$manifest = (Get-AppxPackage [here]).InstallLocation + '\AppxManifest.xml' ; Add-AppxPackage -DisableDevelopmentMode -Register $manifest}"
You can find the app name by repeating the search steps above, or checking within the appslist.txt file.
For example, if reinstalling Camera, the command would look like:
PowerShell -ExecutionPolicy Unrestricted -Command "& {$manifest = (Get-AppxPackage Microsoft.WindowsCamera).InstallLocation + '\AppxManifest.xml' ; Add-AppxPackage -DisableDevelopmentMode -Register $manifest}"Return to Command Prompt, paste the command, and press Enter. This should reinstall the Camera app.
Repeat these steps for any other apps that need to be reinstalled.
10. Finally, restart your computer. After restarting, your applications should work normally and should no longer be underlined or greyed out!